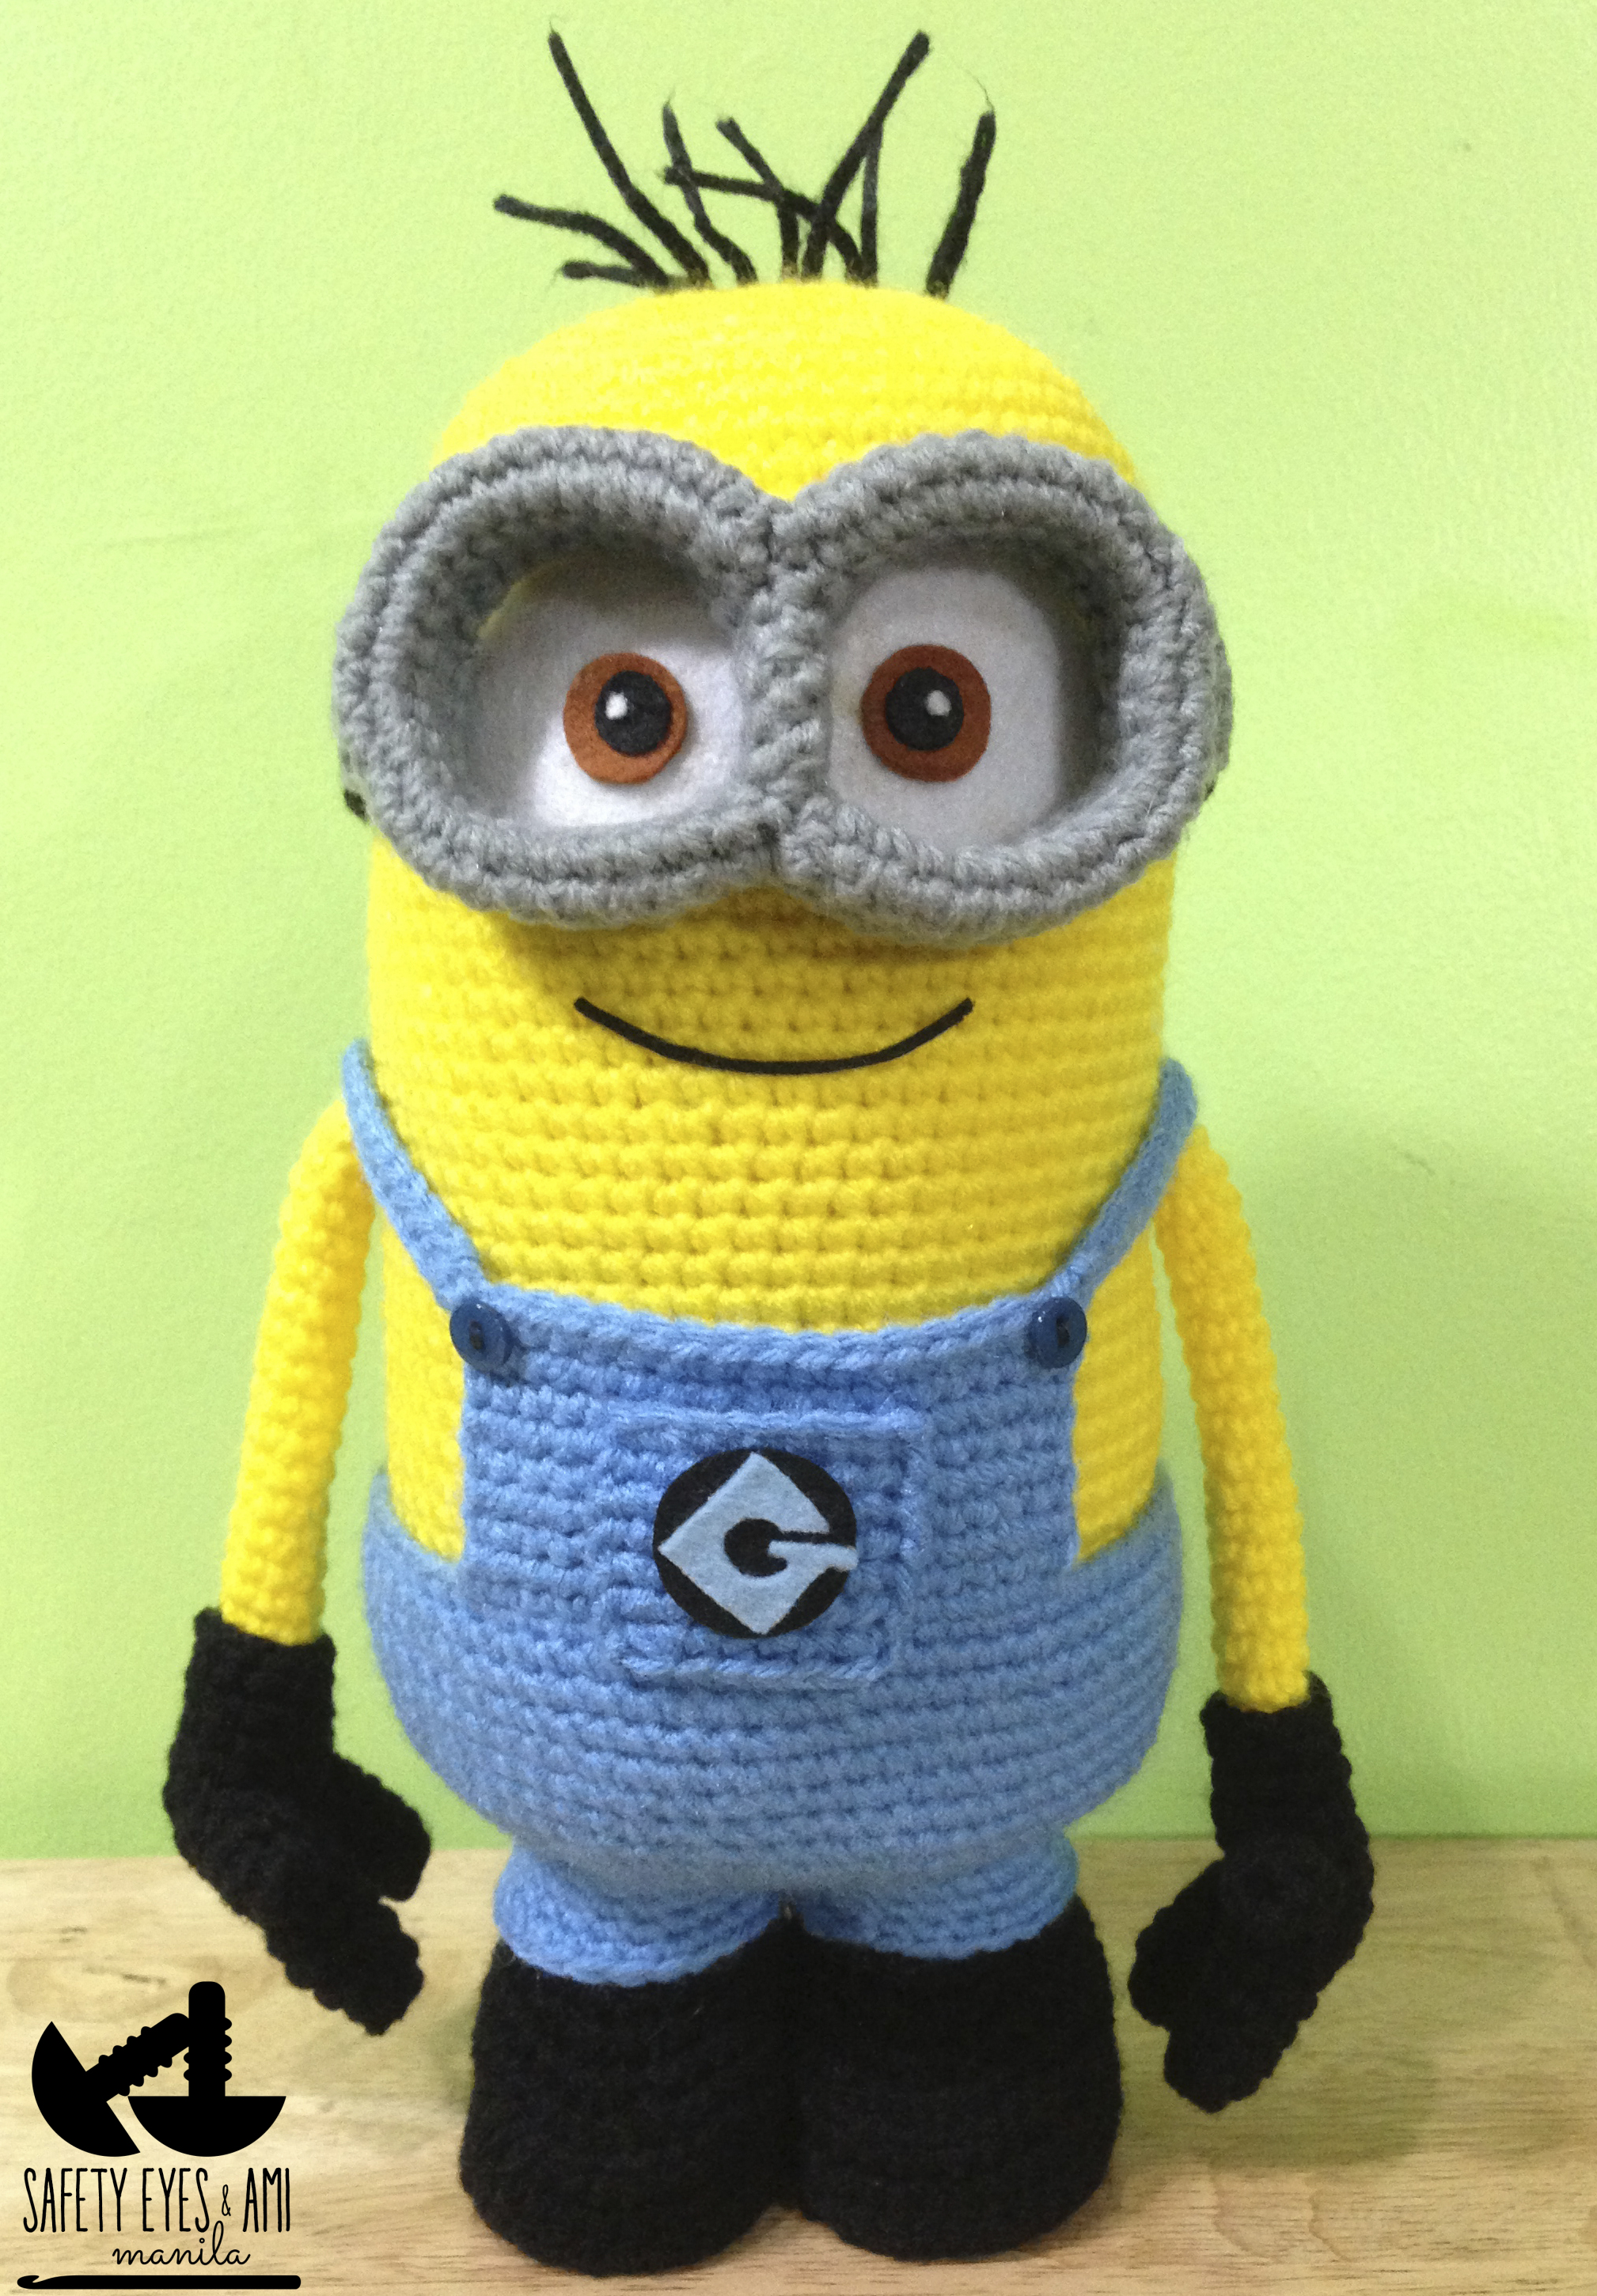
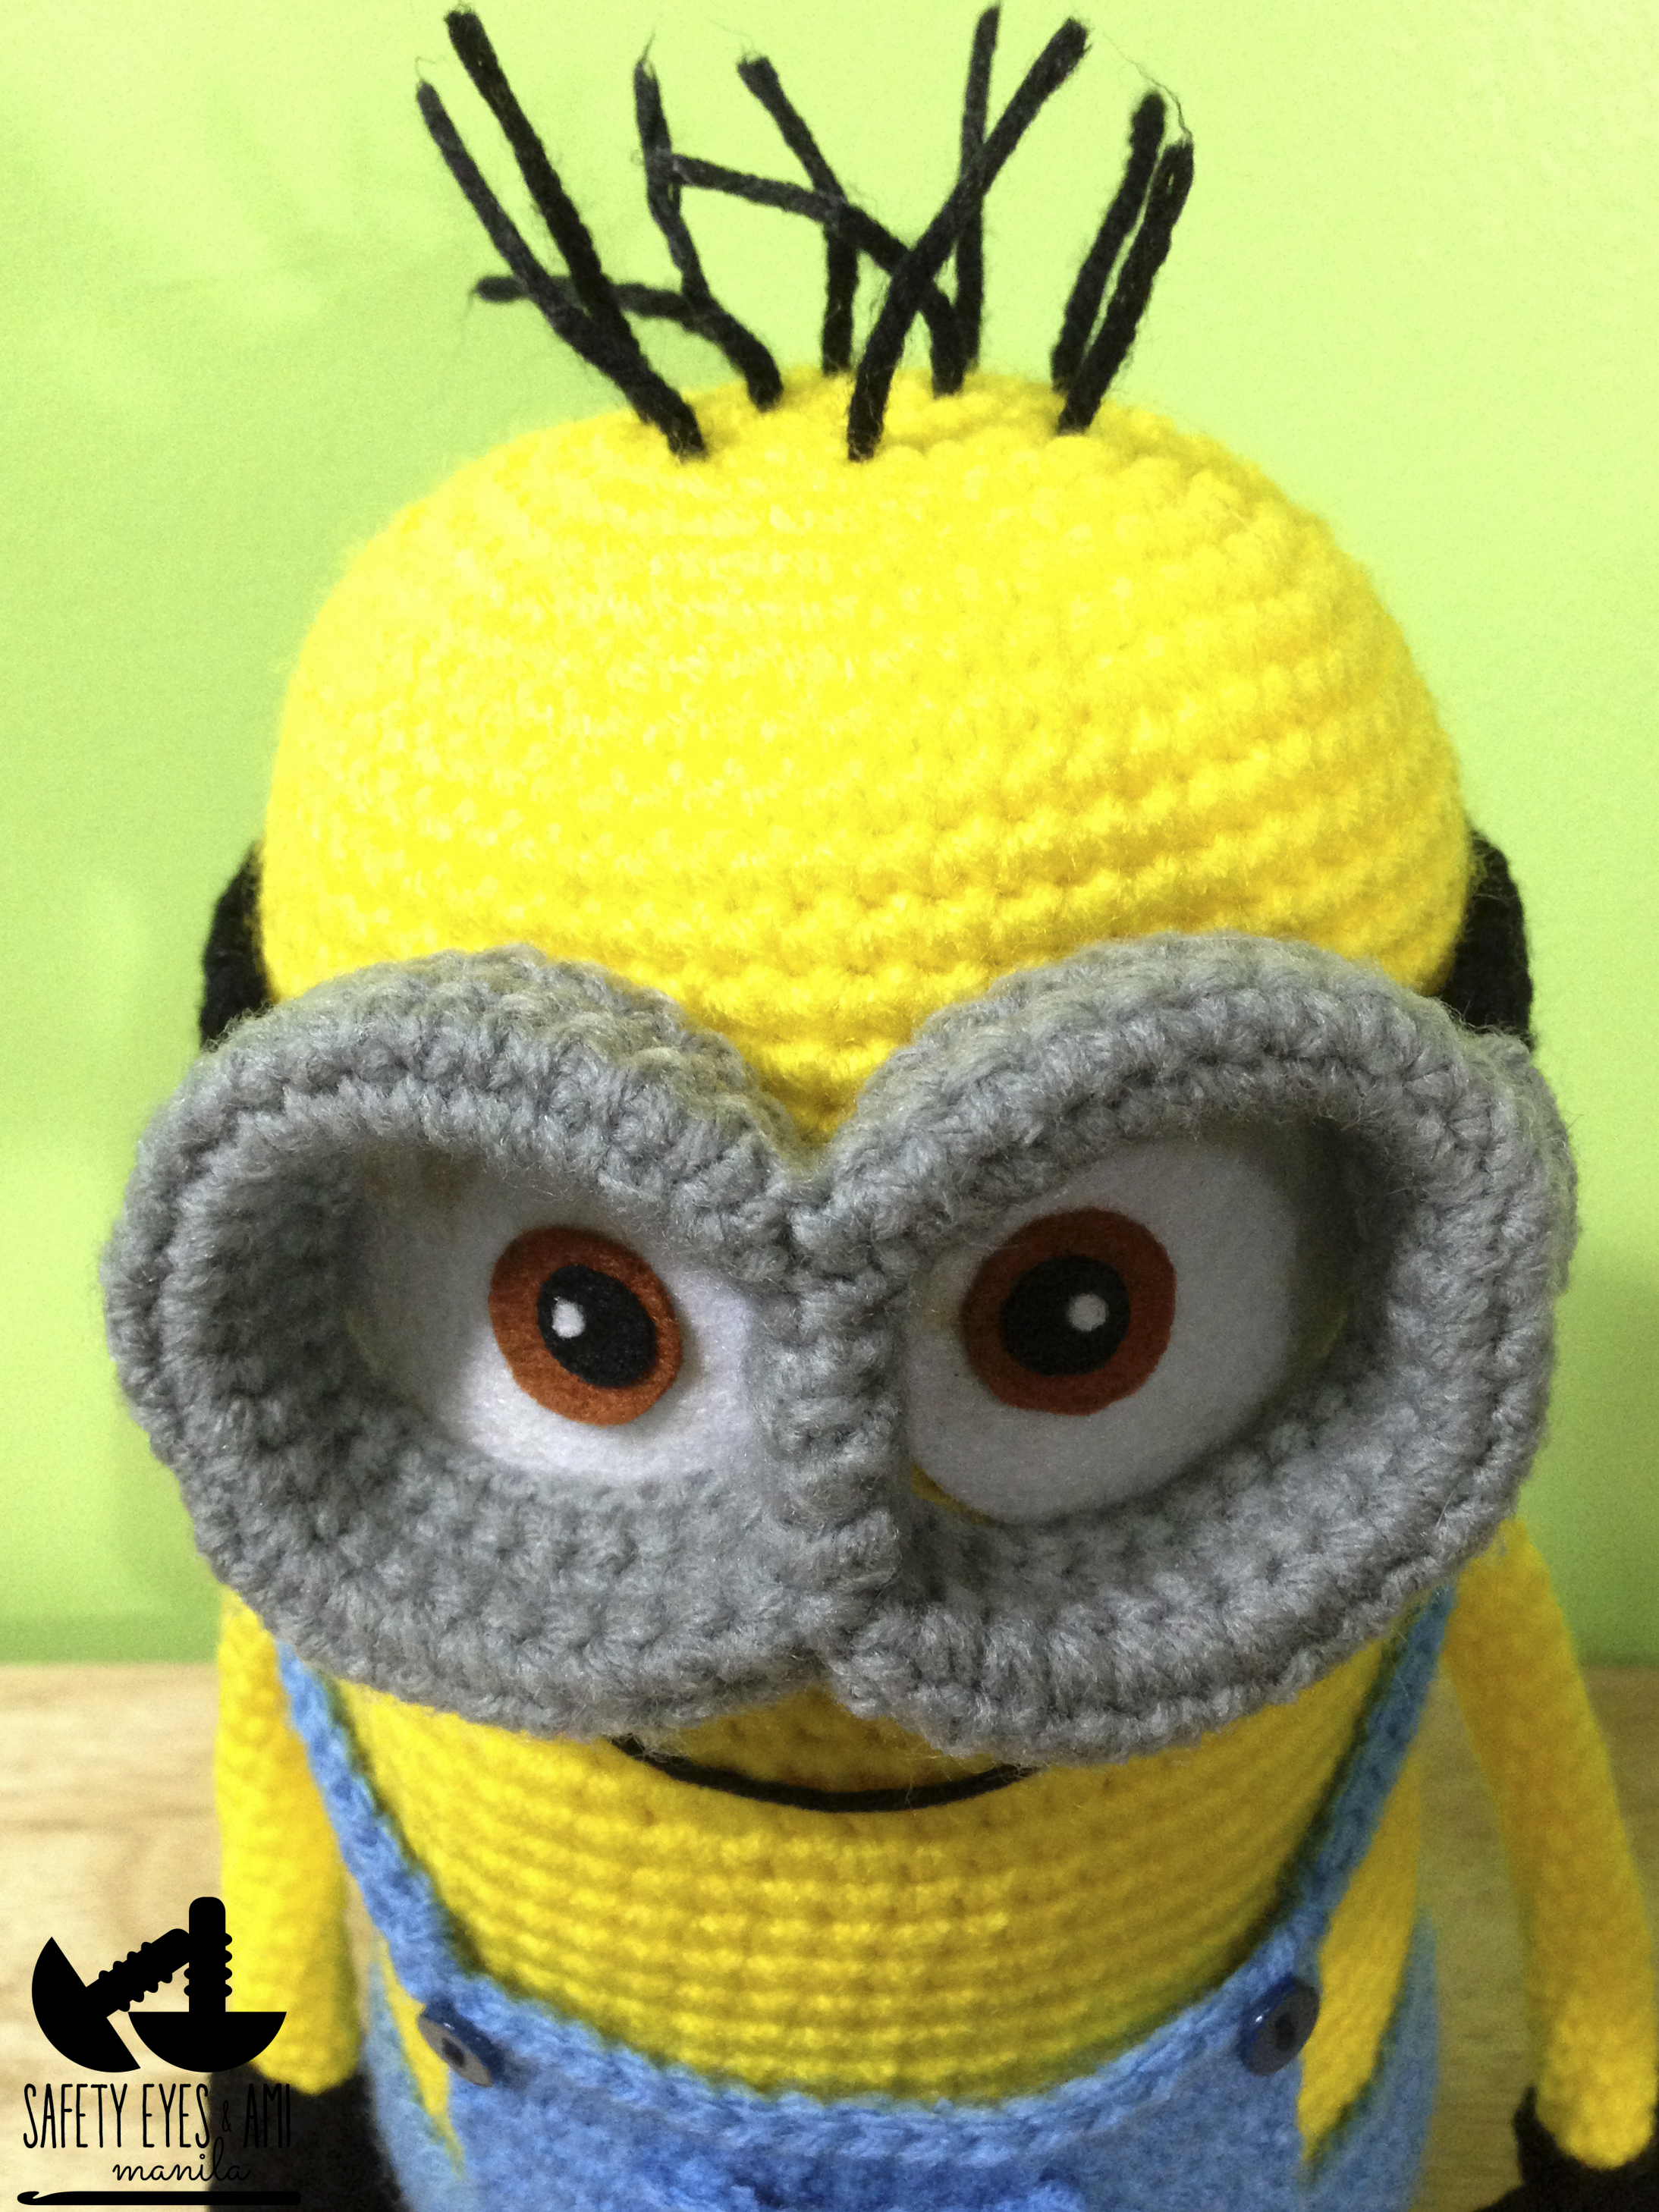
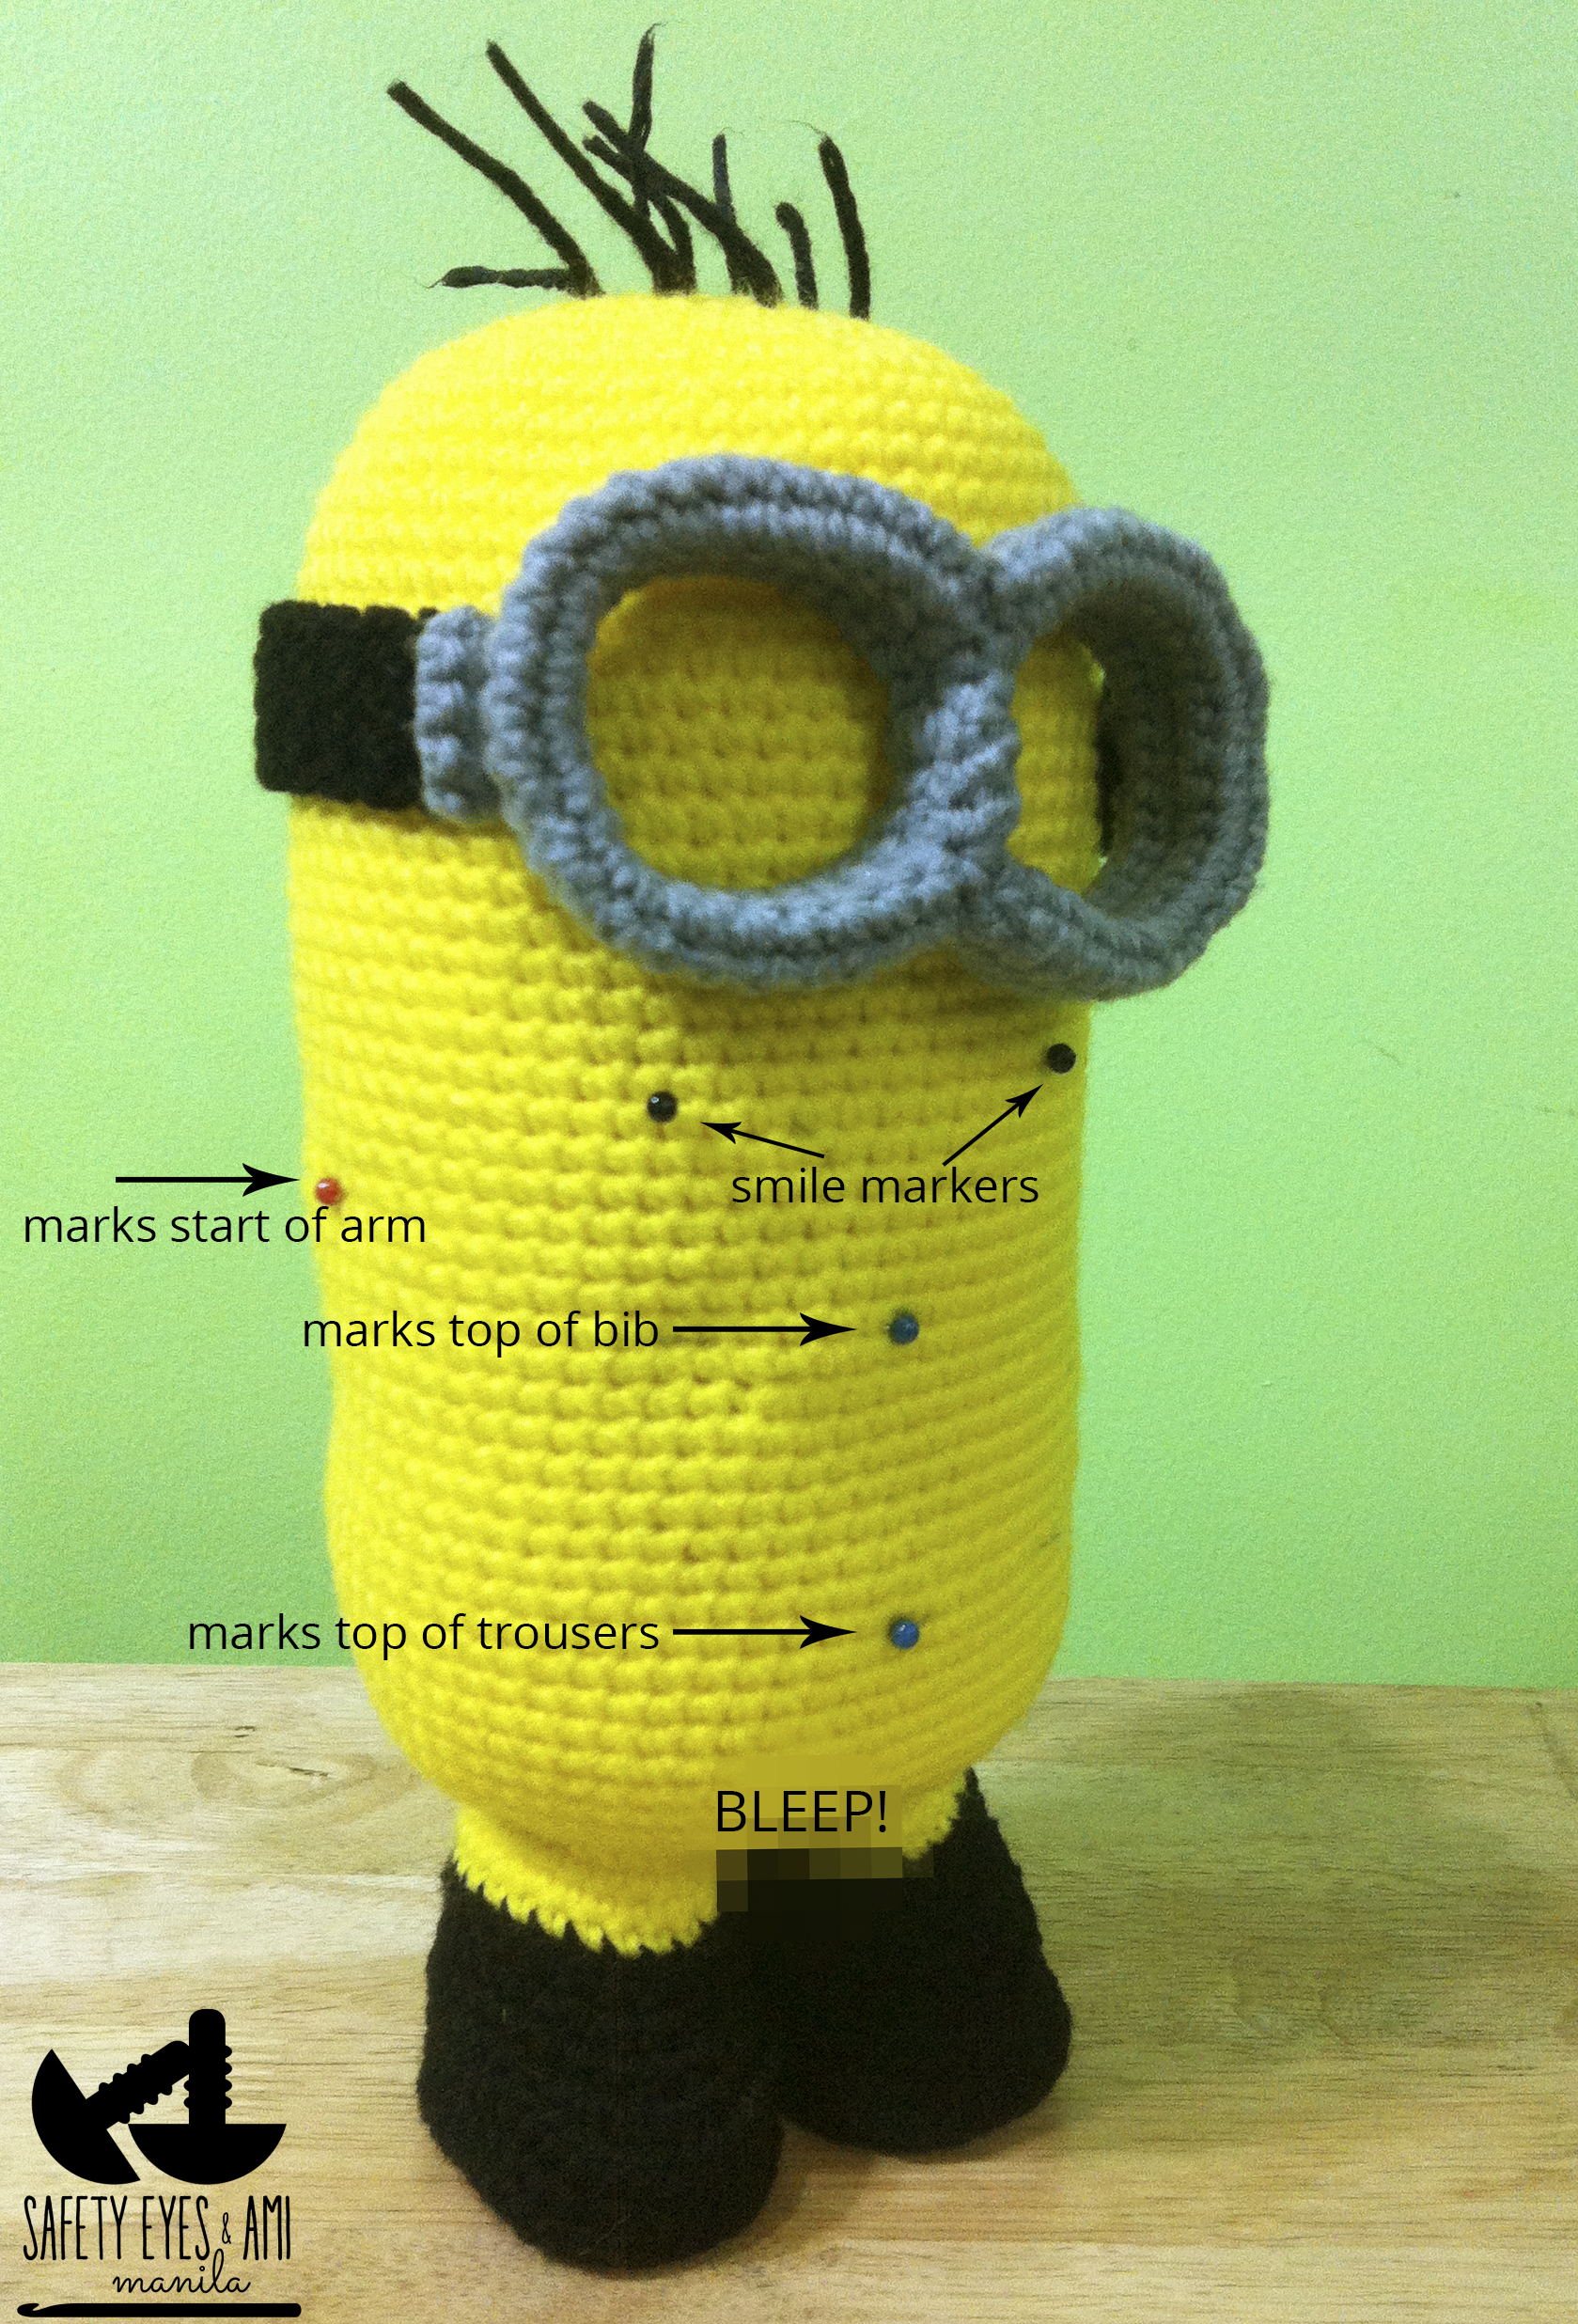
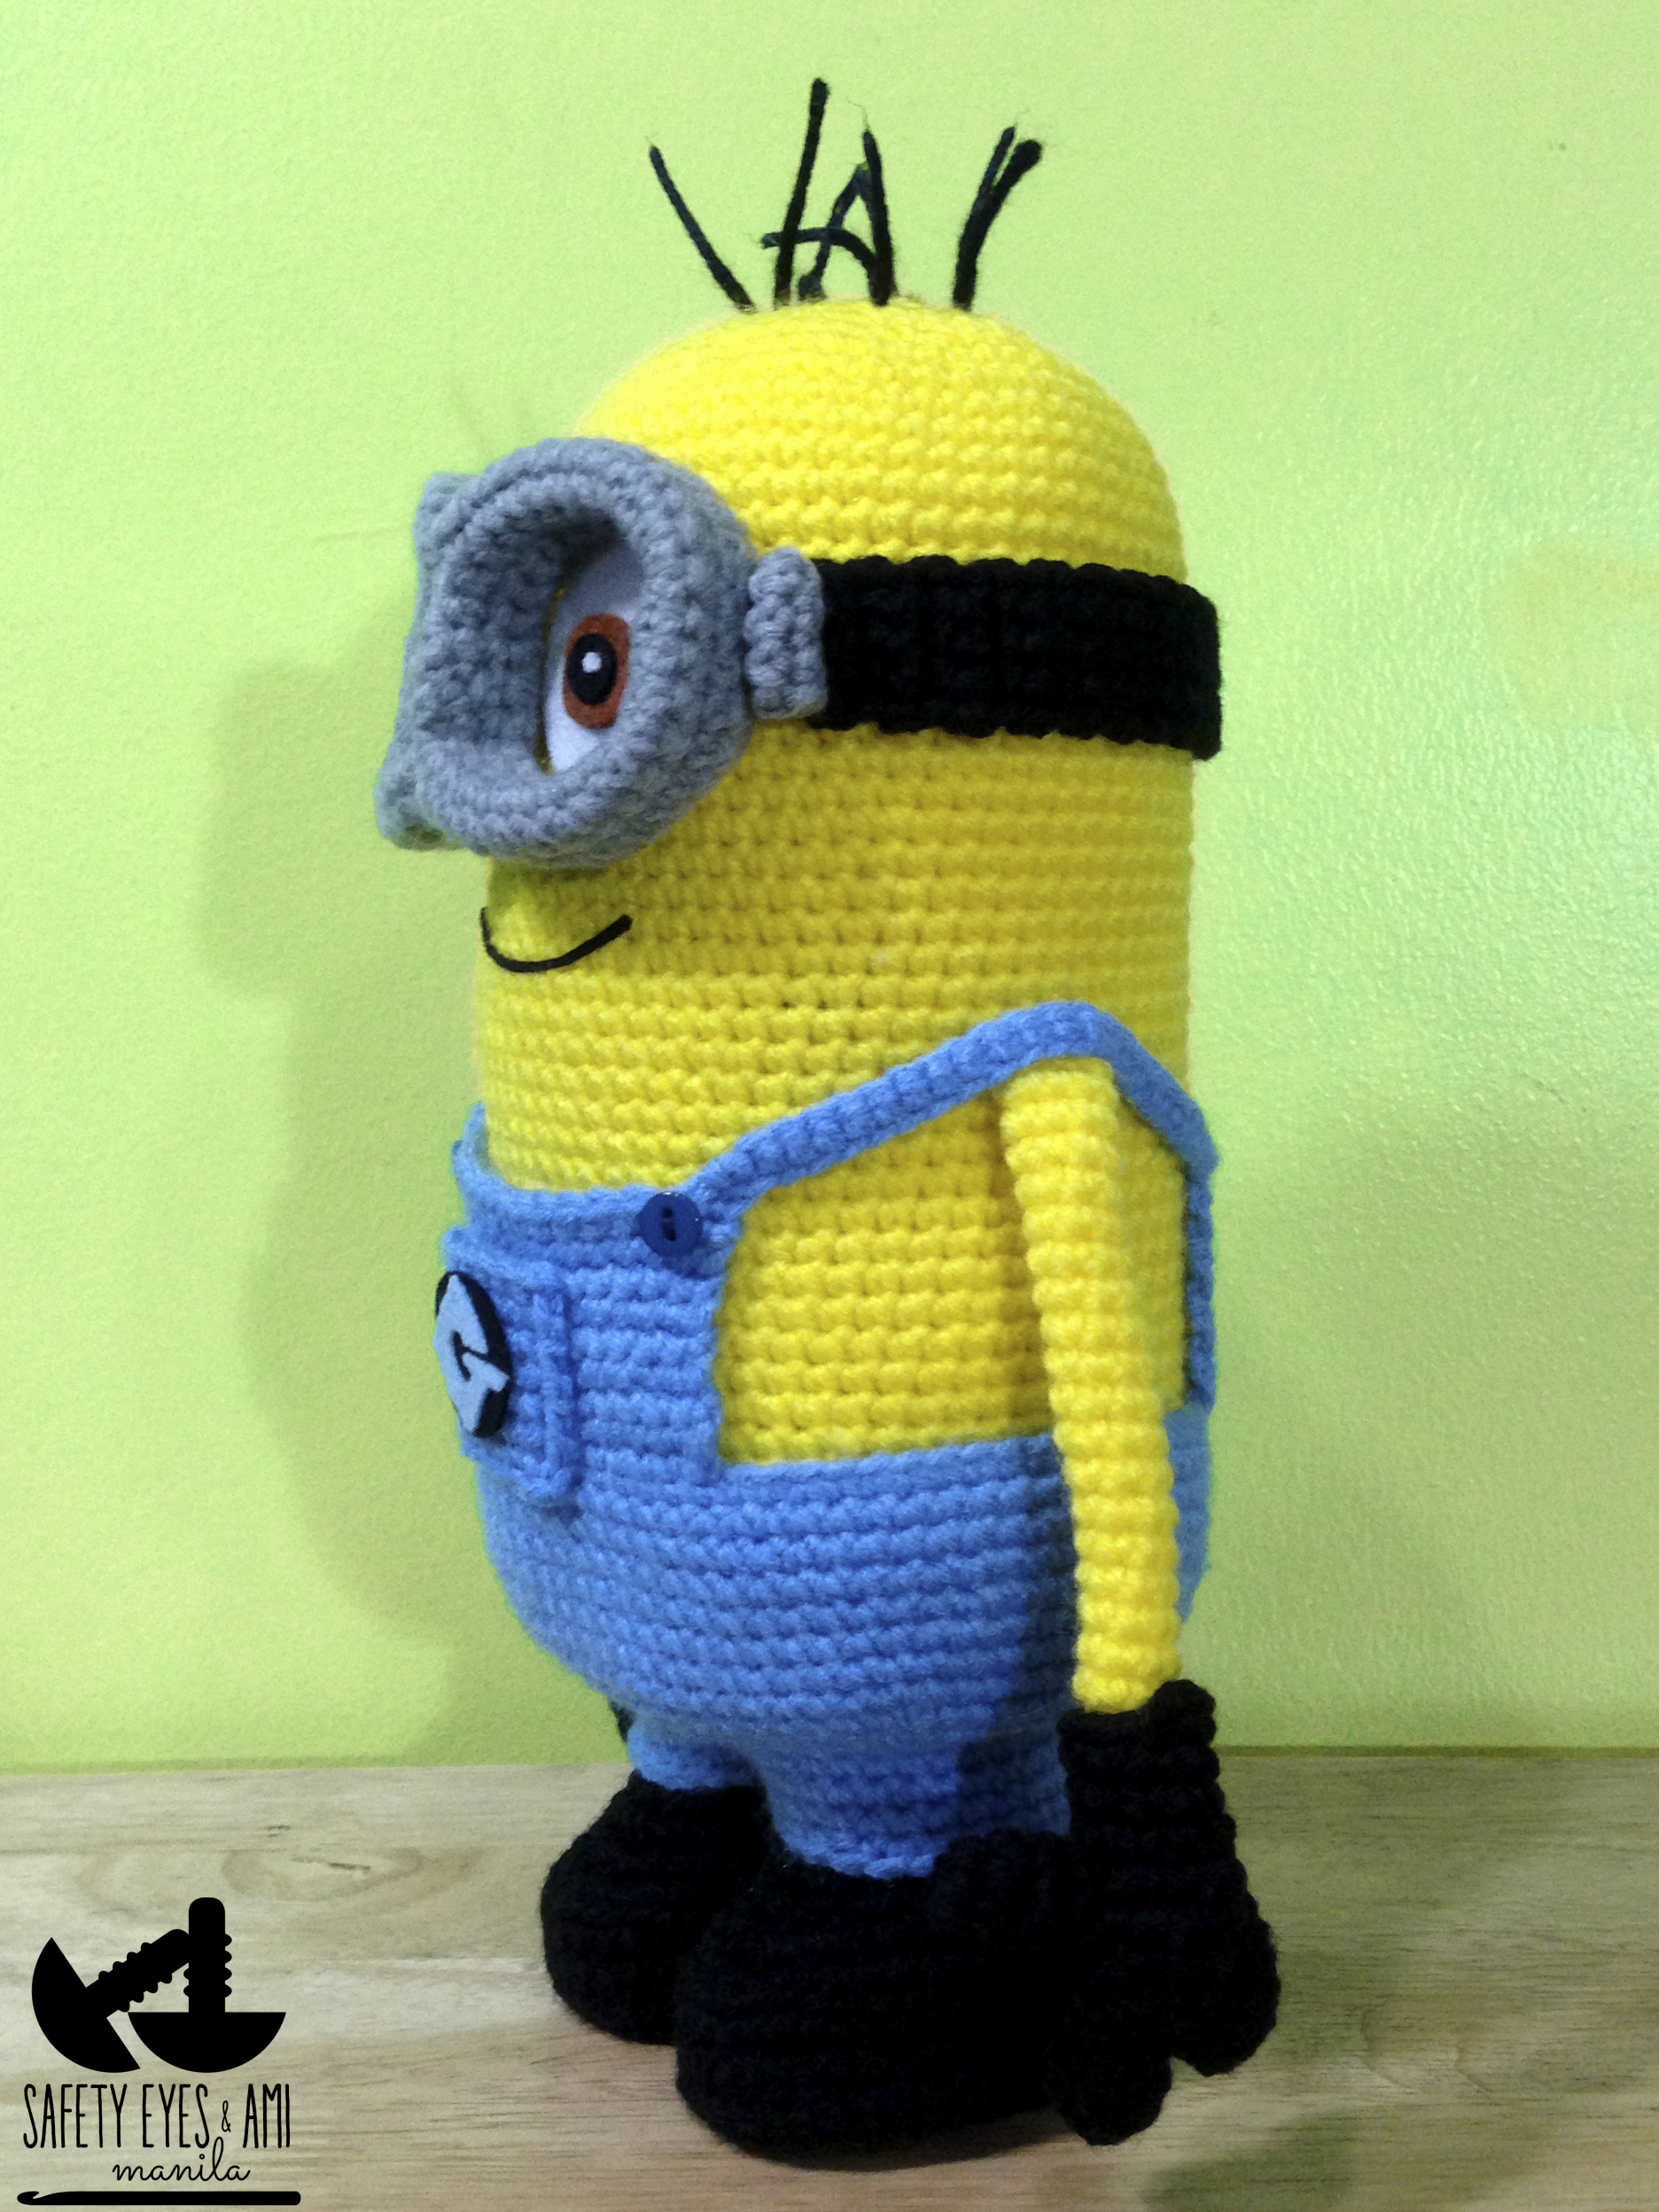
HEAD, BODY & GOGGLES
I followed Stephanie's pattern from R1 to R9 to increase to 63 st. Because I wanted a shorter Minion, I sc'd around only 'til row 50 and started to decrease from there. You can keep crocheting 'til you reach your desired height knowing it takes 7 rows to decrease and close. Don't forget to put the hair in before you stuff and close.
BOOTS & LEGS
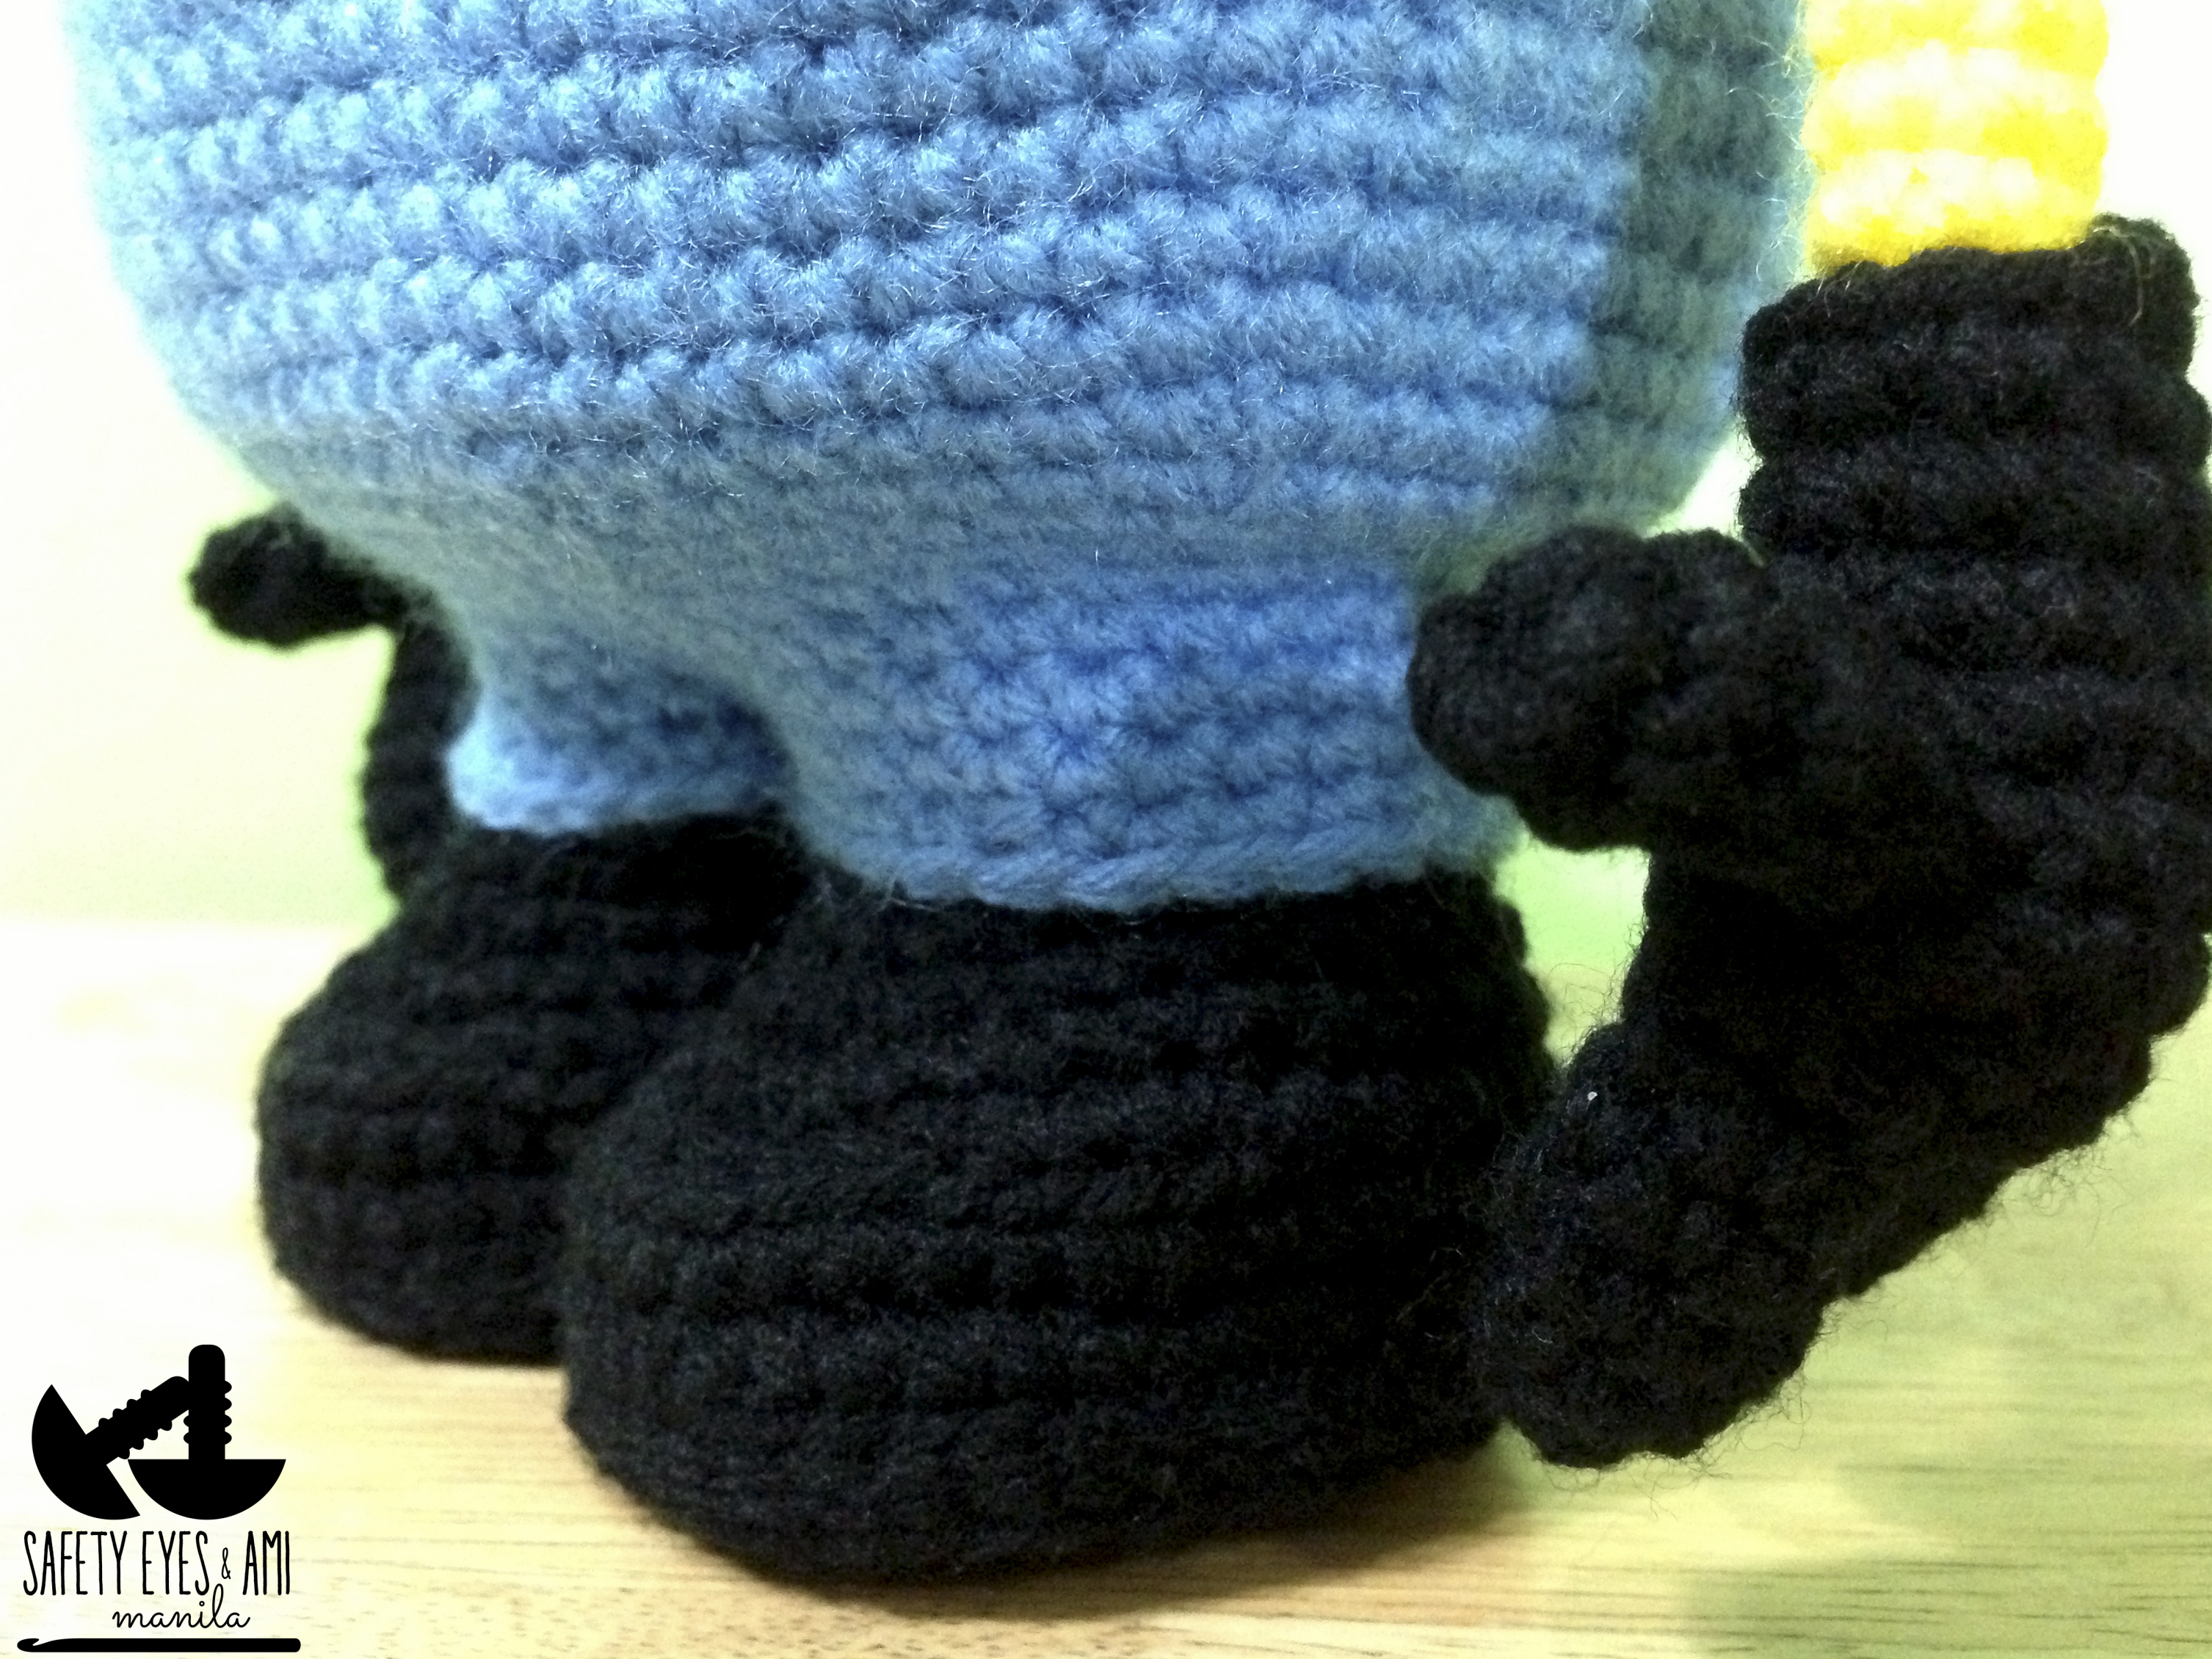
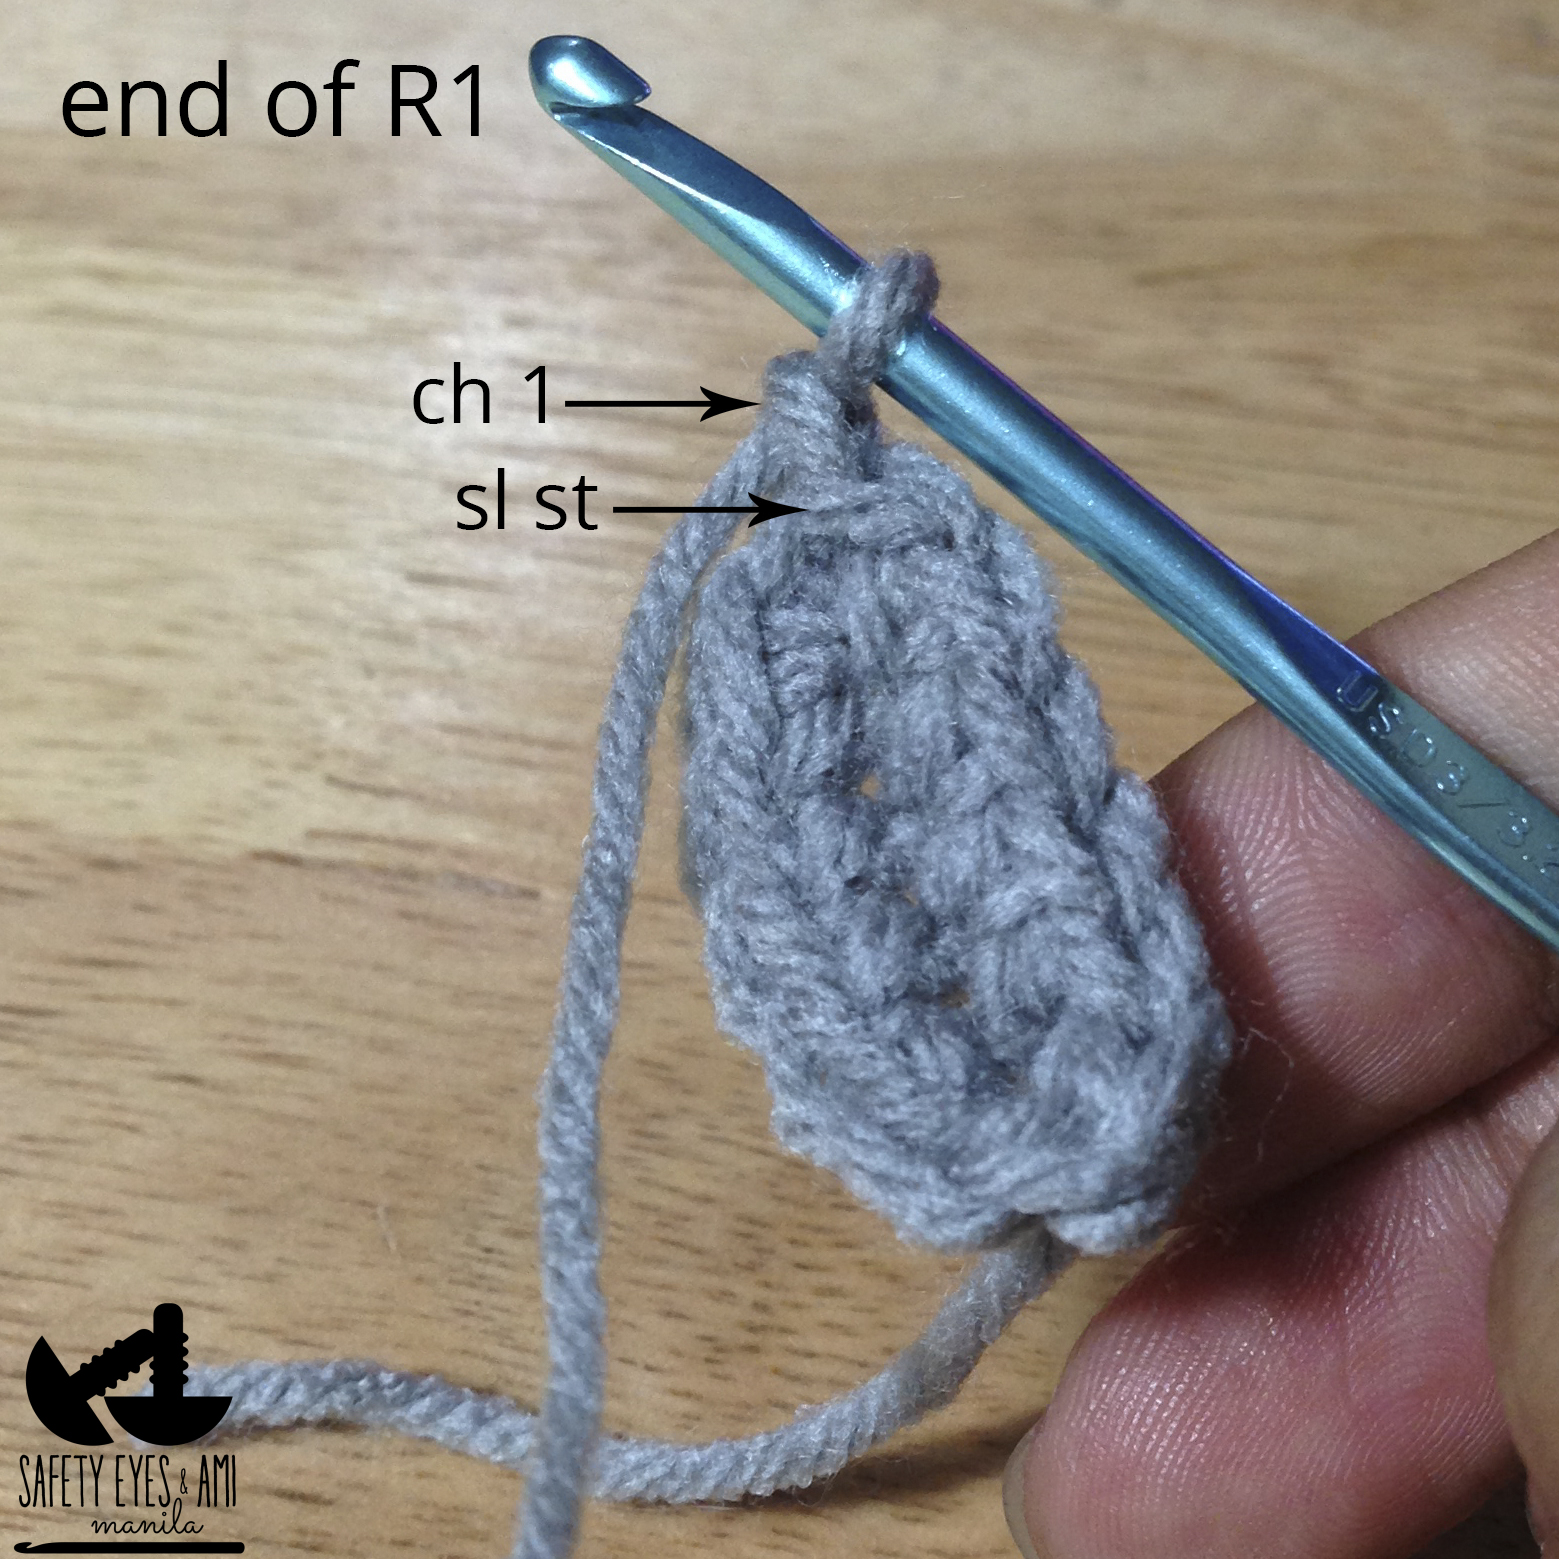
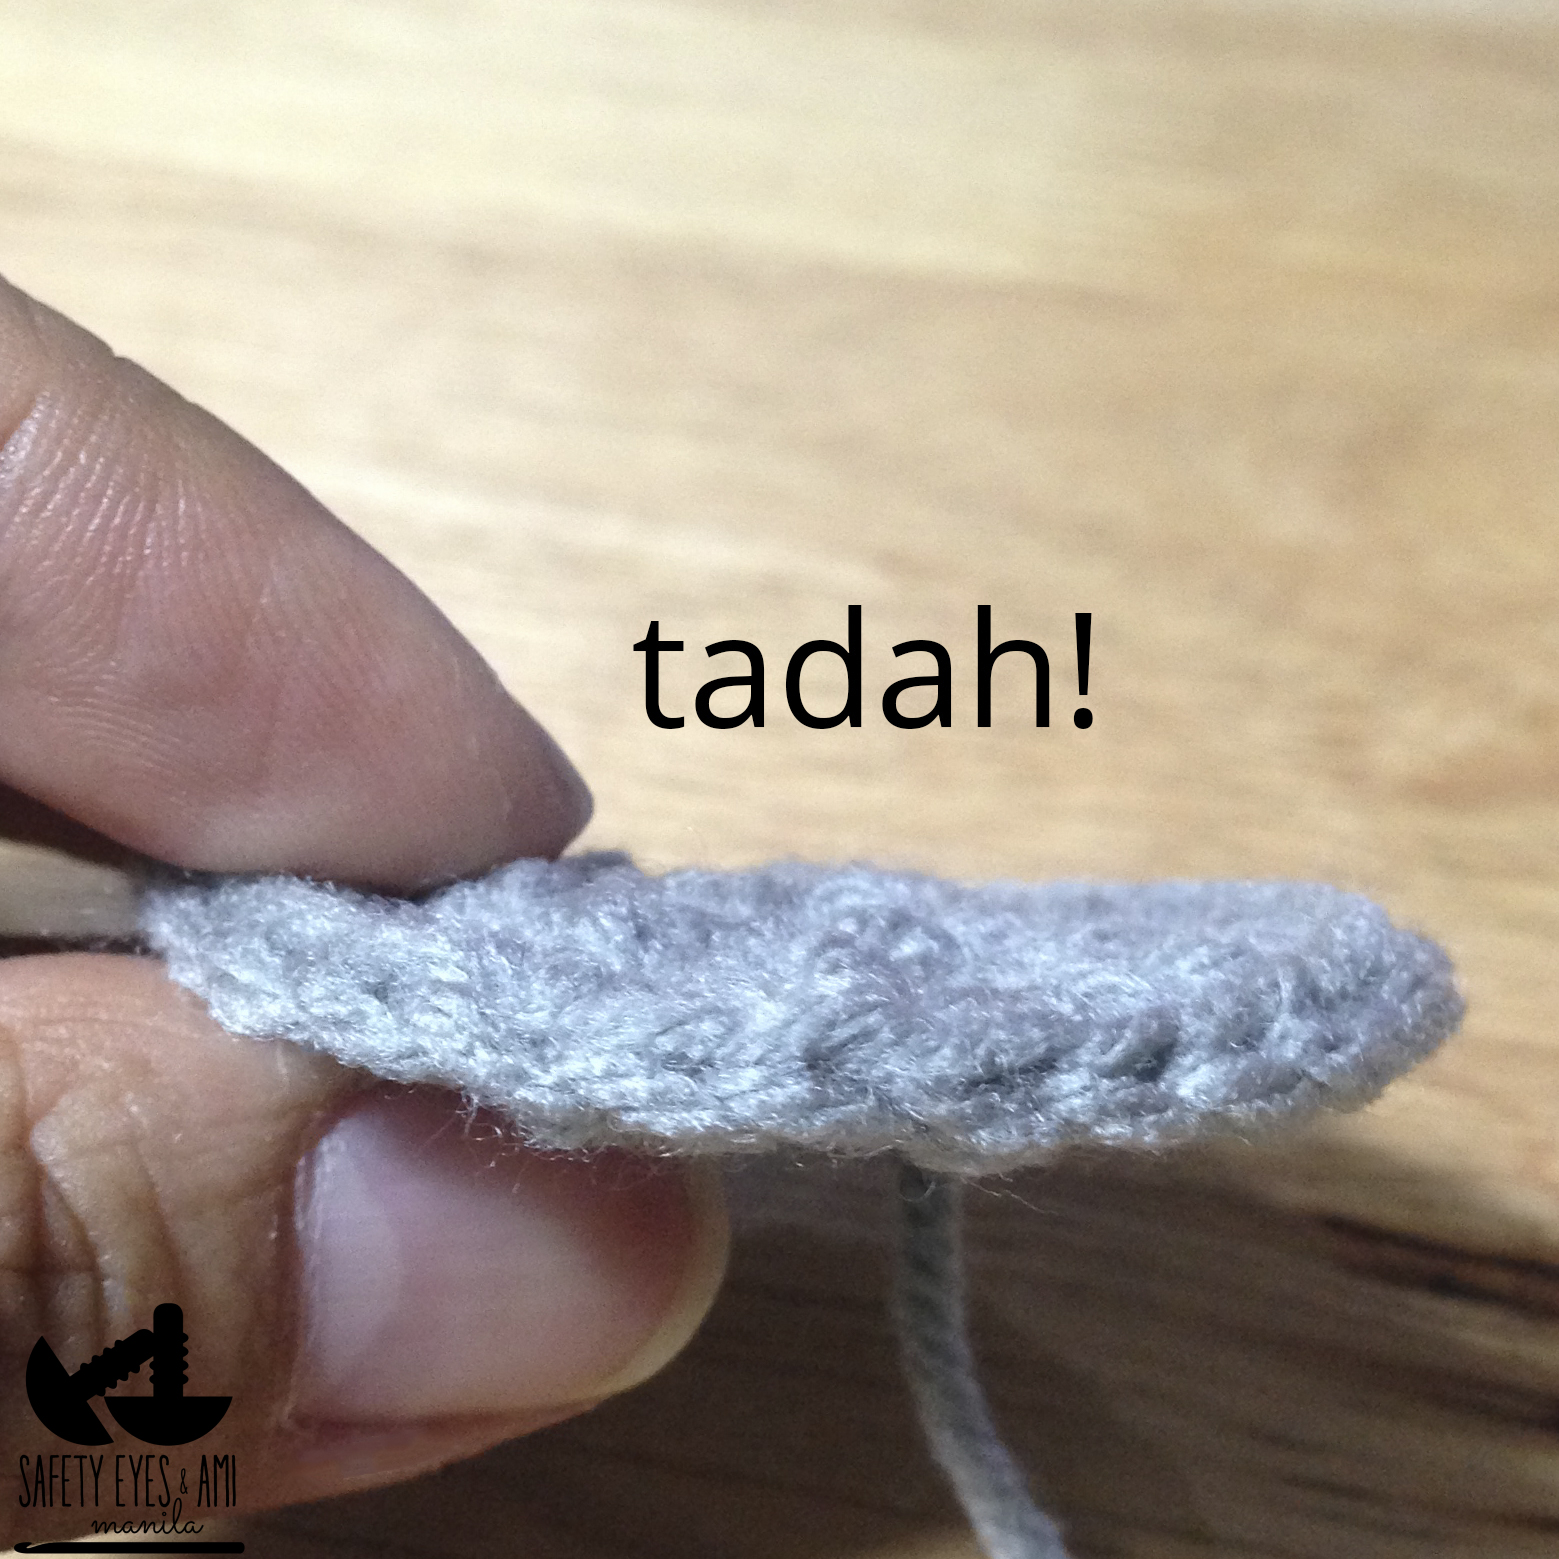
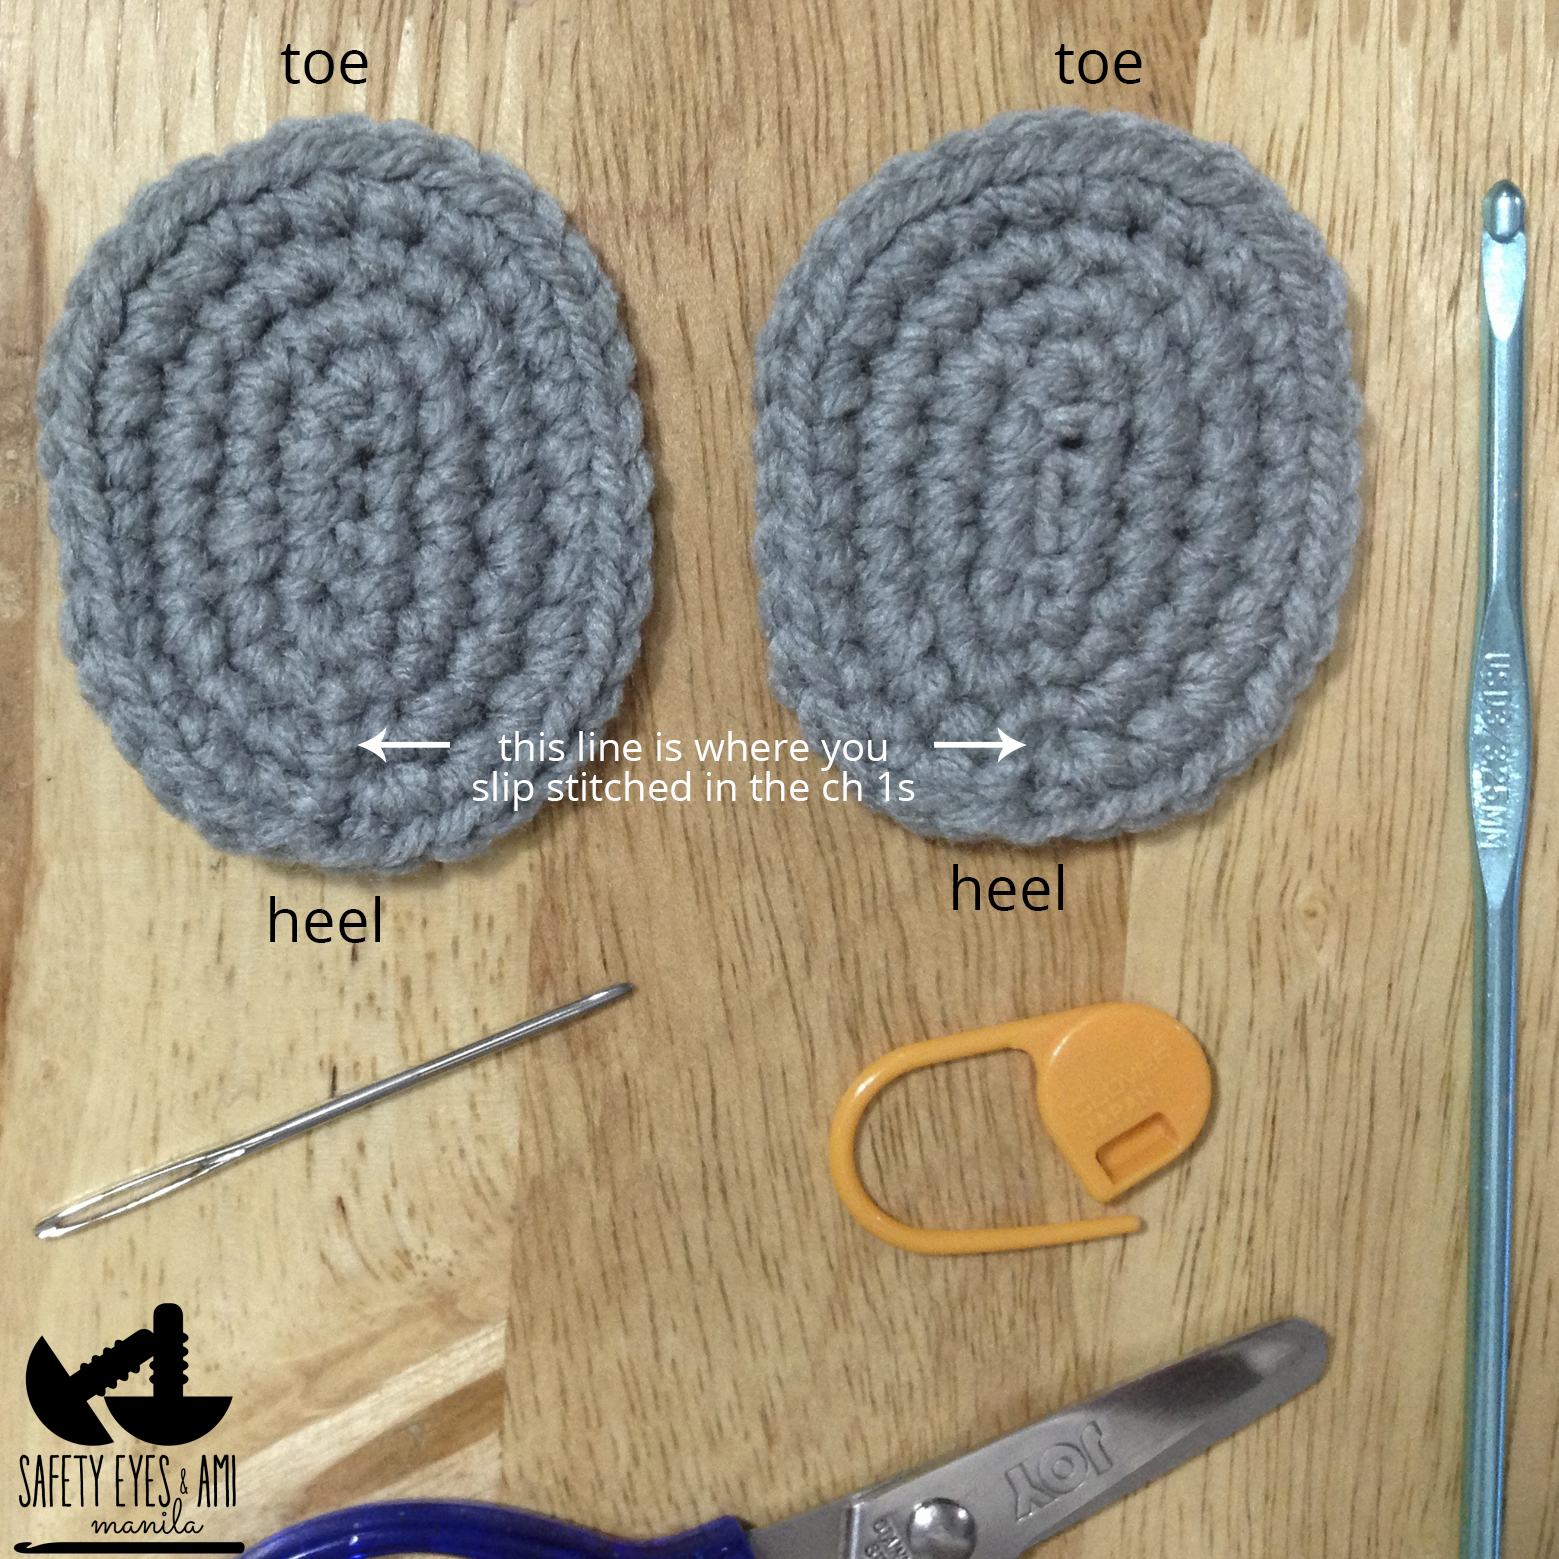
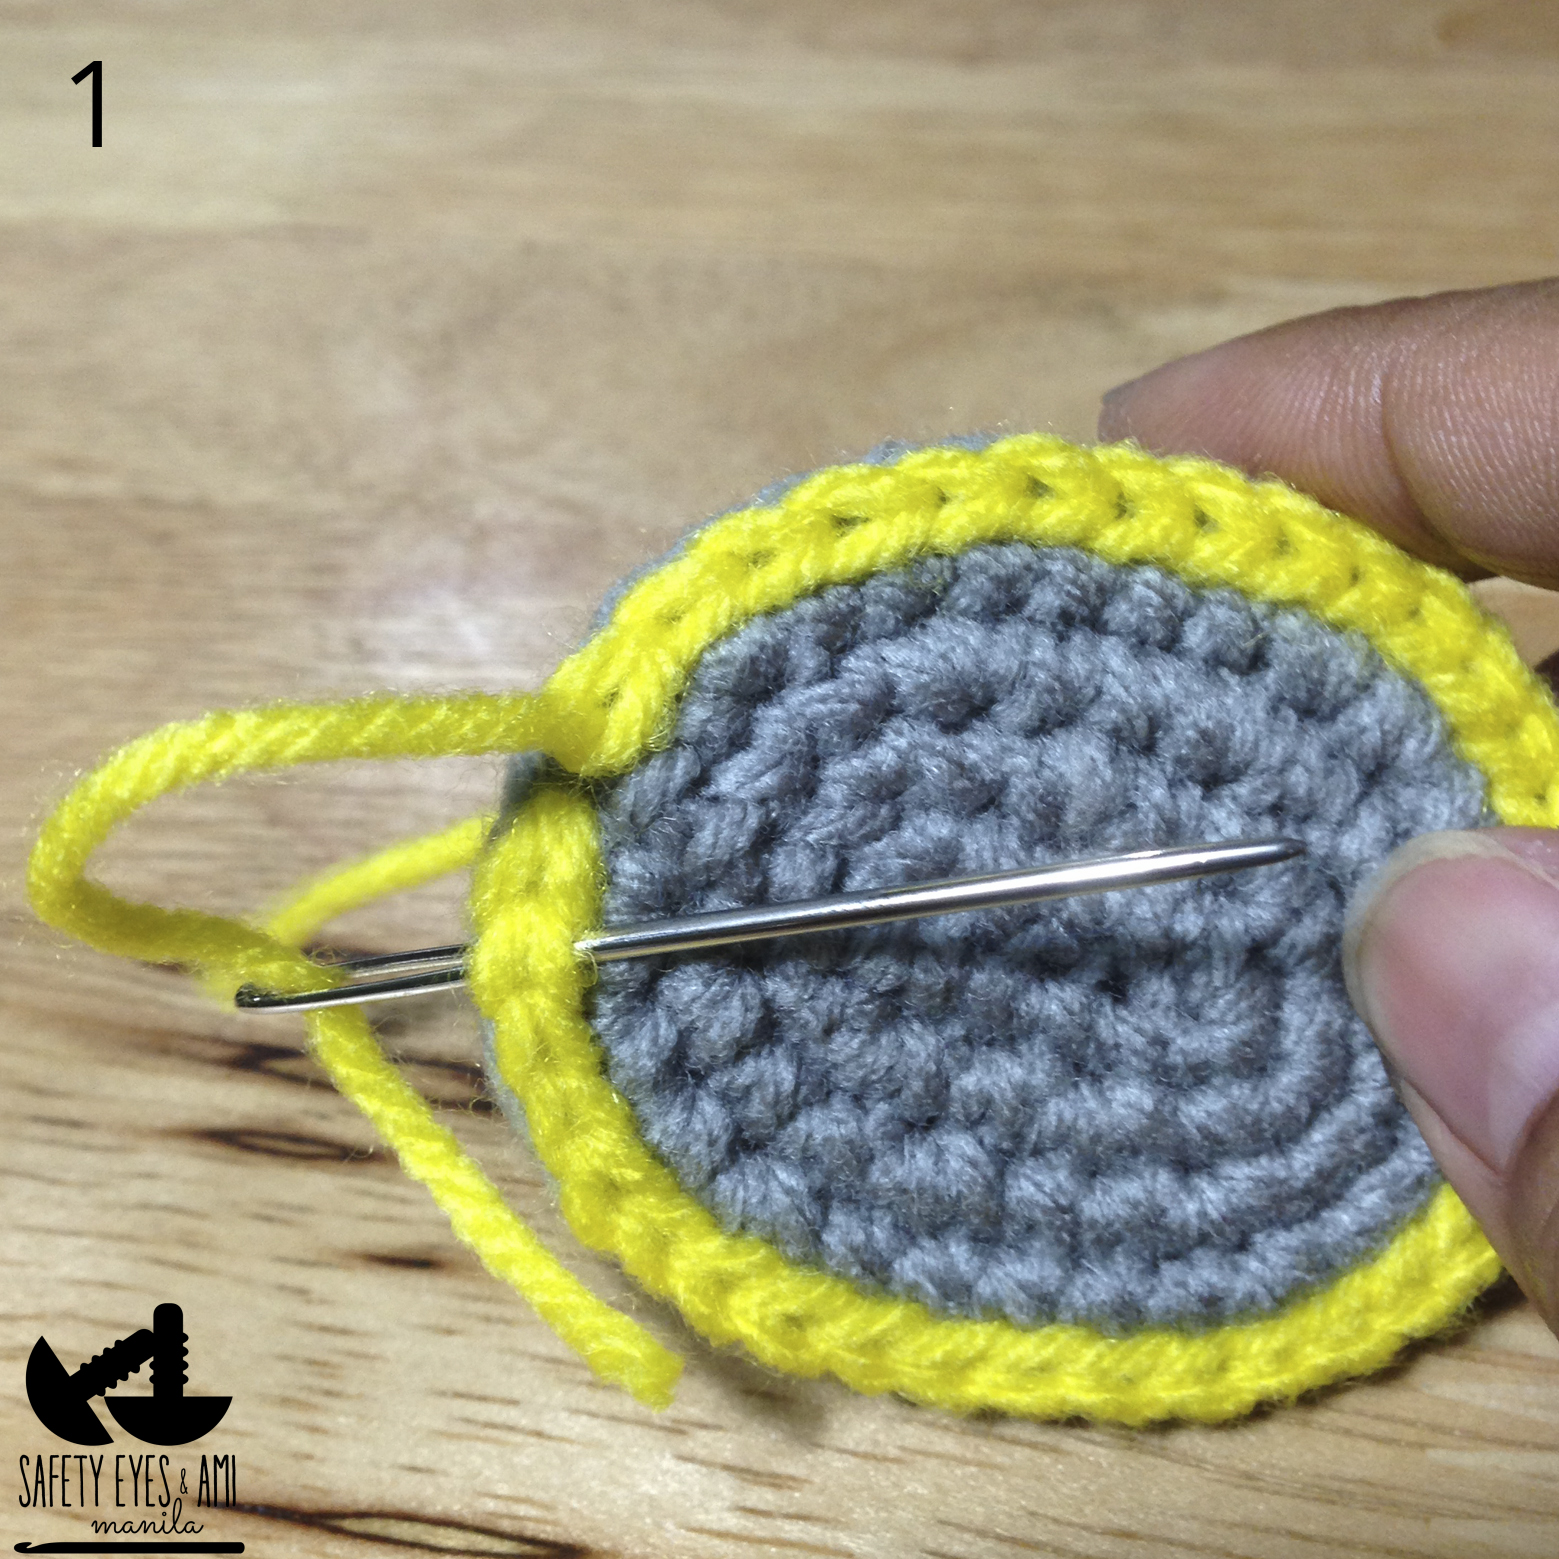
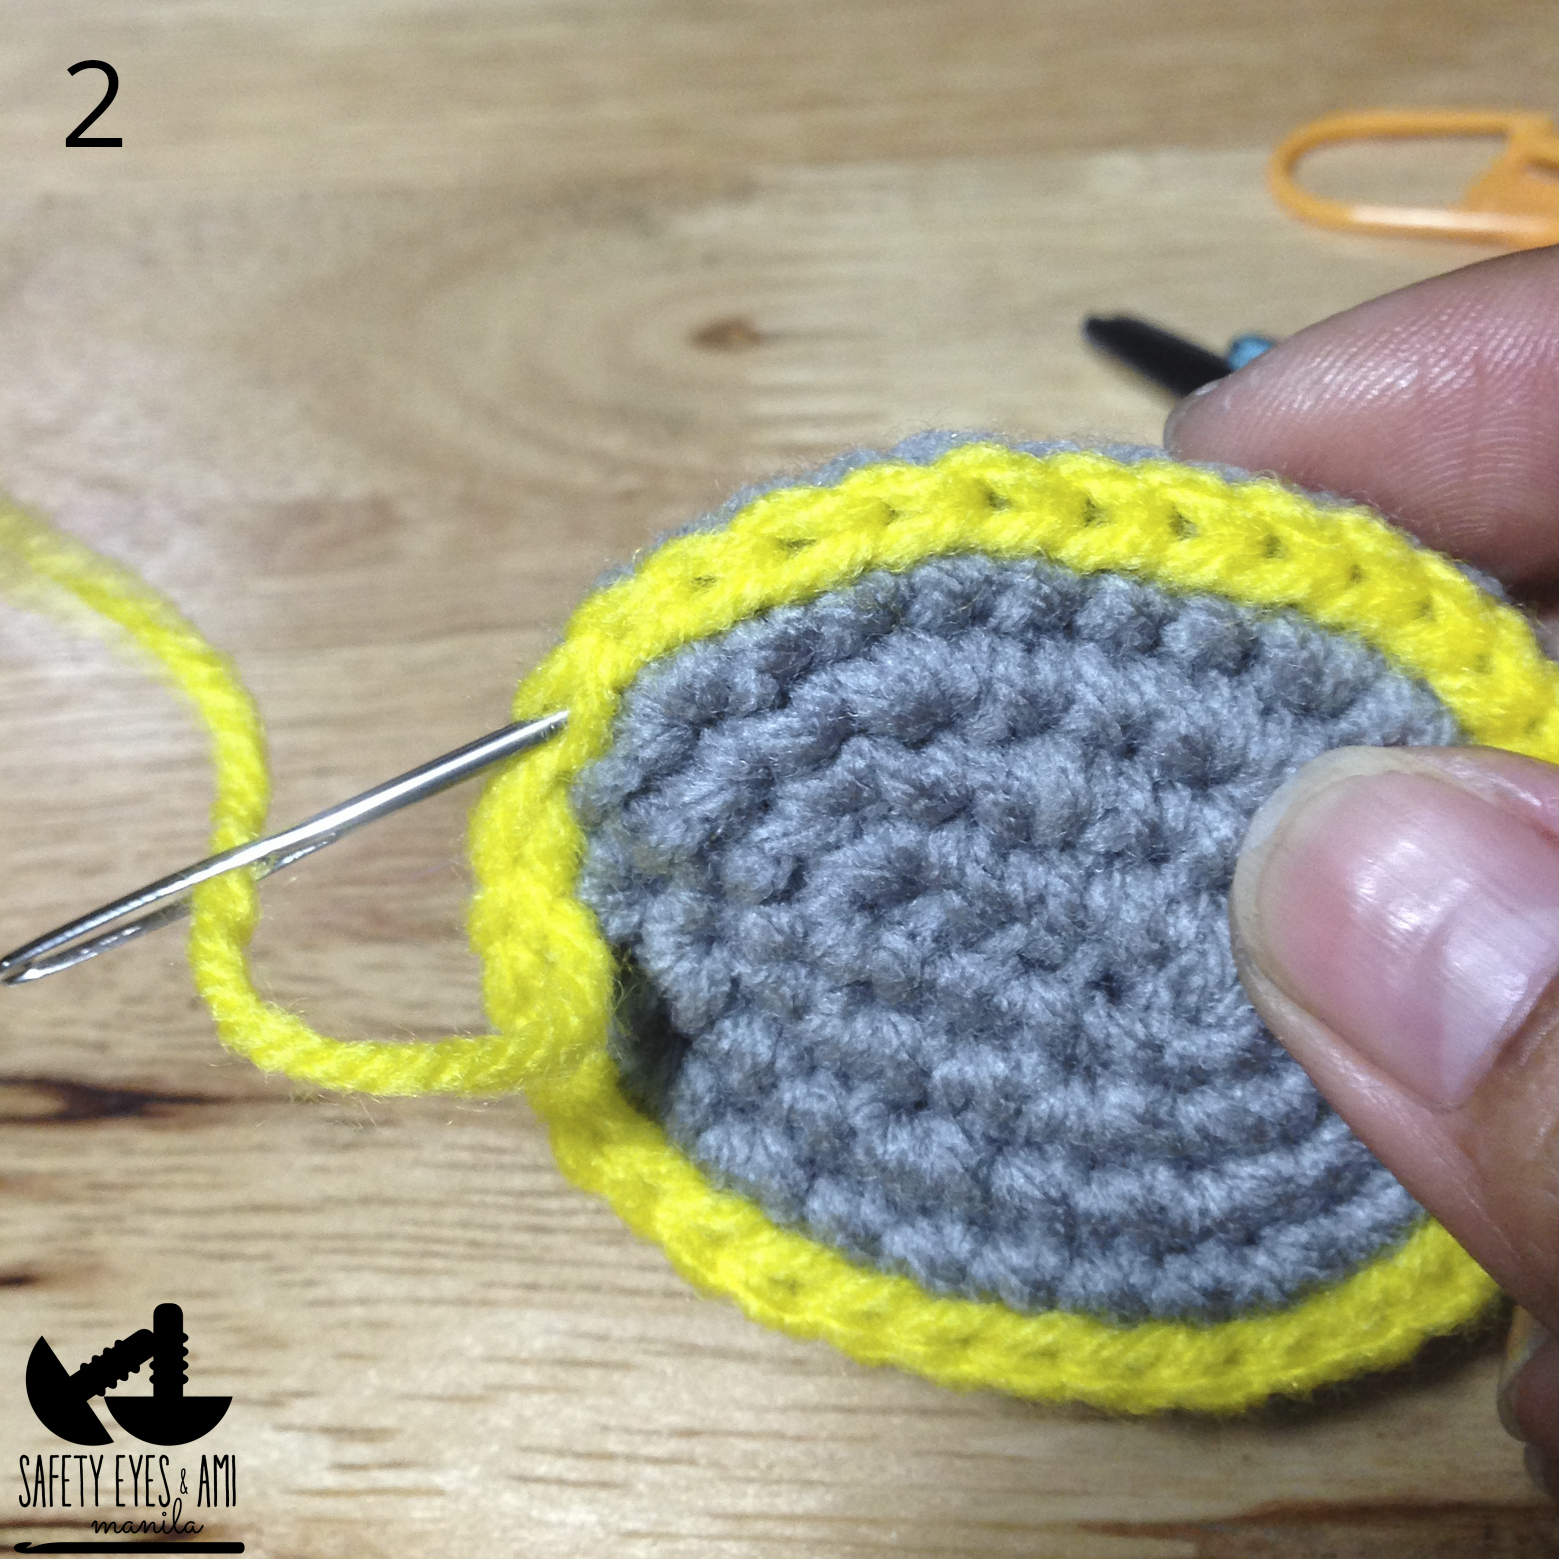
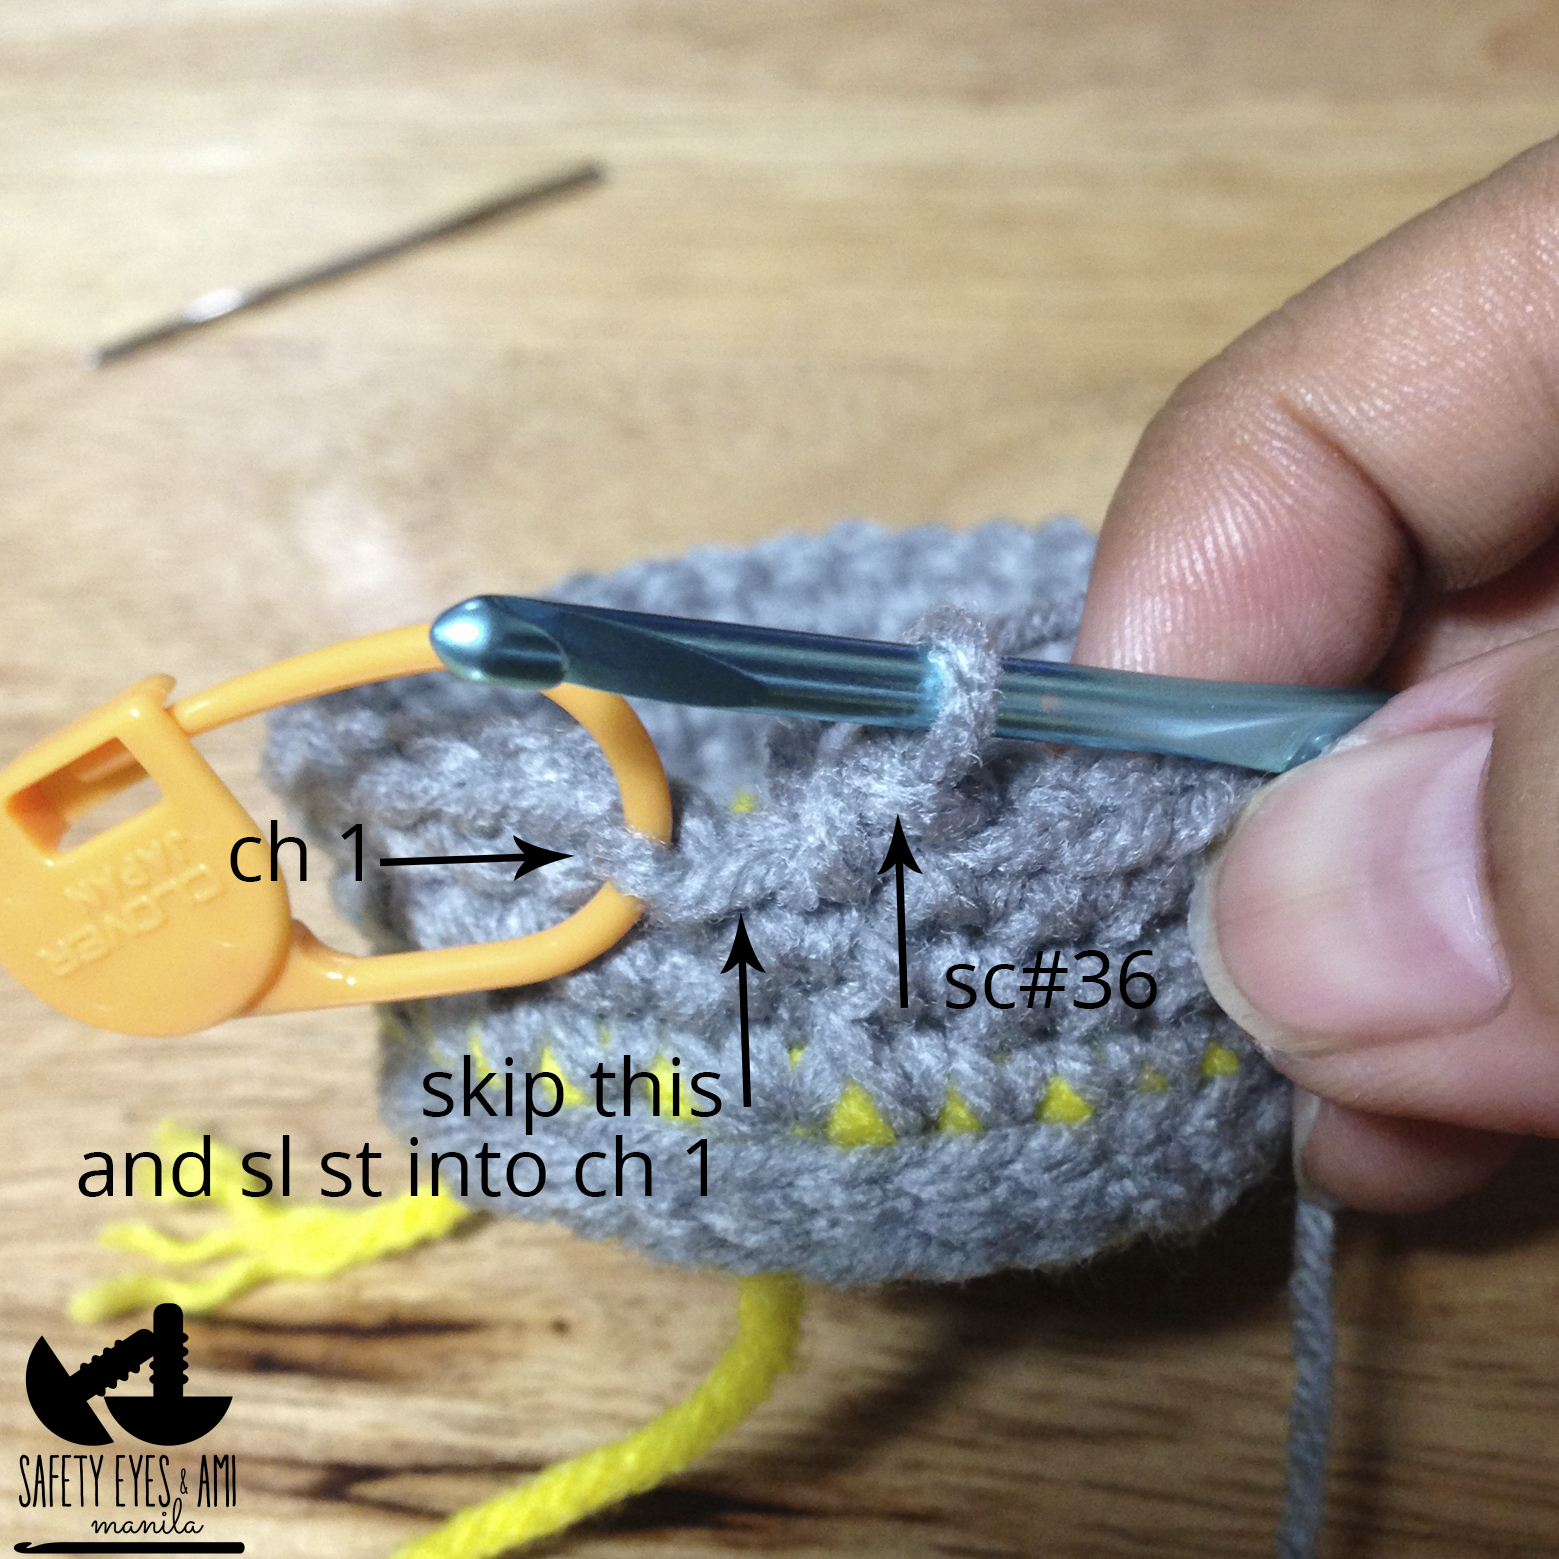
To make sure my Minion could stand on his own, I made his boots like baby booties with a double sole. I also changed color from black to yellow instead of blue to go from boots to "Minion skin". Just for the purposes of this tutorial, I used grey for the boots instead of black just so the stitches may be easily seen. But Minion's shoes are made in black. SOLES (make 4) I sl st (slip stitch) into the ch1 from R2-4. Watch your tension. If your stitches are too tight, your soles won't stay flat and may start to curl in. Ch 6 R1 (start in 2nd ch fr hook) inc, sc 3, make 3 sc in the last chain, (working on the other side of chain now) sc 4. (12) sl st into 1st sc, ch 1 and mark the ch 1 R2 [sc 1, inc ] 6x (18) sl st into the ch 1 of the previous row and ch 1 R3 [inc, sc 2] 6x (24) skip the last (extra) stitch, sl st into ch 1 of the previous row and ch 1 R4 inc 4, sc 5, inc 4, sc 1, inc 3, sc 6, inc (36) skip the last (extra) stitch, sl st into ch 1 of the previous row and ch 1
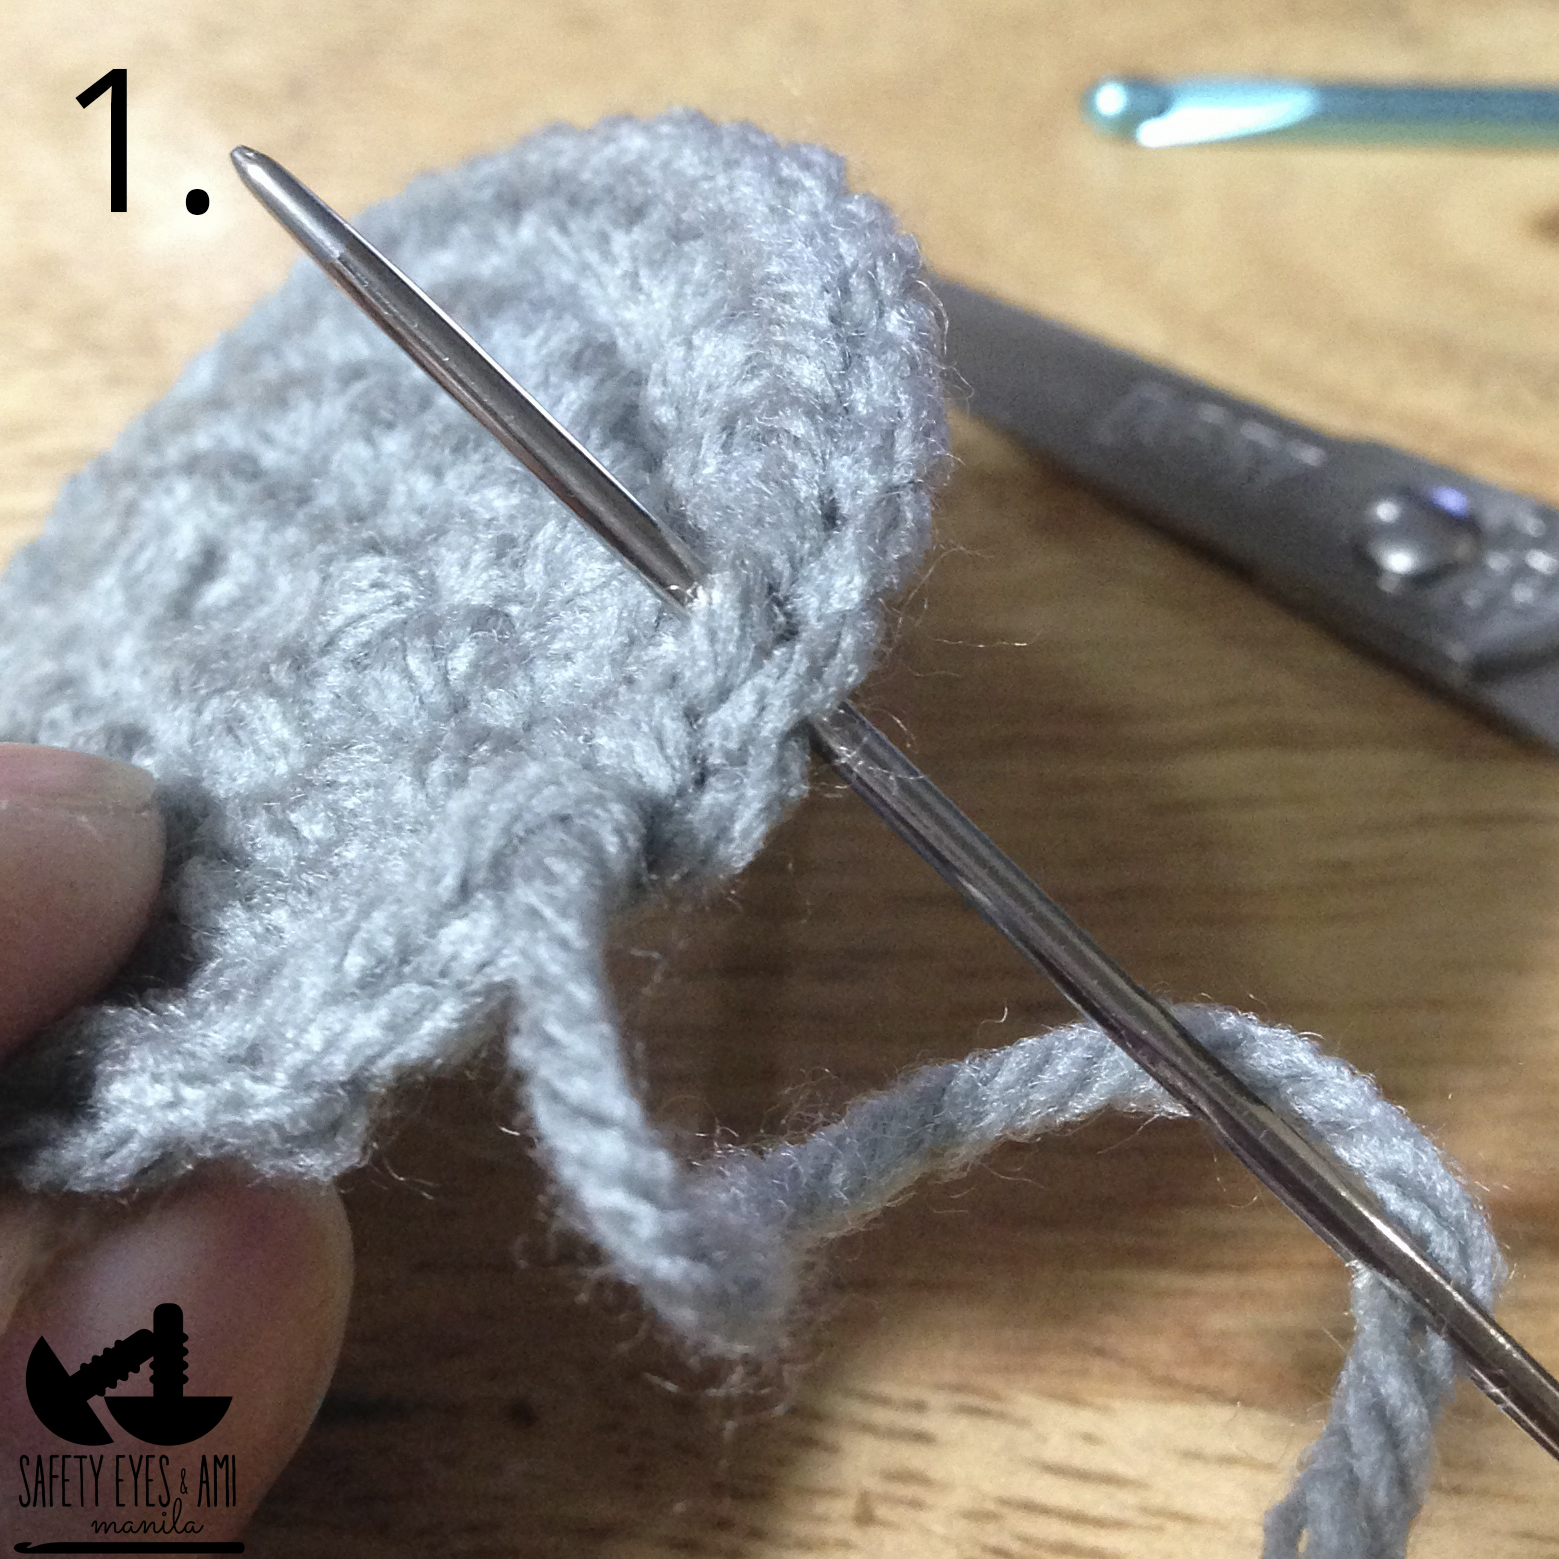
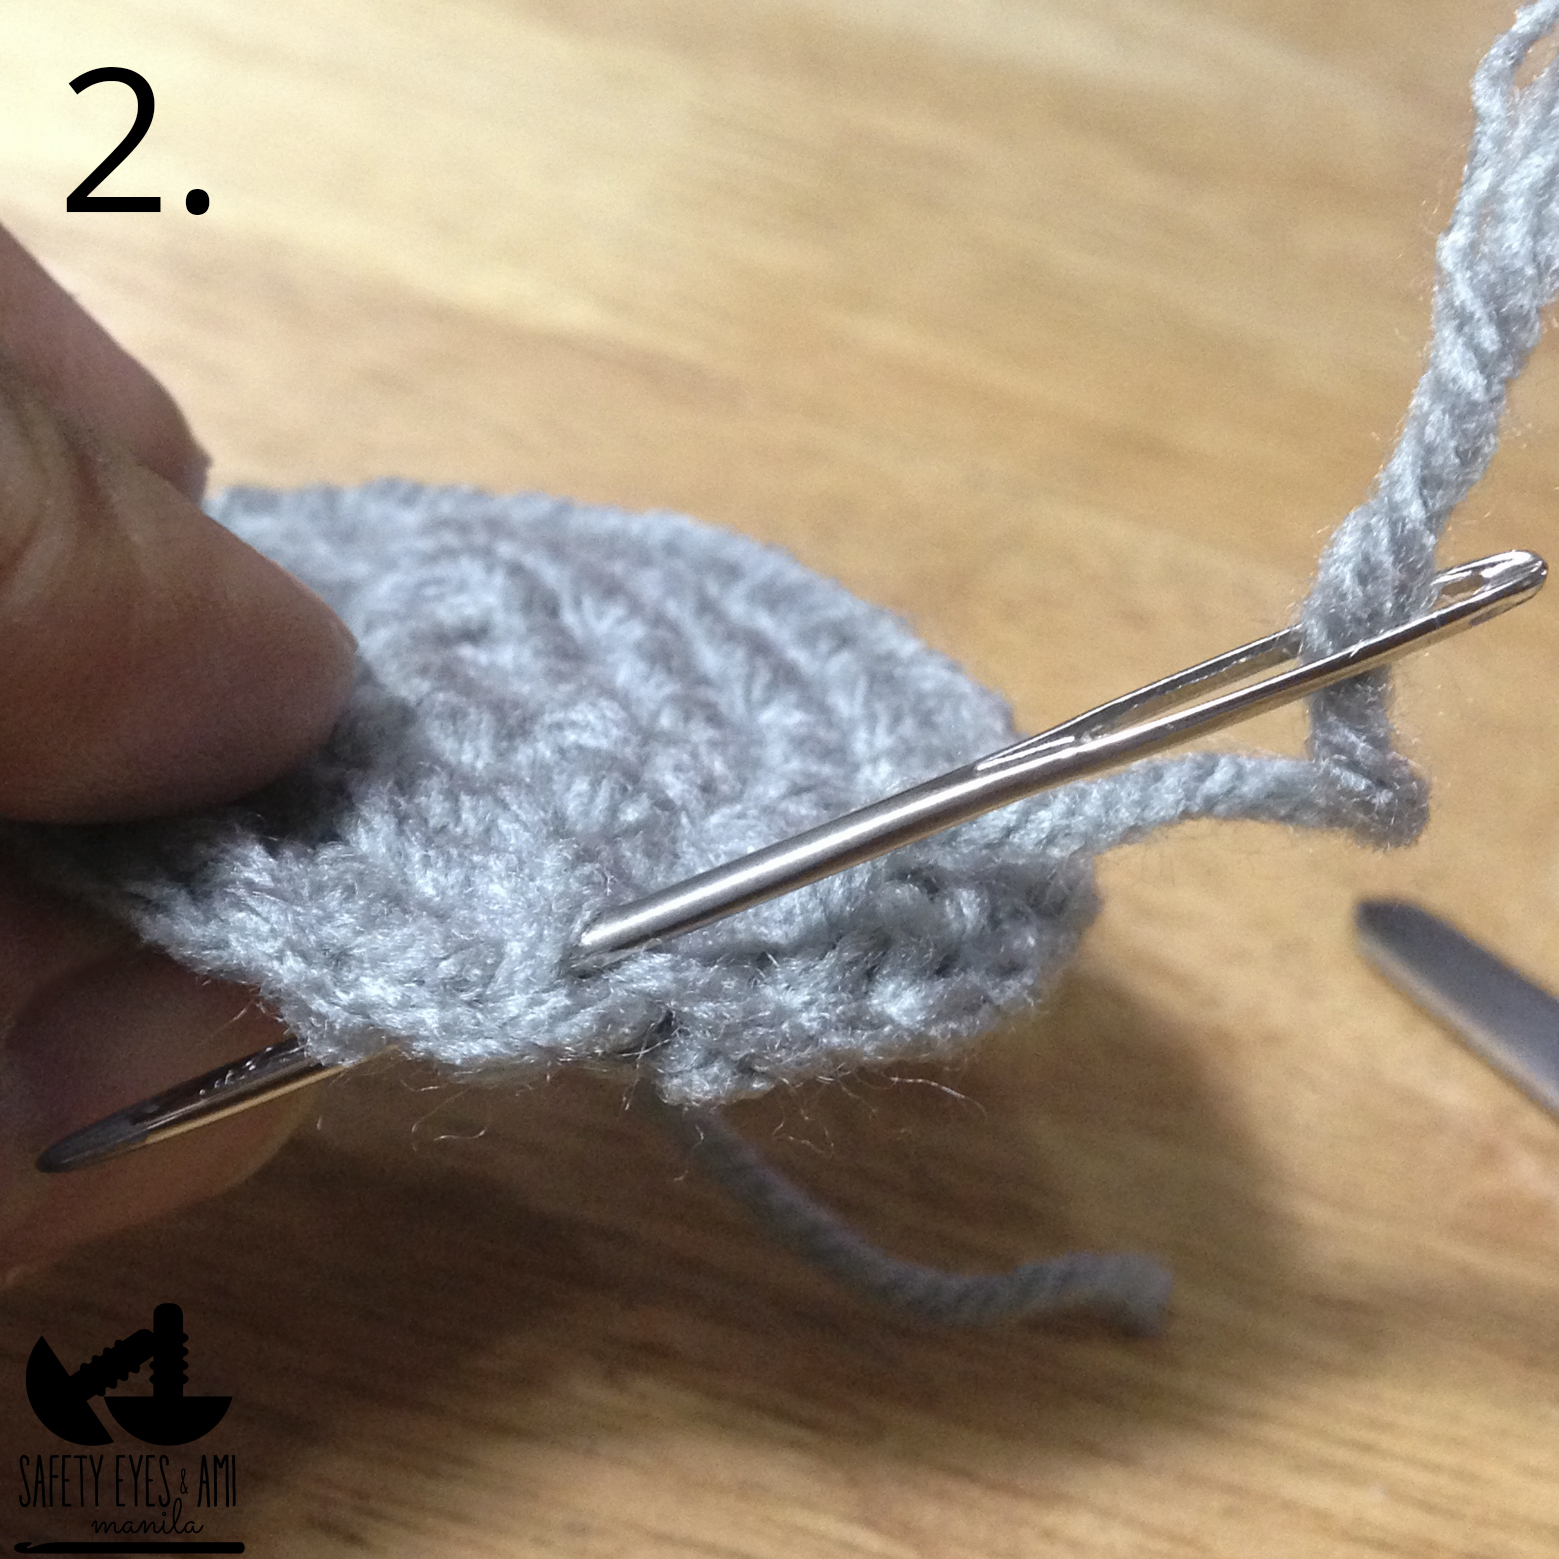
To finish and close, cut yarn leaving a tail about 1.5" and pull through loop. Thread the tail under both loops of the 2nd stitch from your last sc. Close the loop by threading back through the center of the previous sc. You won't notice where you started and where you ended! And even if it ends up a bit messy, you won't notice when you use black yarn. Just make sure you have a total of 36 stitches. If you're making a smaller and skinnier Minion, you can stop at R3 with 24 st to make smaller boots.
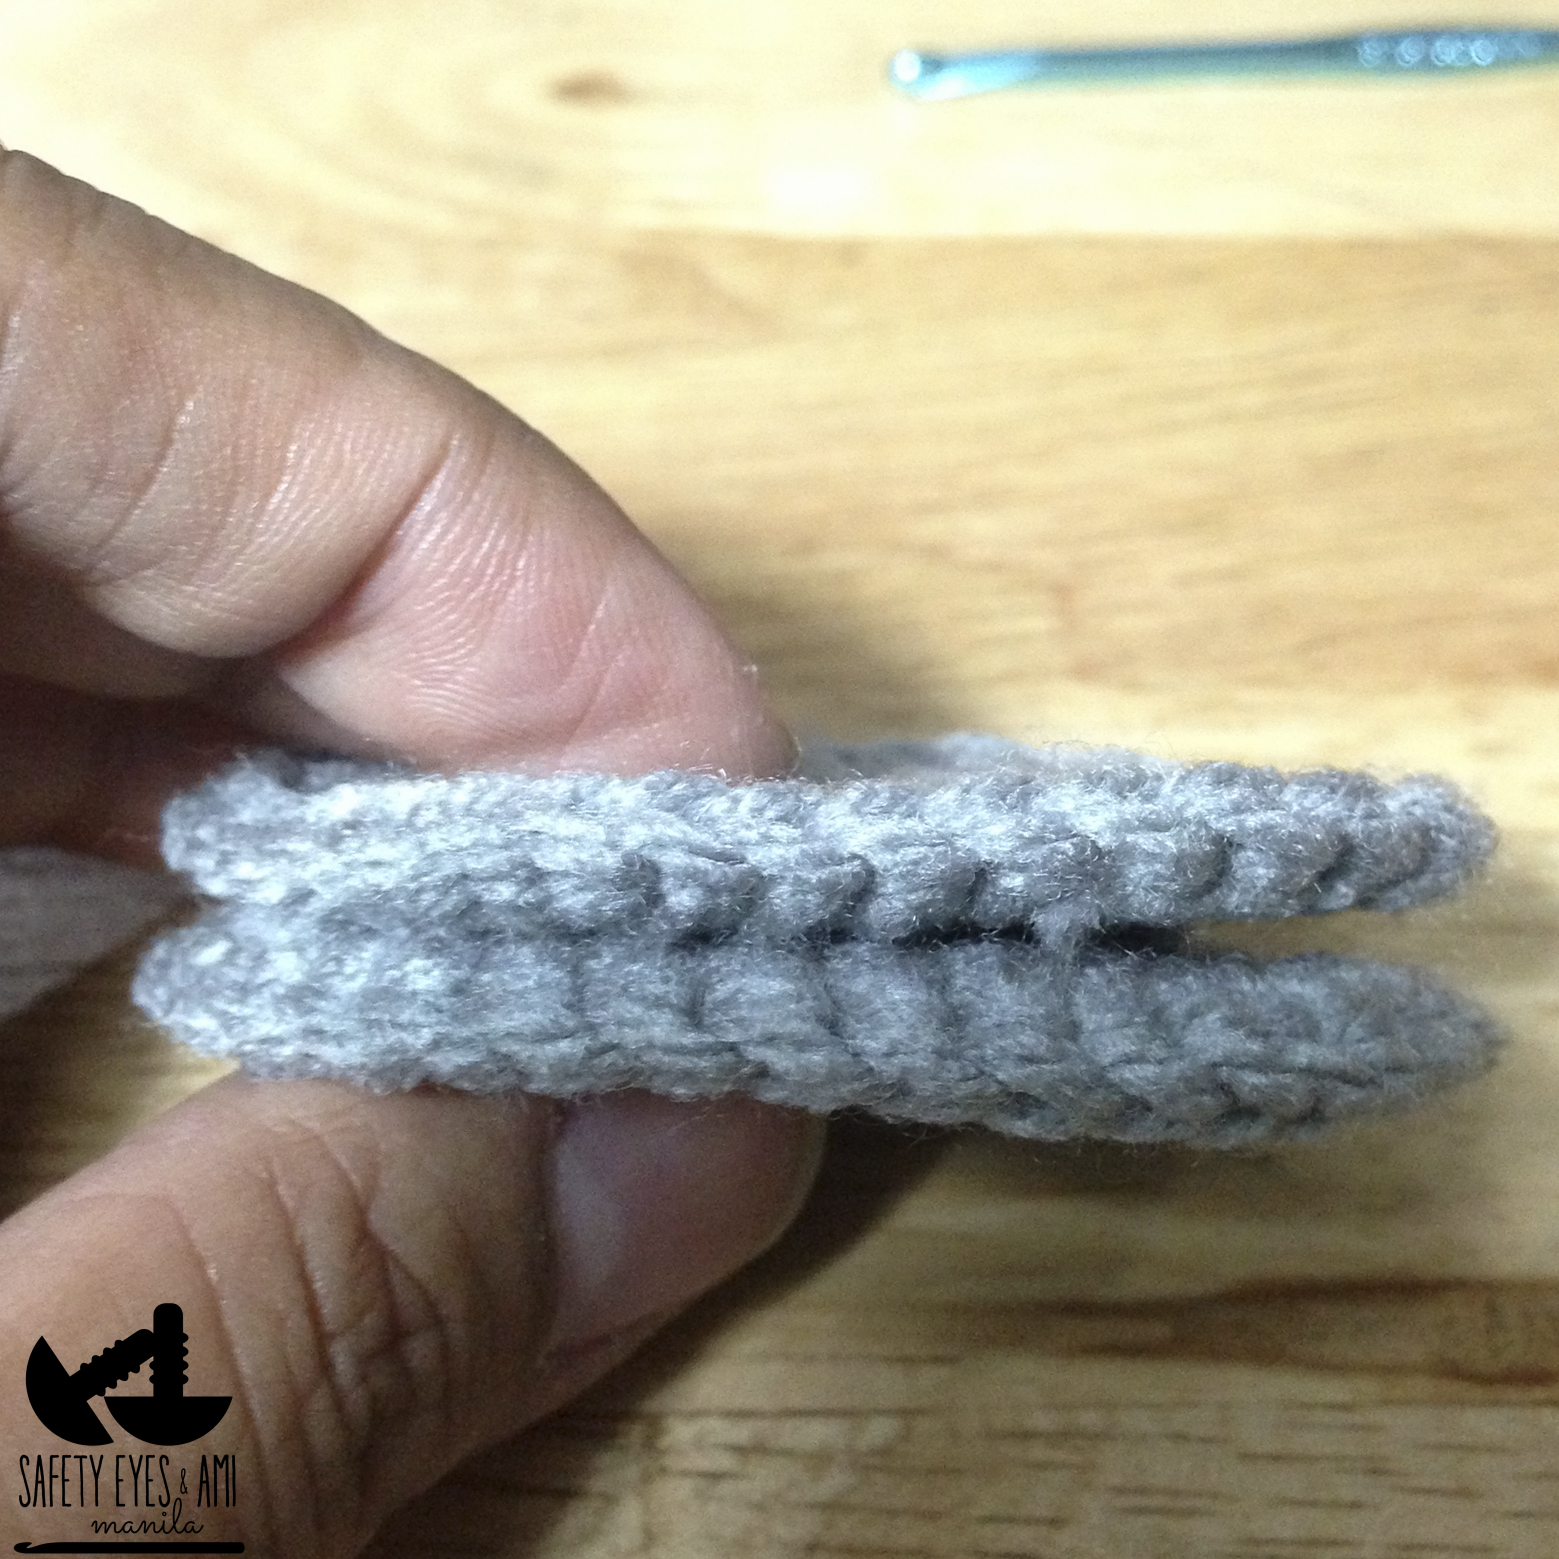
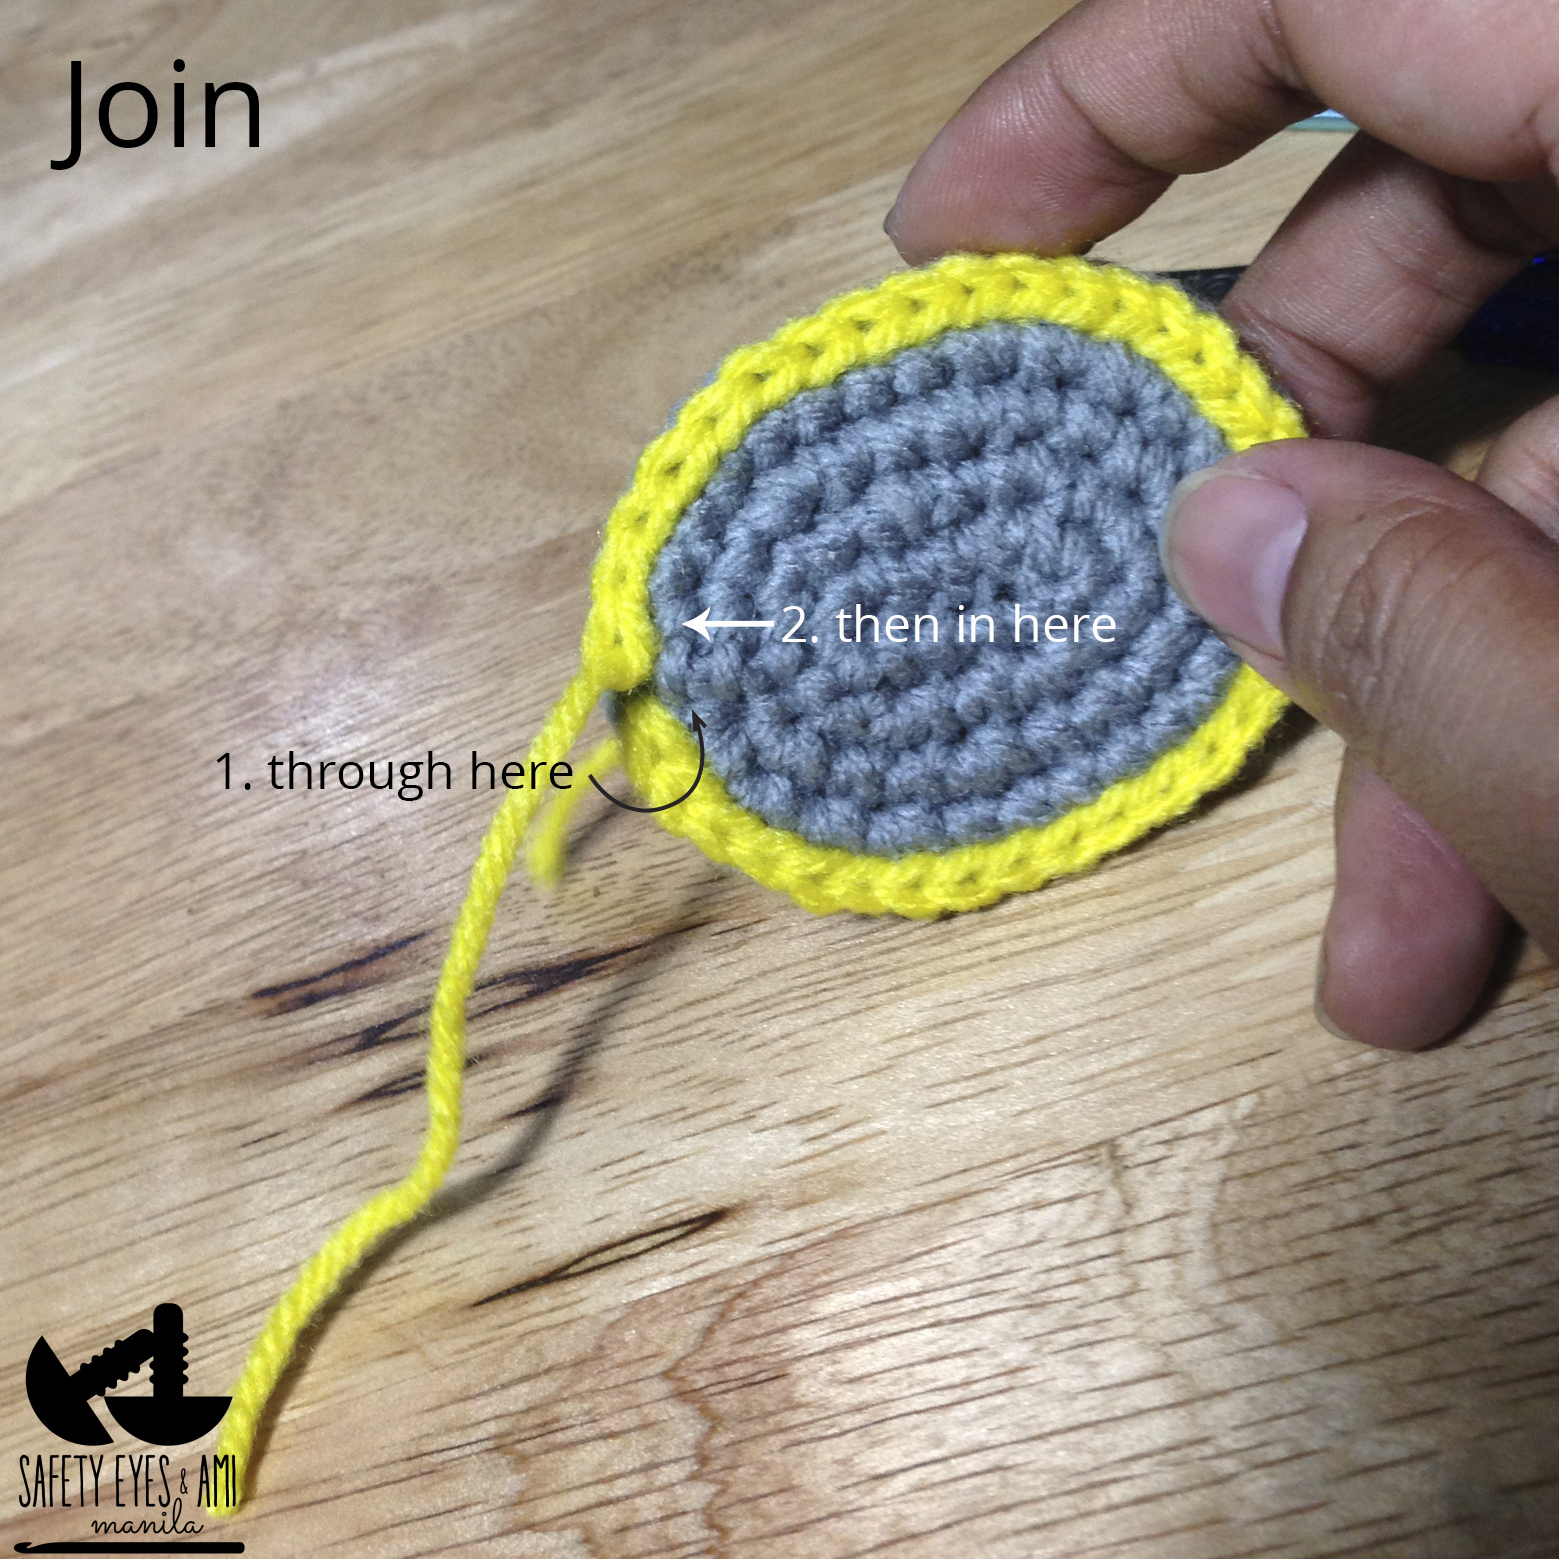
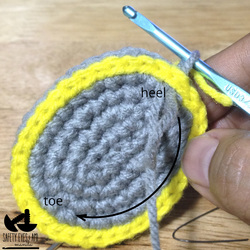
Take 2 soles. Don't worry if they're not exactly the same size. The stitches will eventually line up. Put them together with the heels toward you and the right sides facing out. You can hide all the extra hanging tails in between. For the purposes of this tutorial, I used yellow yarn to stitch the 2 soles together so the chains can be easily seen.
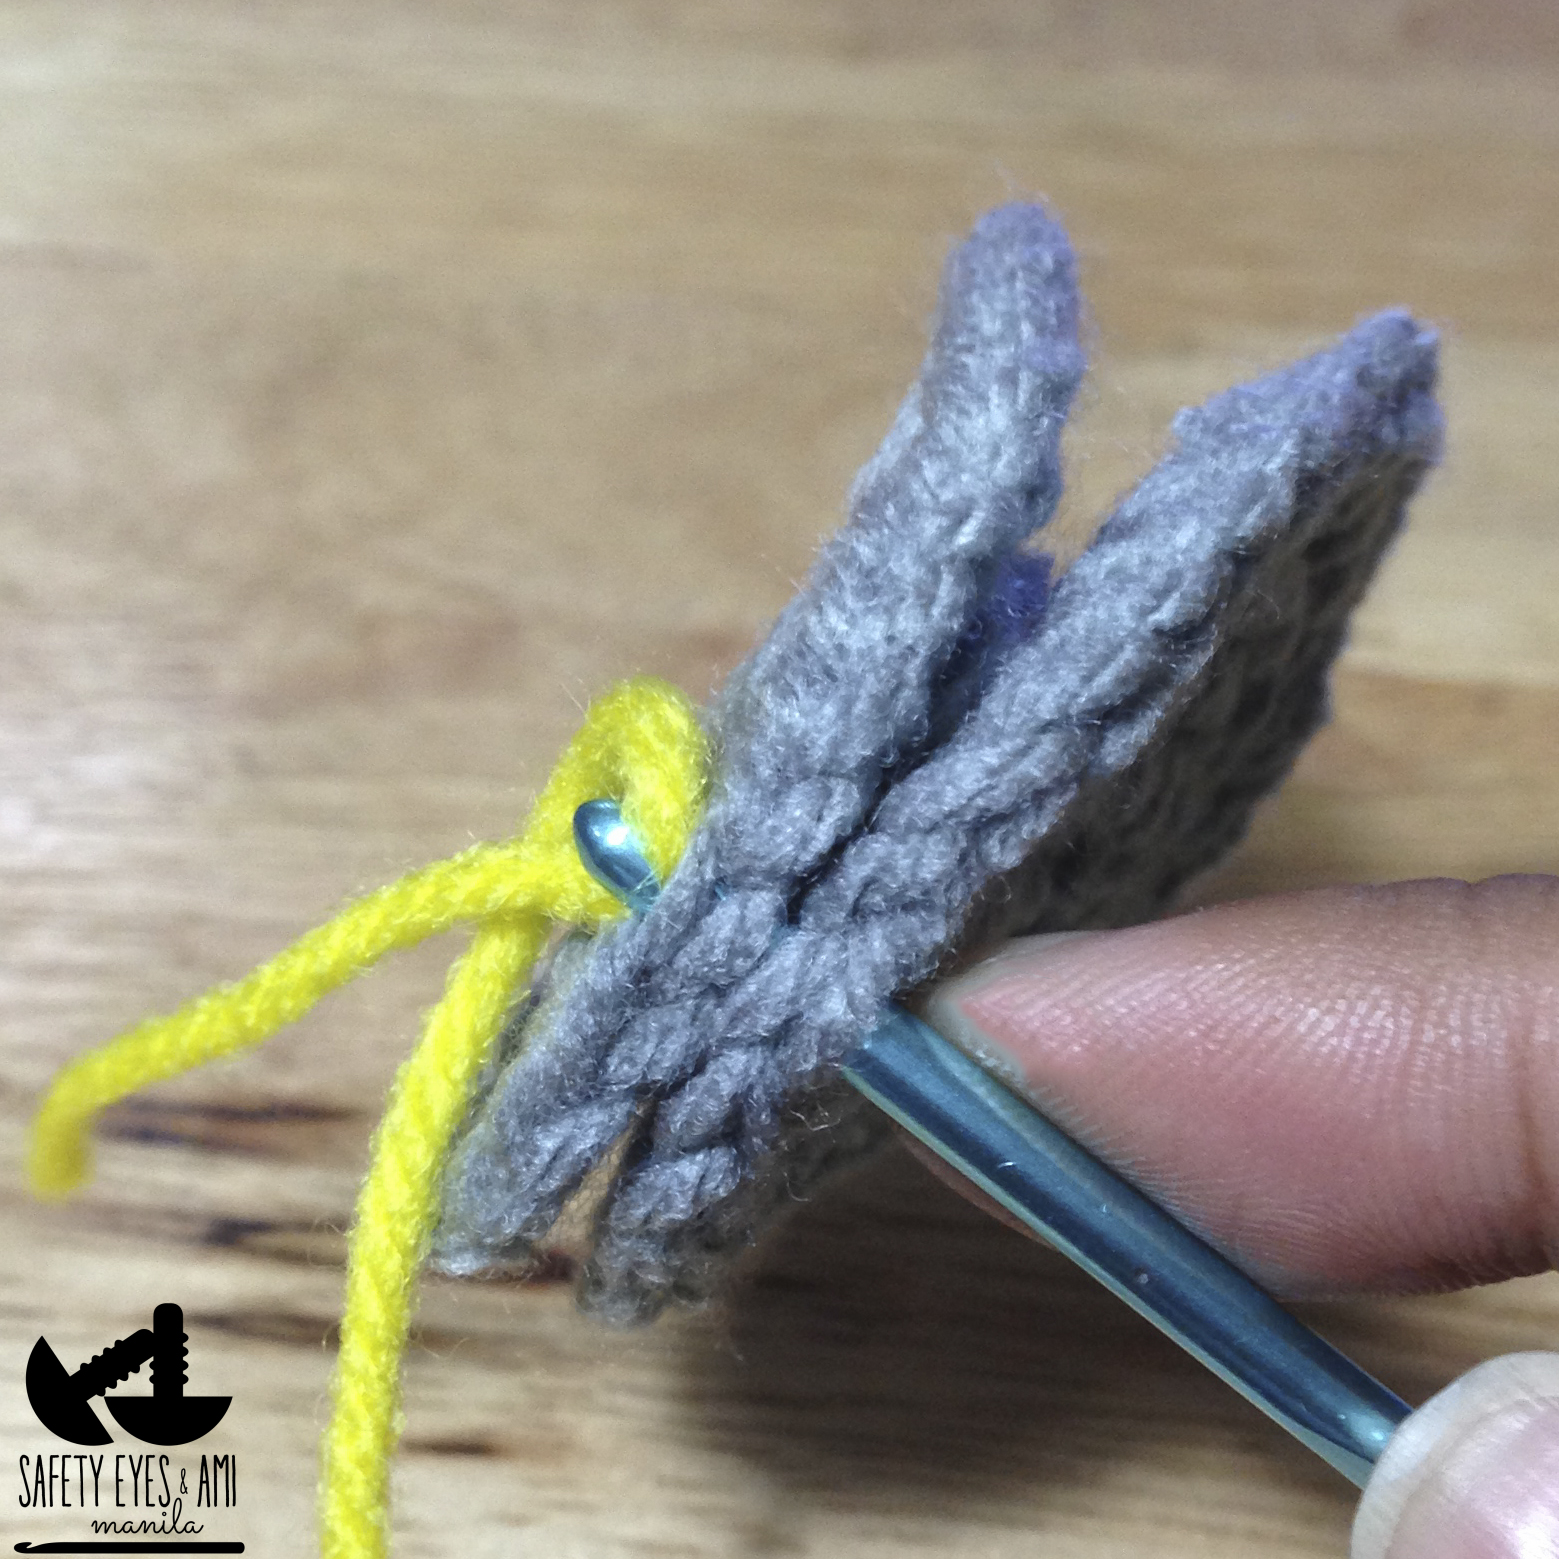
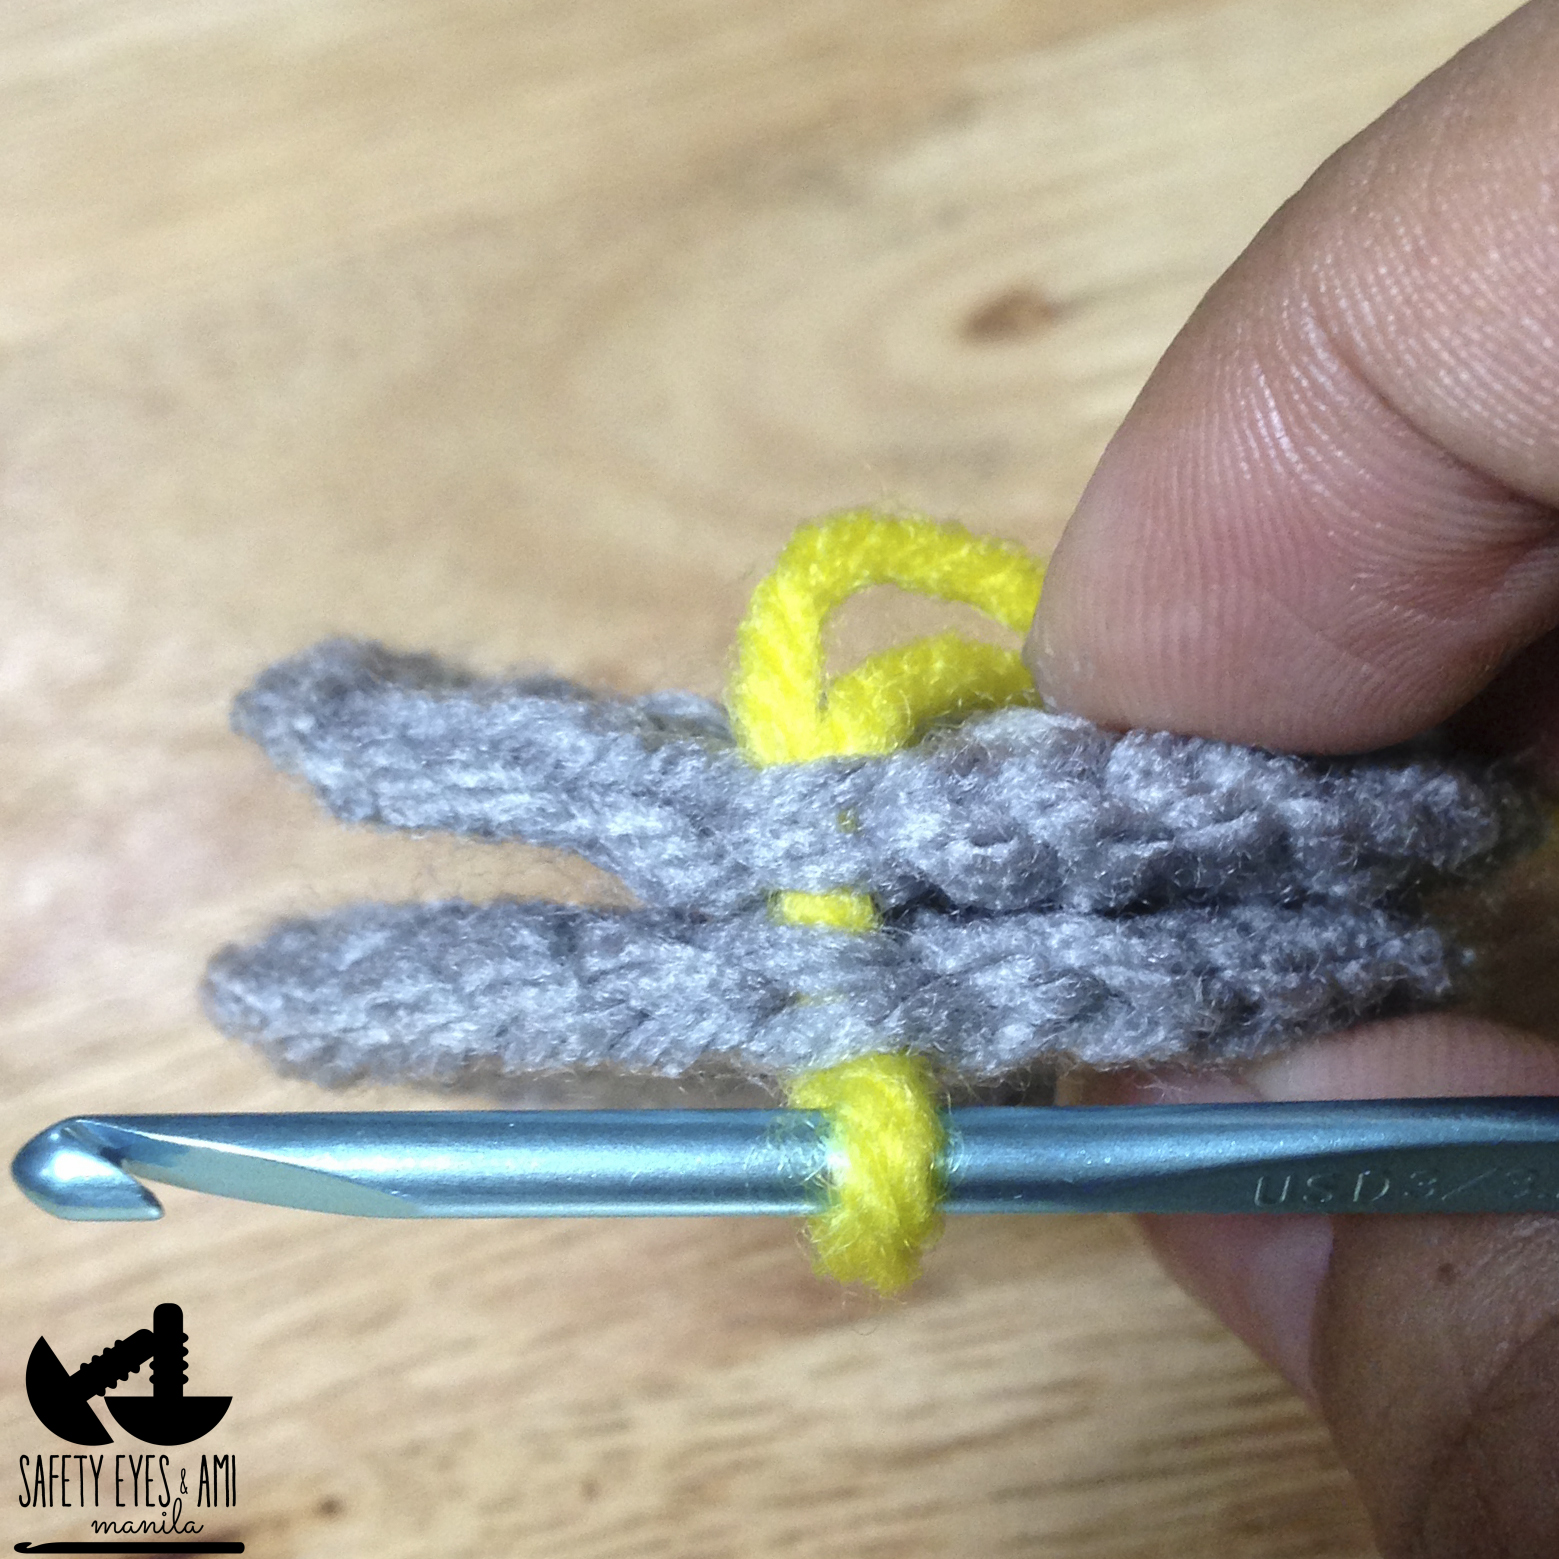
First, take the center of the heels and pull your yarn under all 4 loops - that's 2 from each sole. You'll have 1 loop on your hook. Then, insert your hook under the next set of loops, pick up the yarn and pull through the loop to make your 1st stitch. Insert your hook under the next set of loops making sure you get under all 4 loops, pick up the yarn and pull through. Keep doing this going around the sole. The stitches facing you should look like chains. The side facing away from you will be the bottom of the boots and they'll have running stitches.
You can tuck the tail in before you end this row. You'll finish and close this row much like you did with the soles. You should have 36 chains total. Again, don't worry too much if it gets messy in the end as long as you have 36 chains.
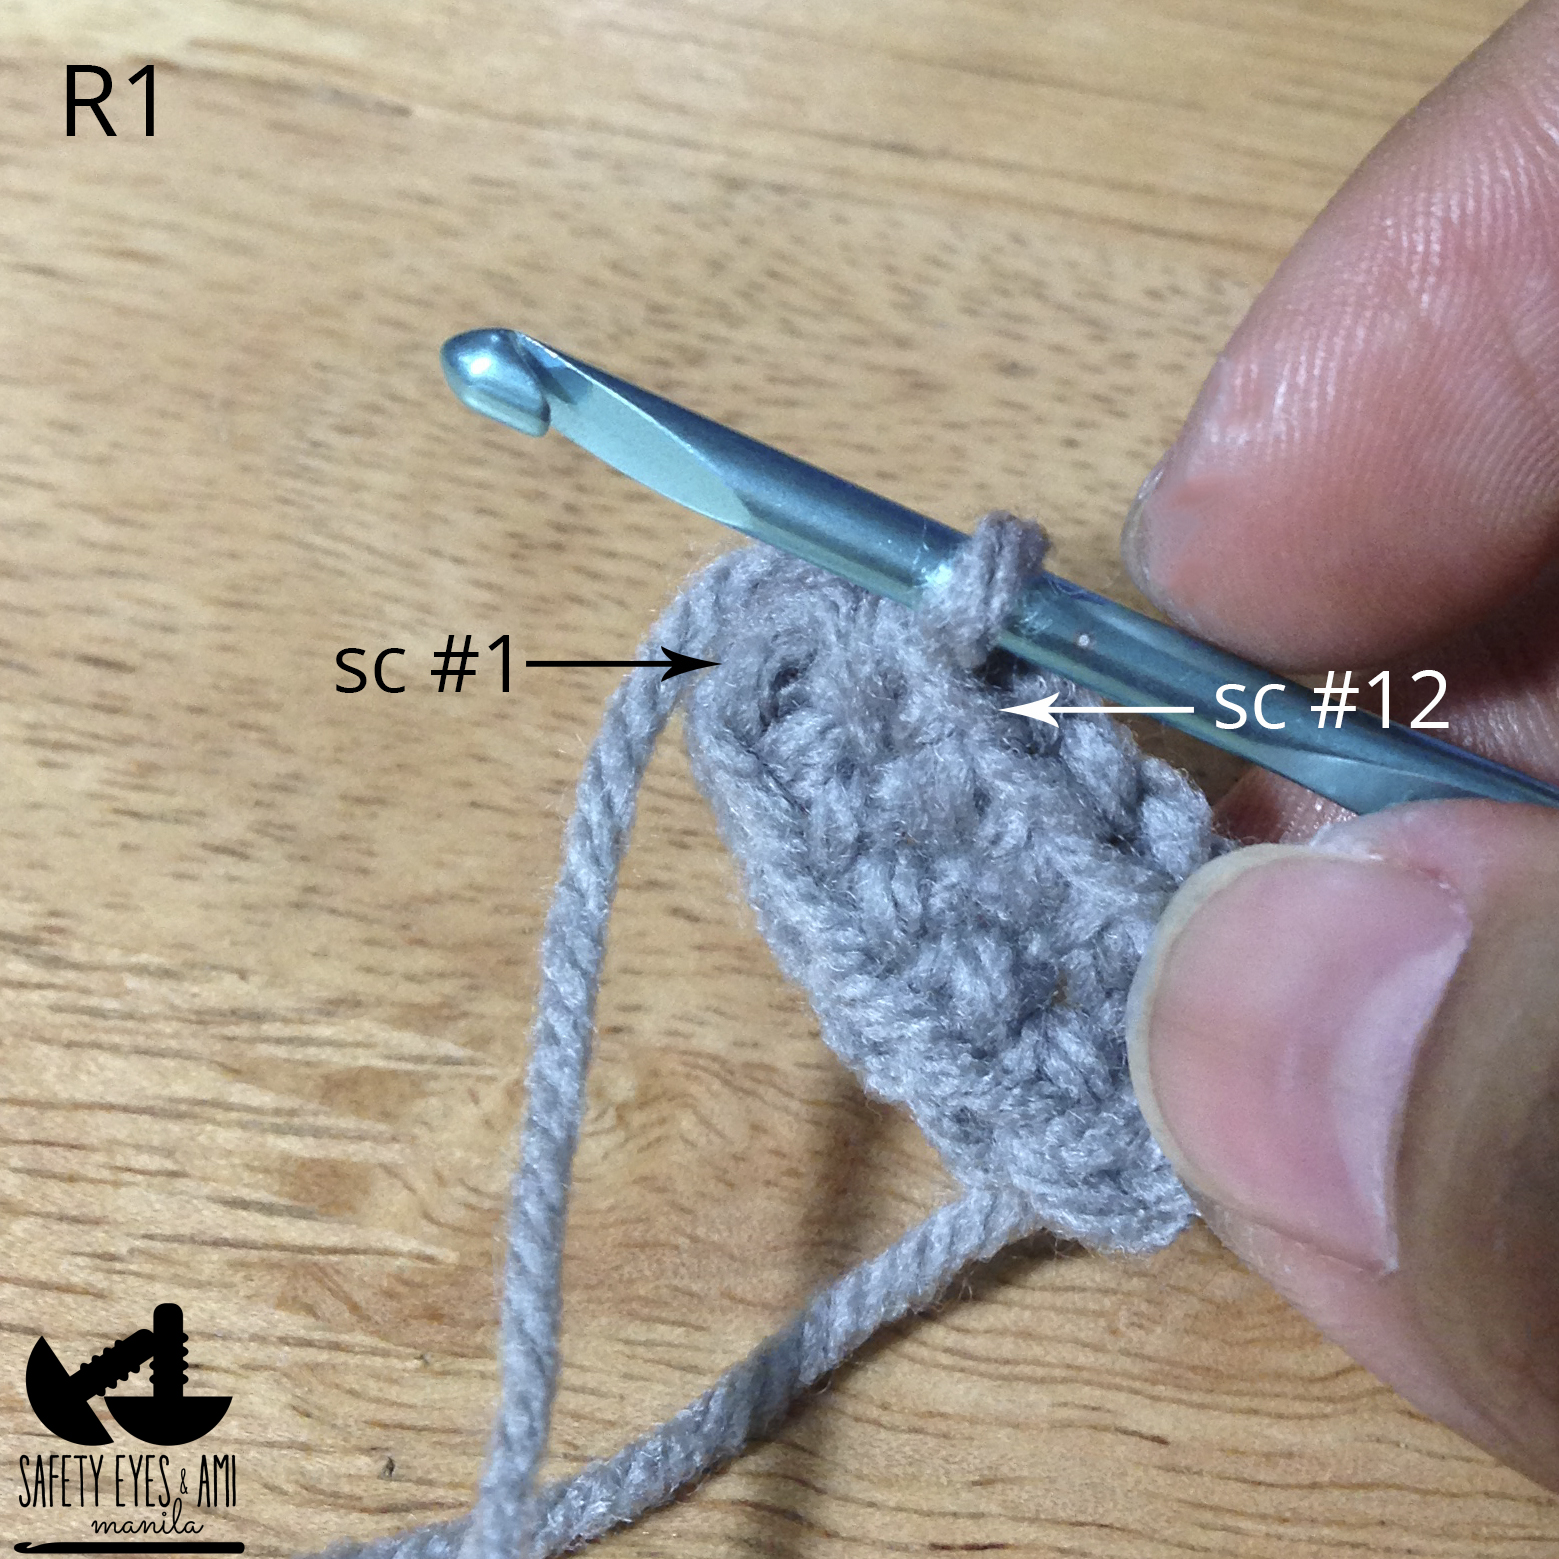
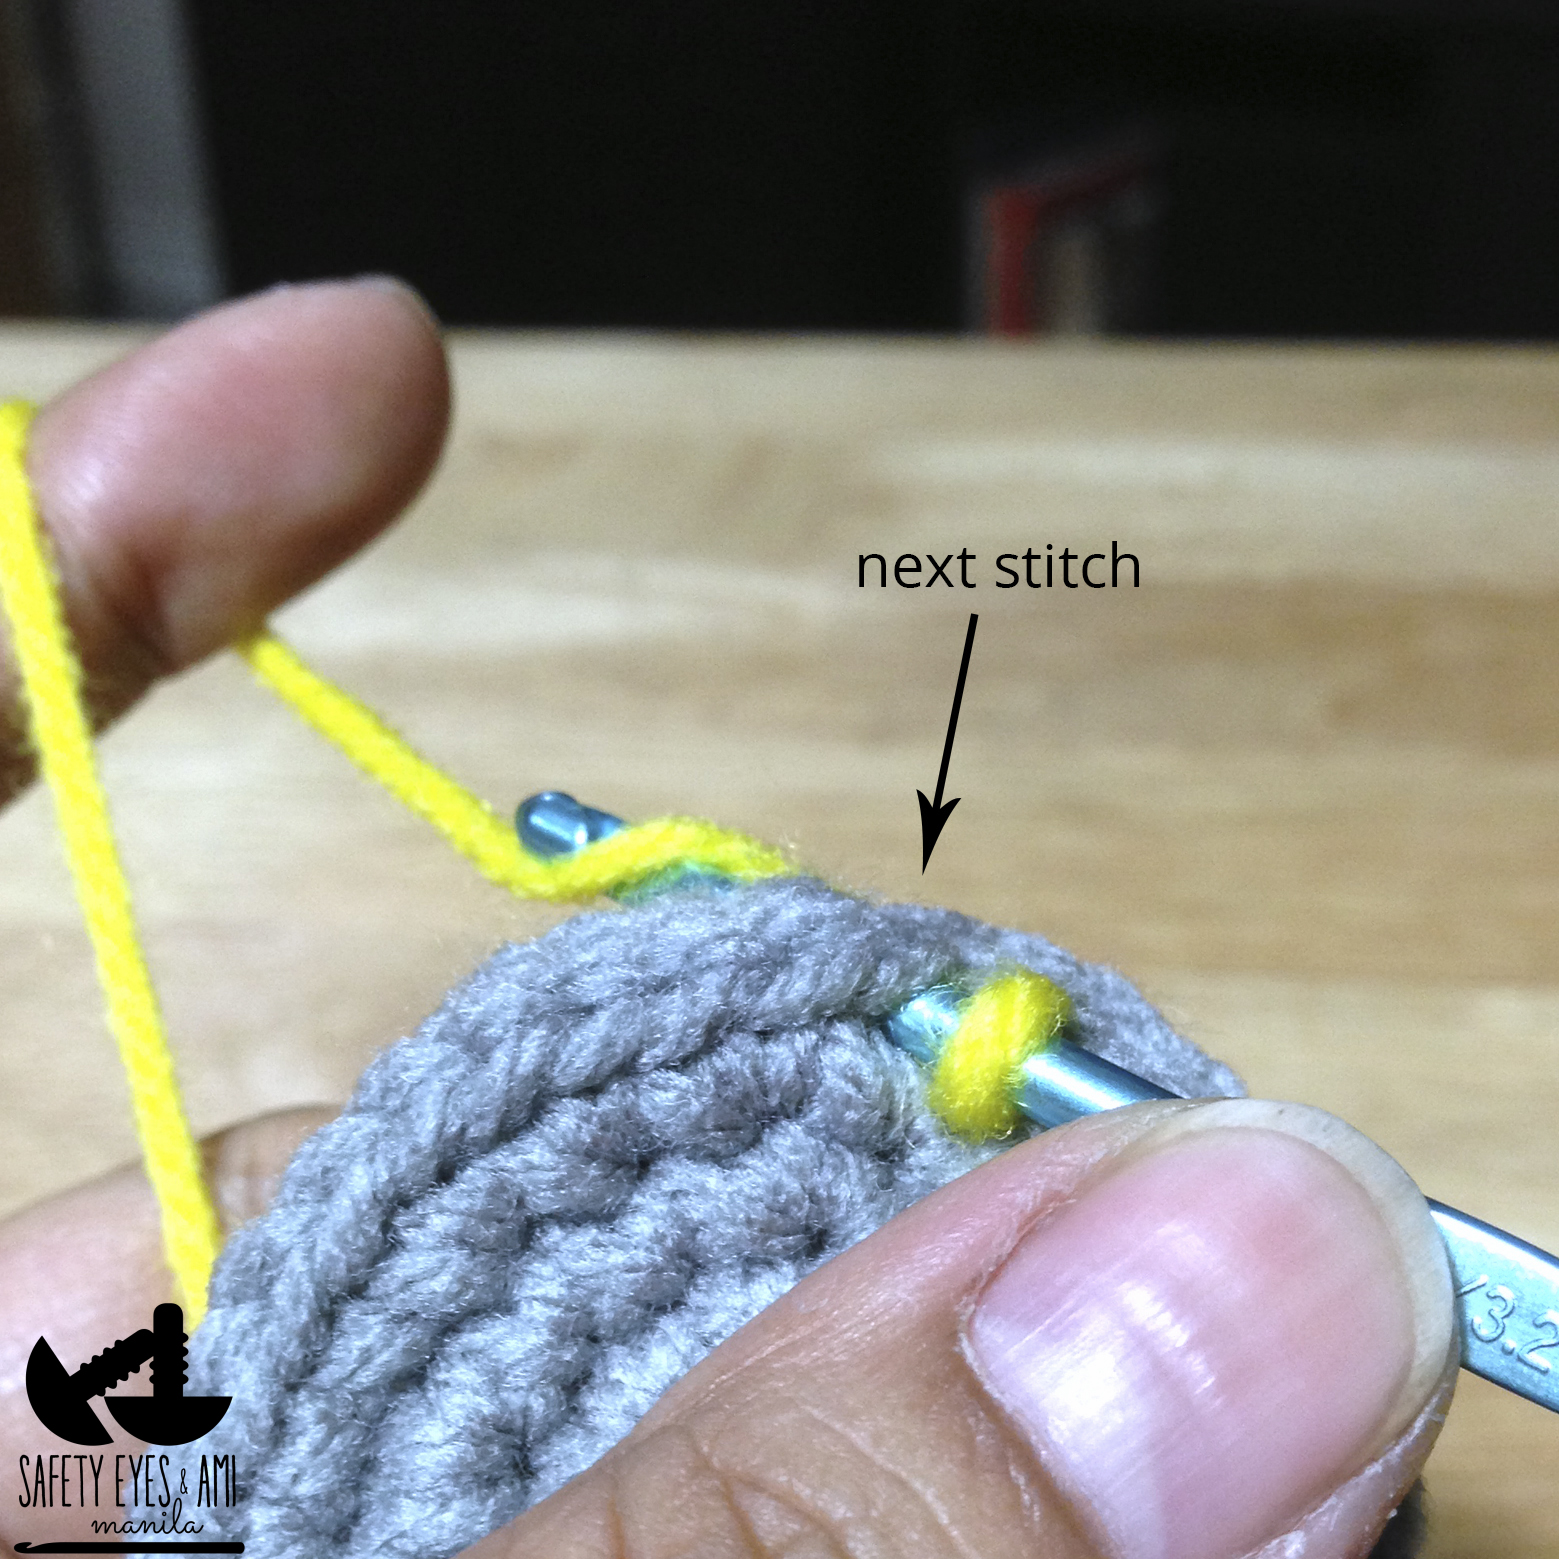
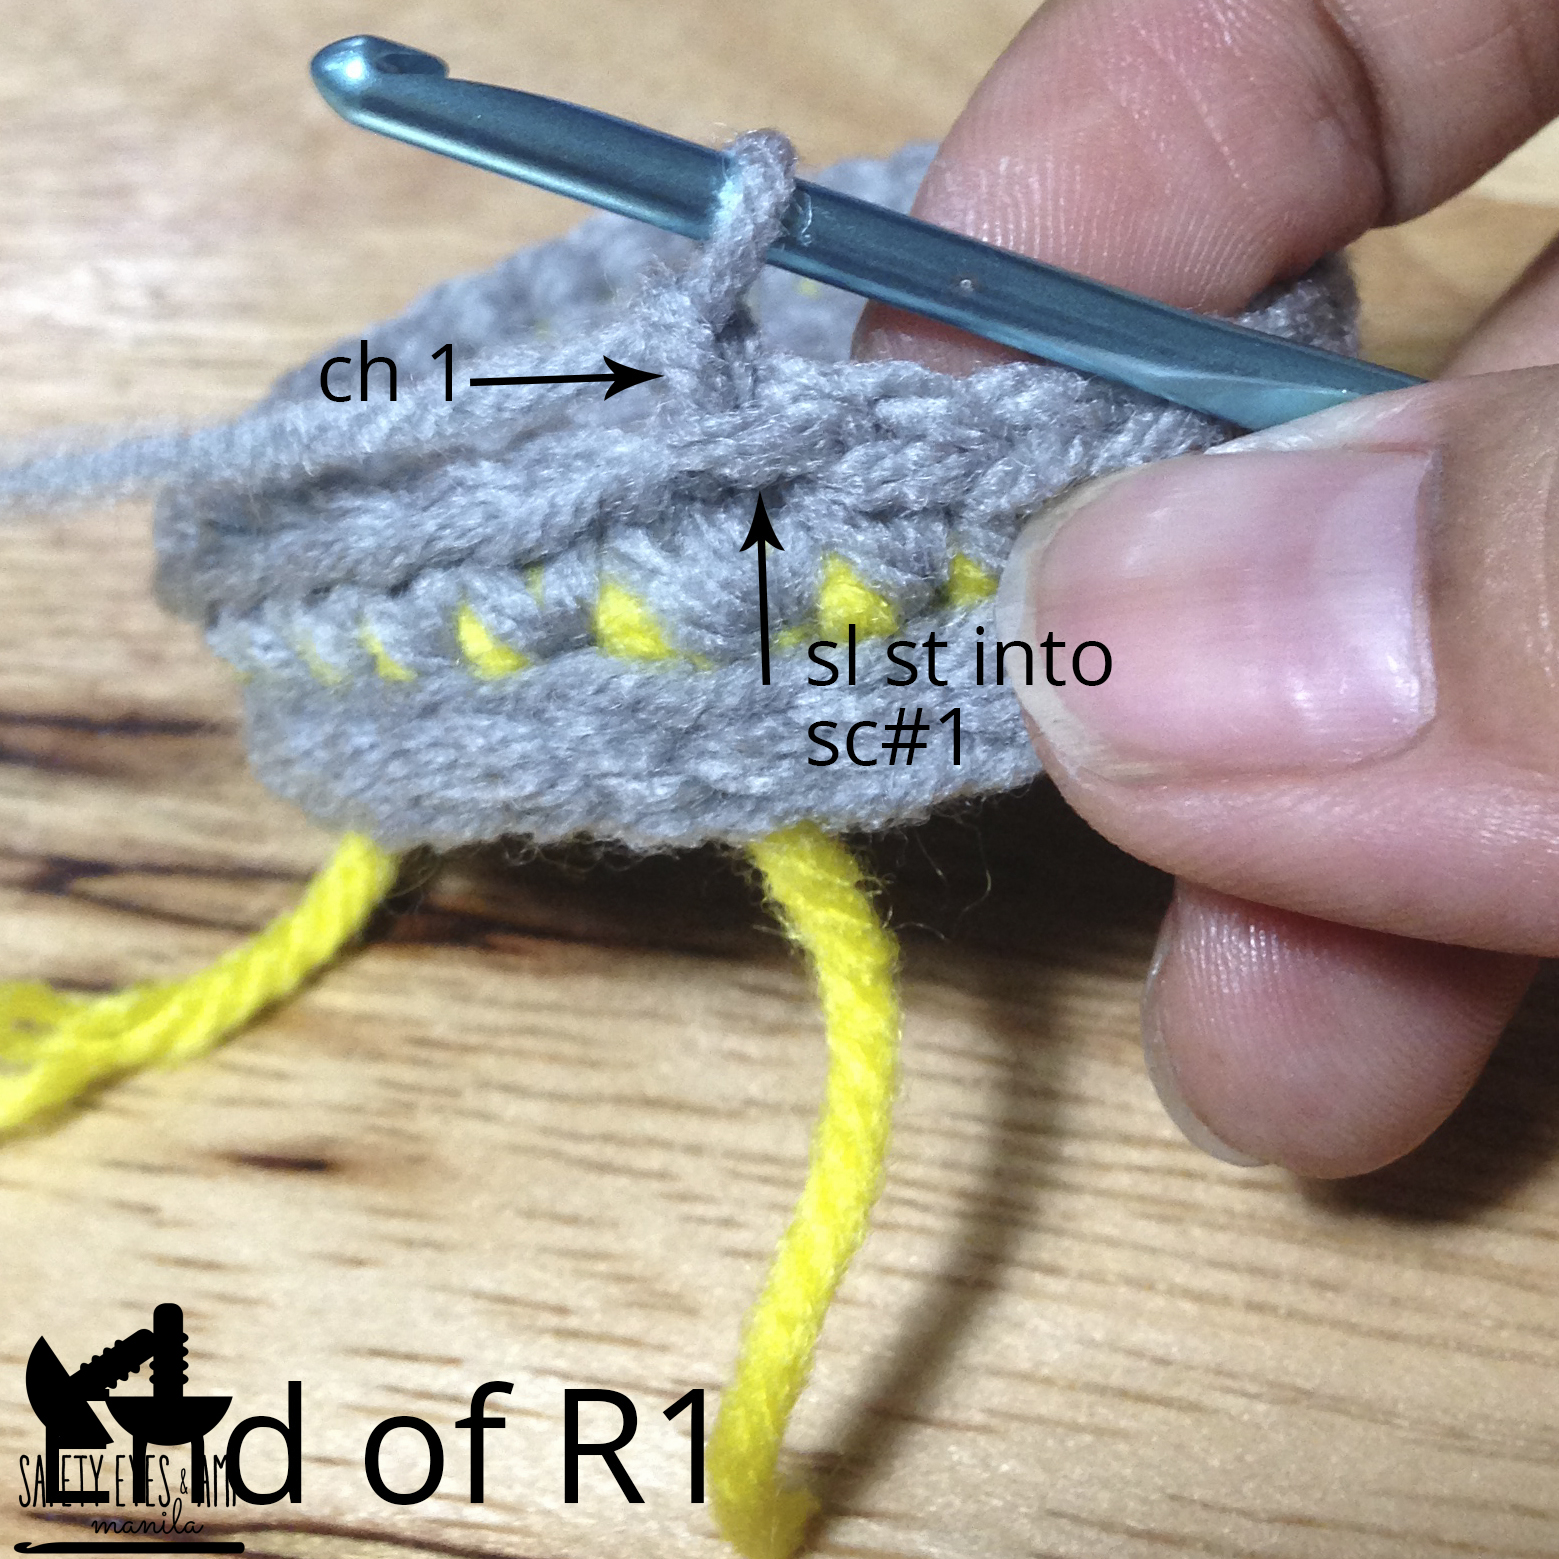
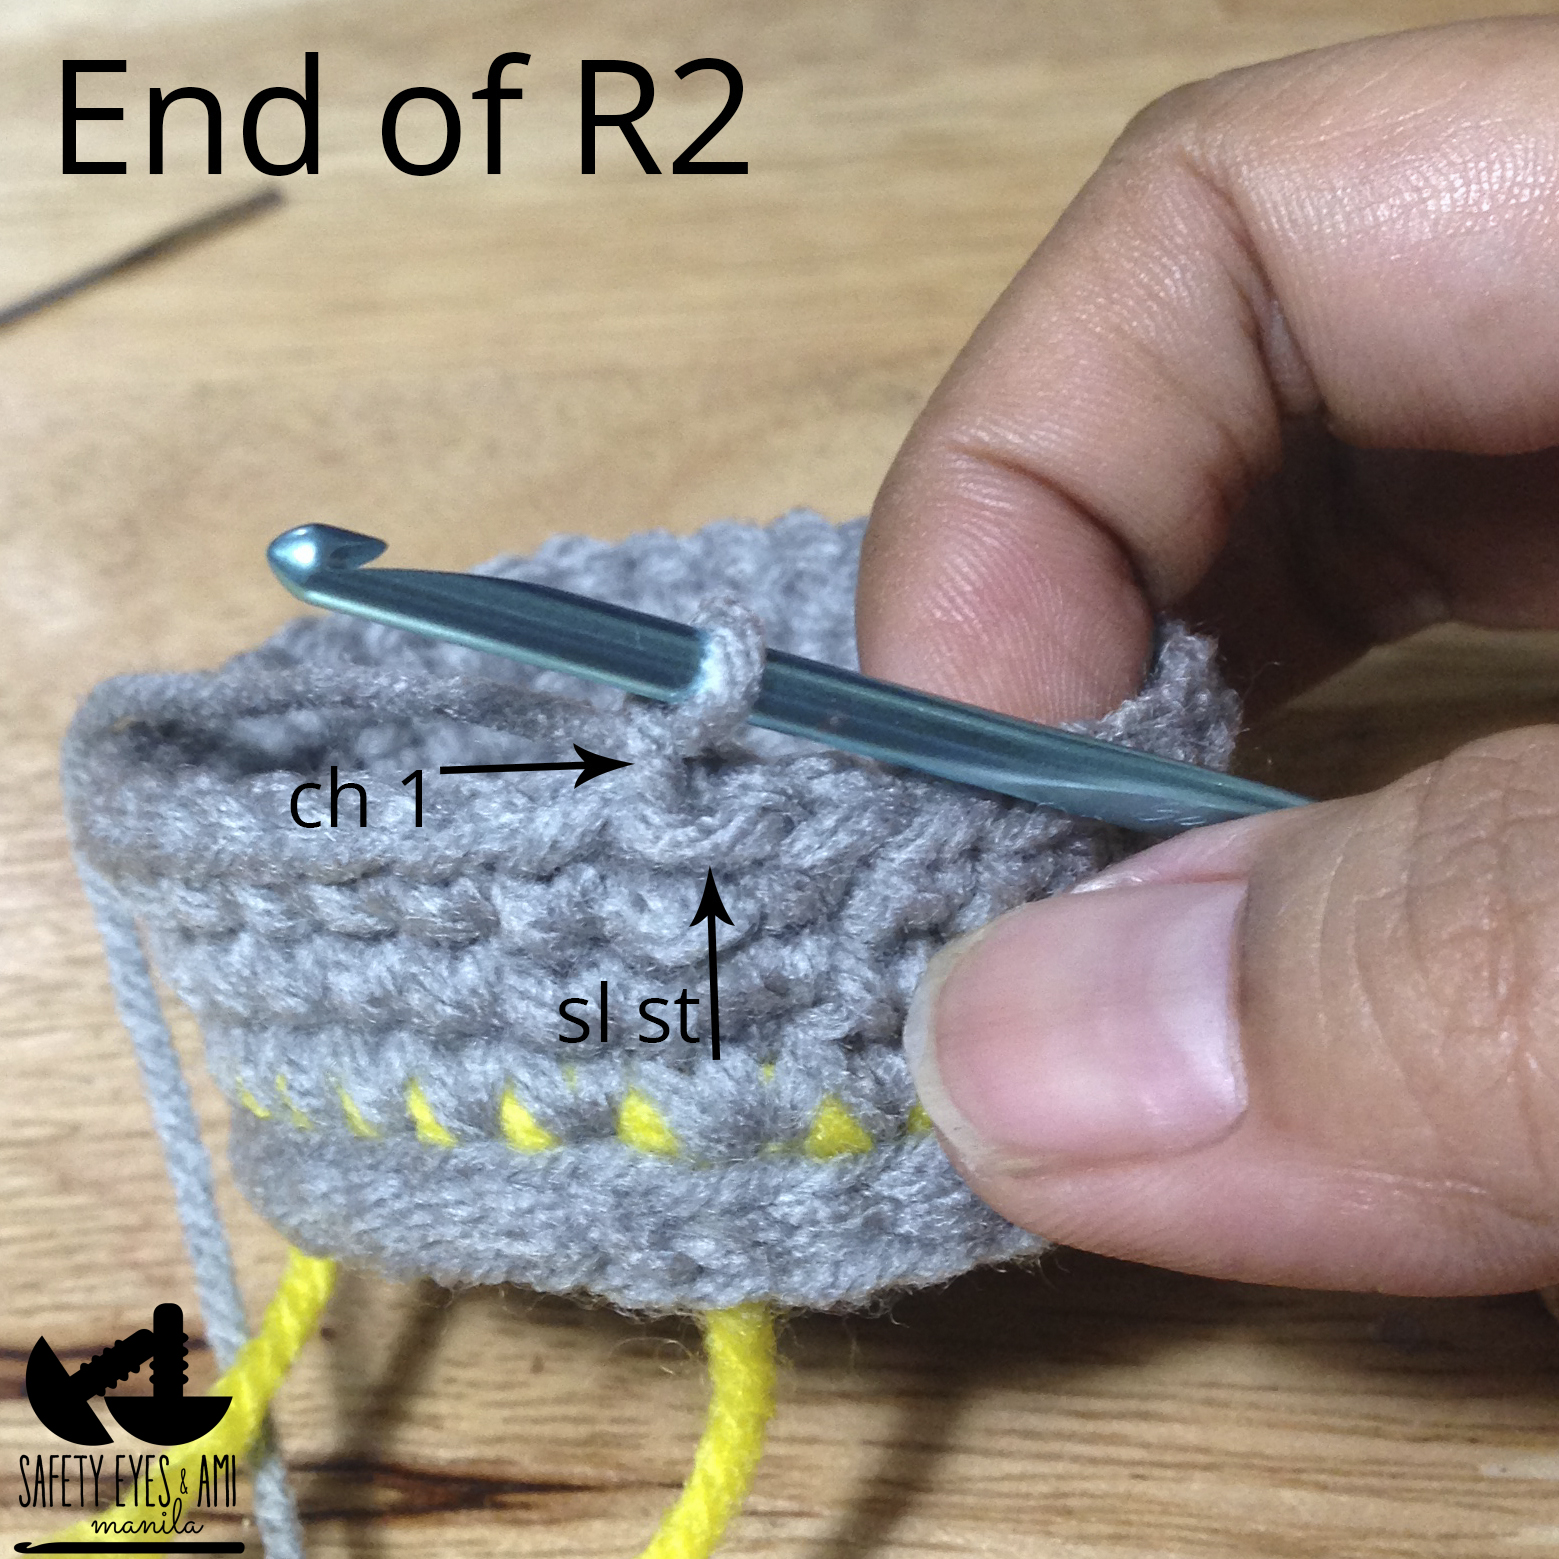
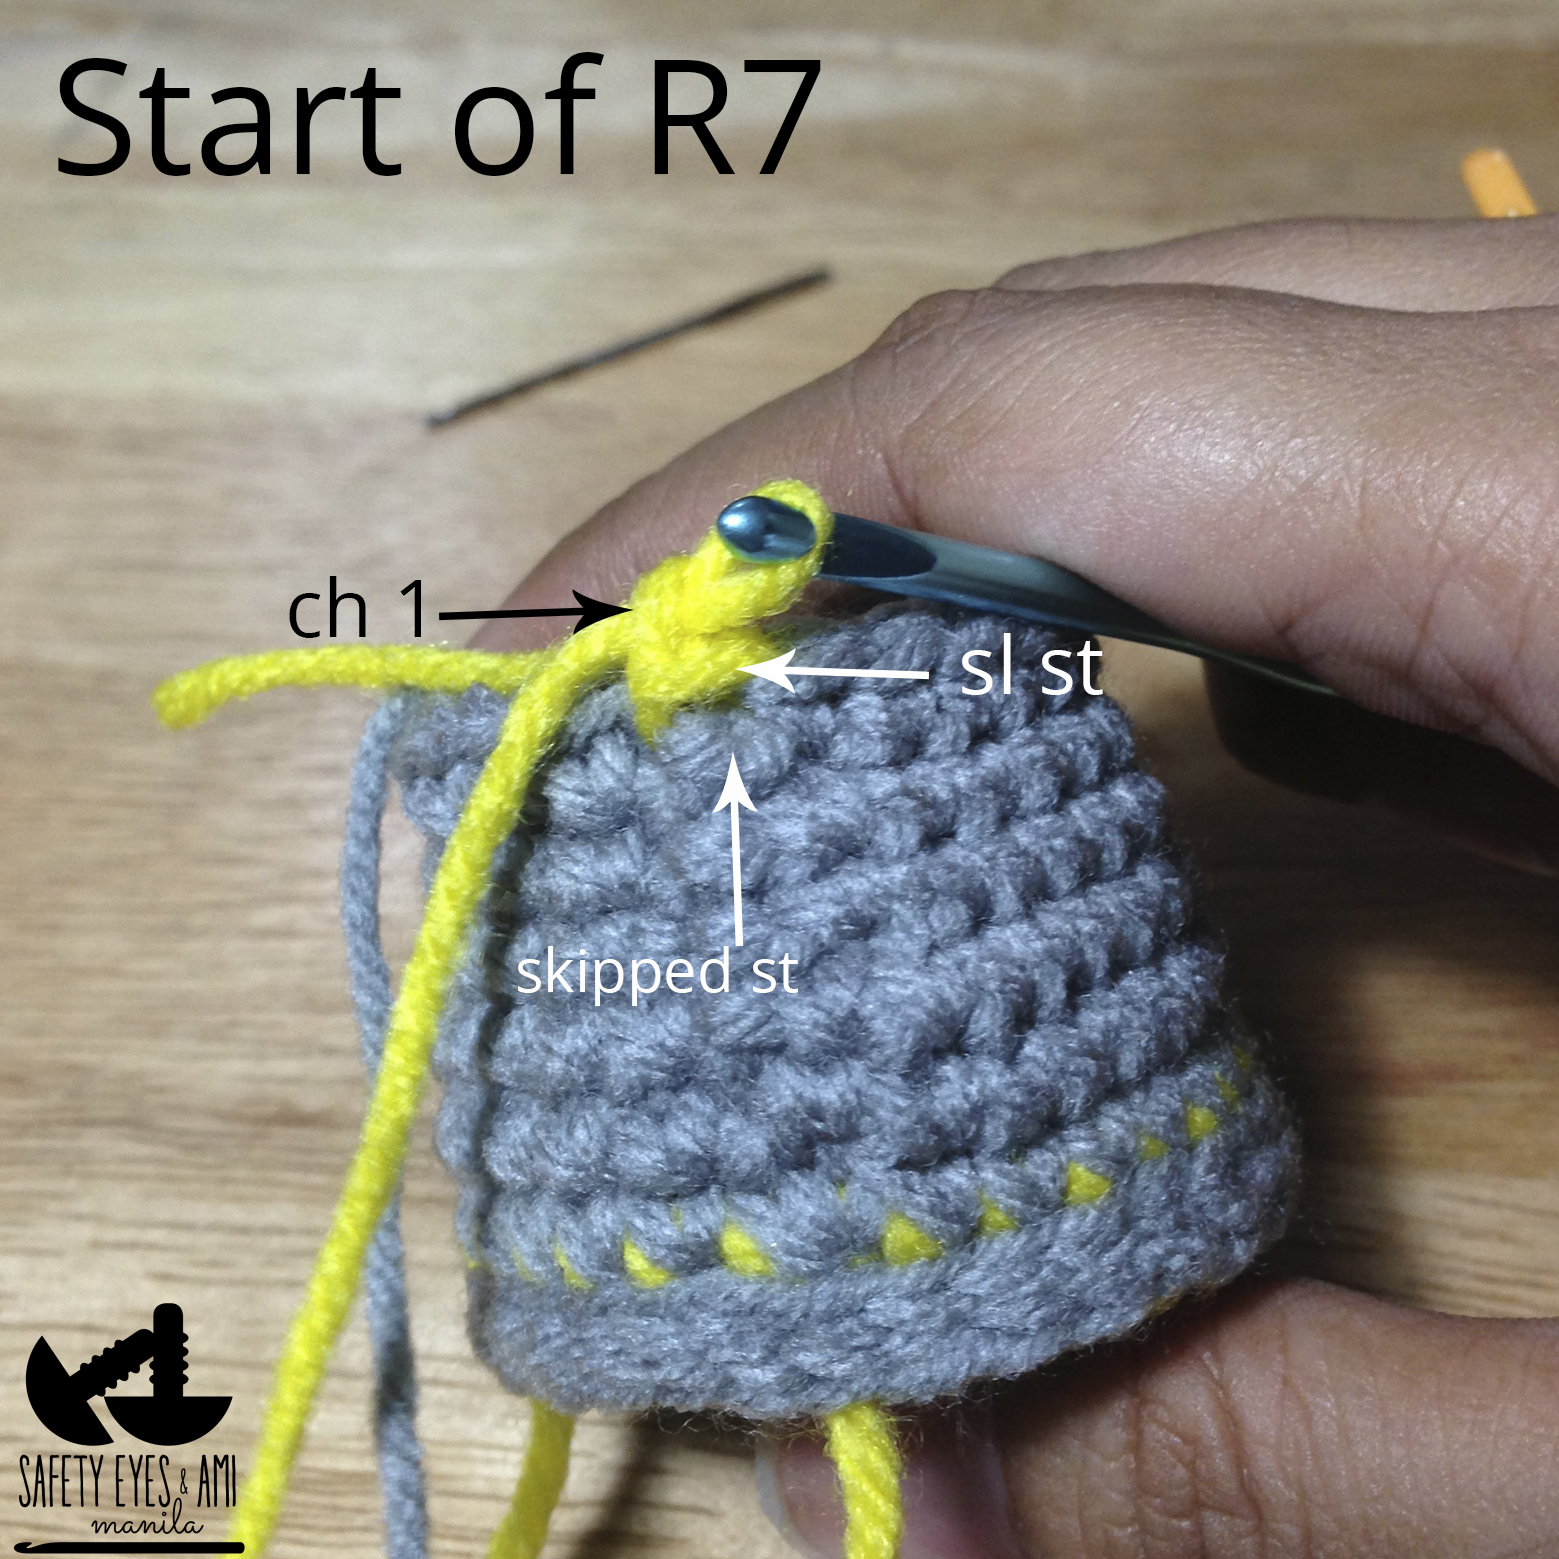
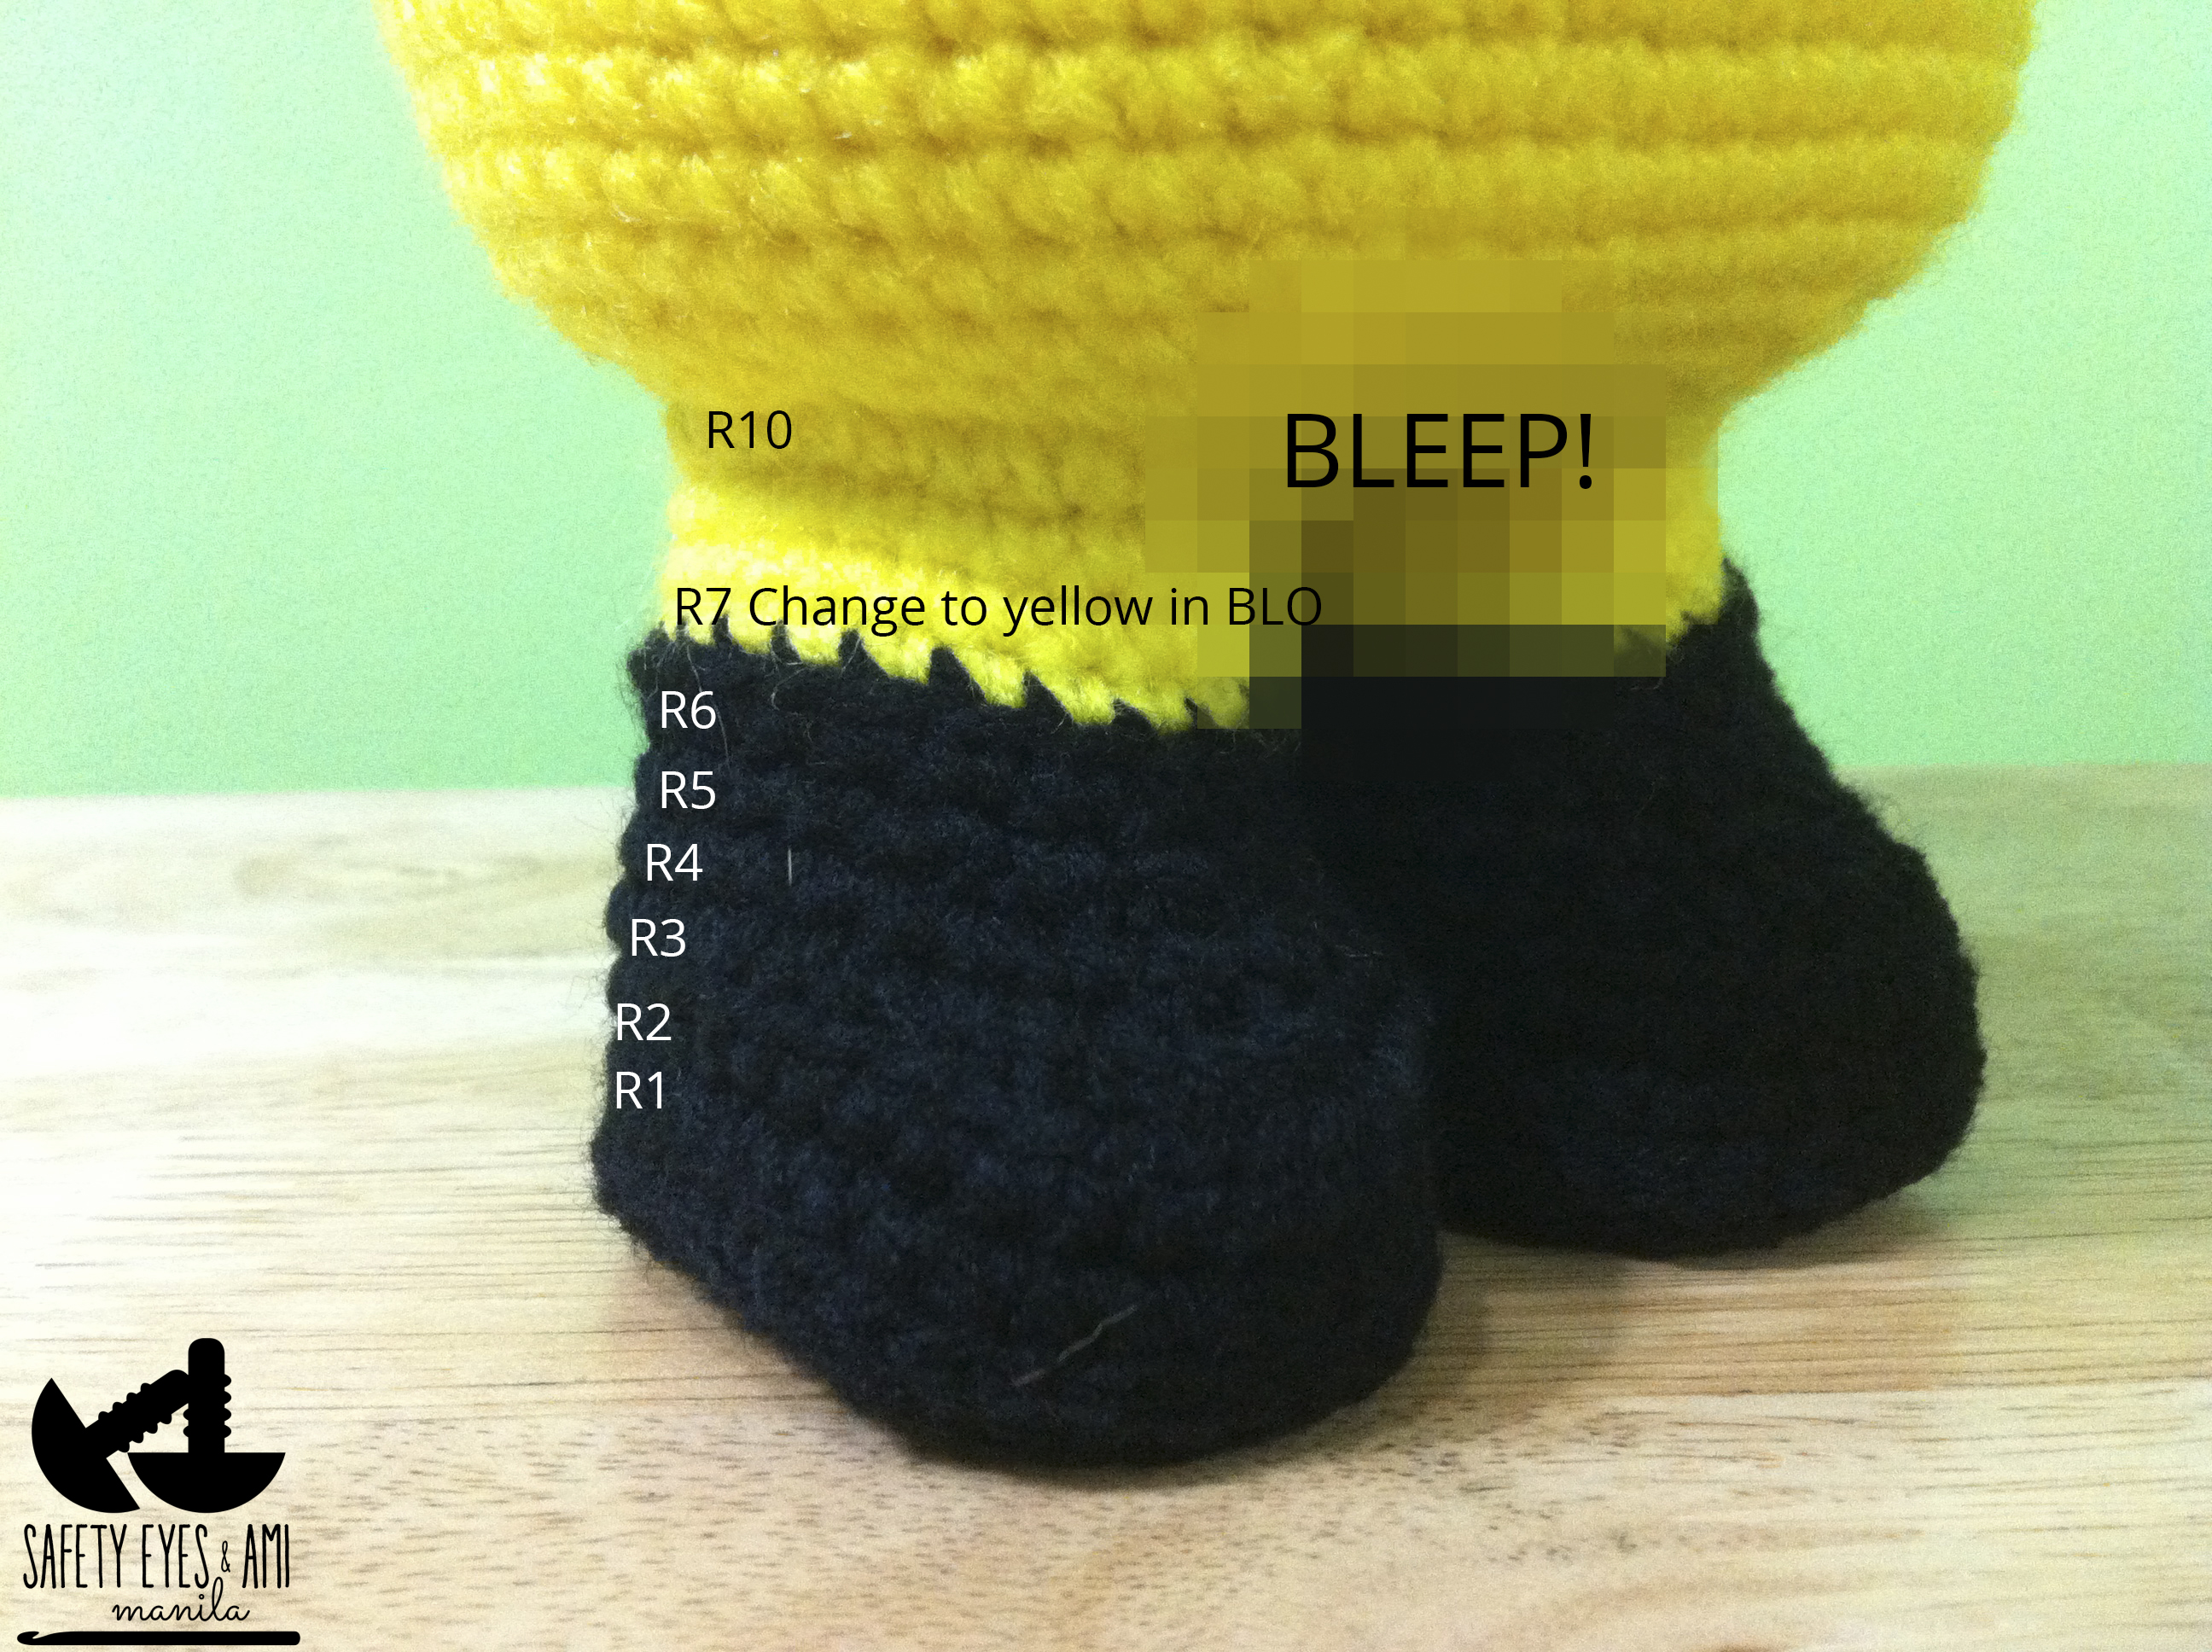
Let's go back to grey yarn to make the rest of the boot. Again, starting at the center of the heel, insert your hook under the 2 loops of the chain, pick up the grey yarn and pull through the chain. You'll have 1 loop on your hook. Yarn over, pull through the loop, insert your hook into the same (center) chain, yarn over, pull though. You'll have 2 loops on your hook. Yarn over and pull through 2 loops to make your 1st sc. Then sc all around. This is R1. End with a sl st into sc #1. Ch 1. Mark the ch1.
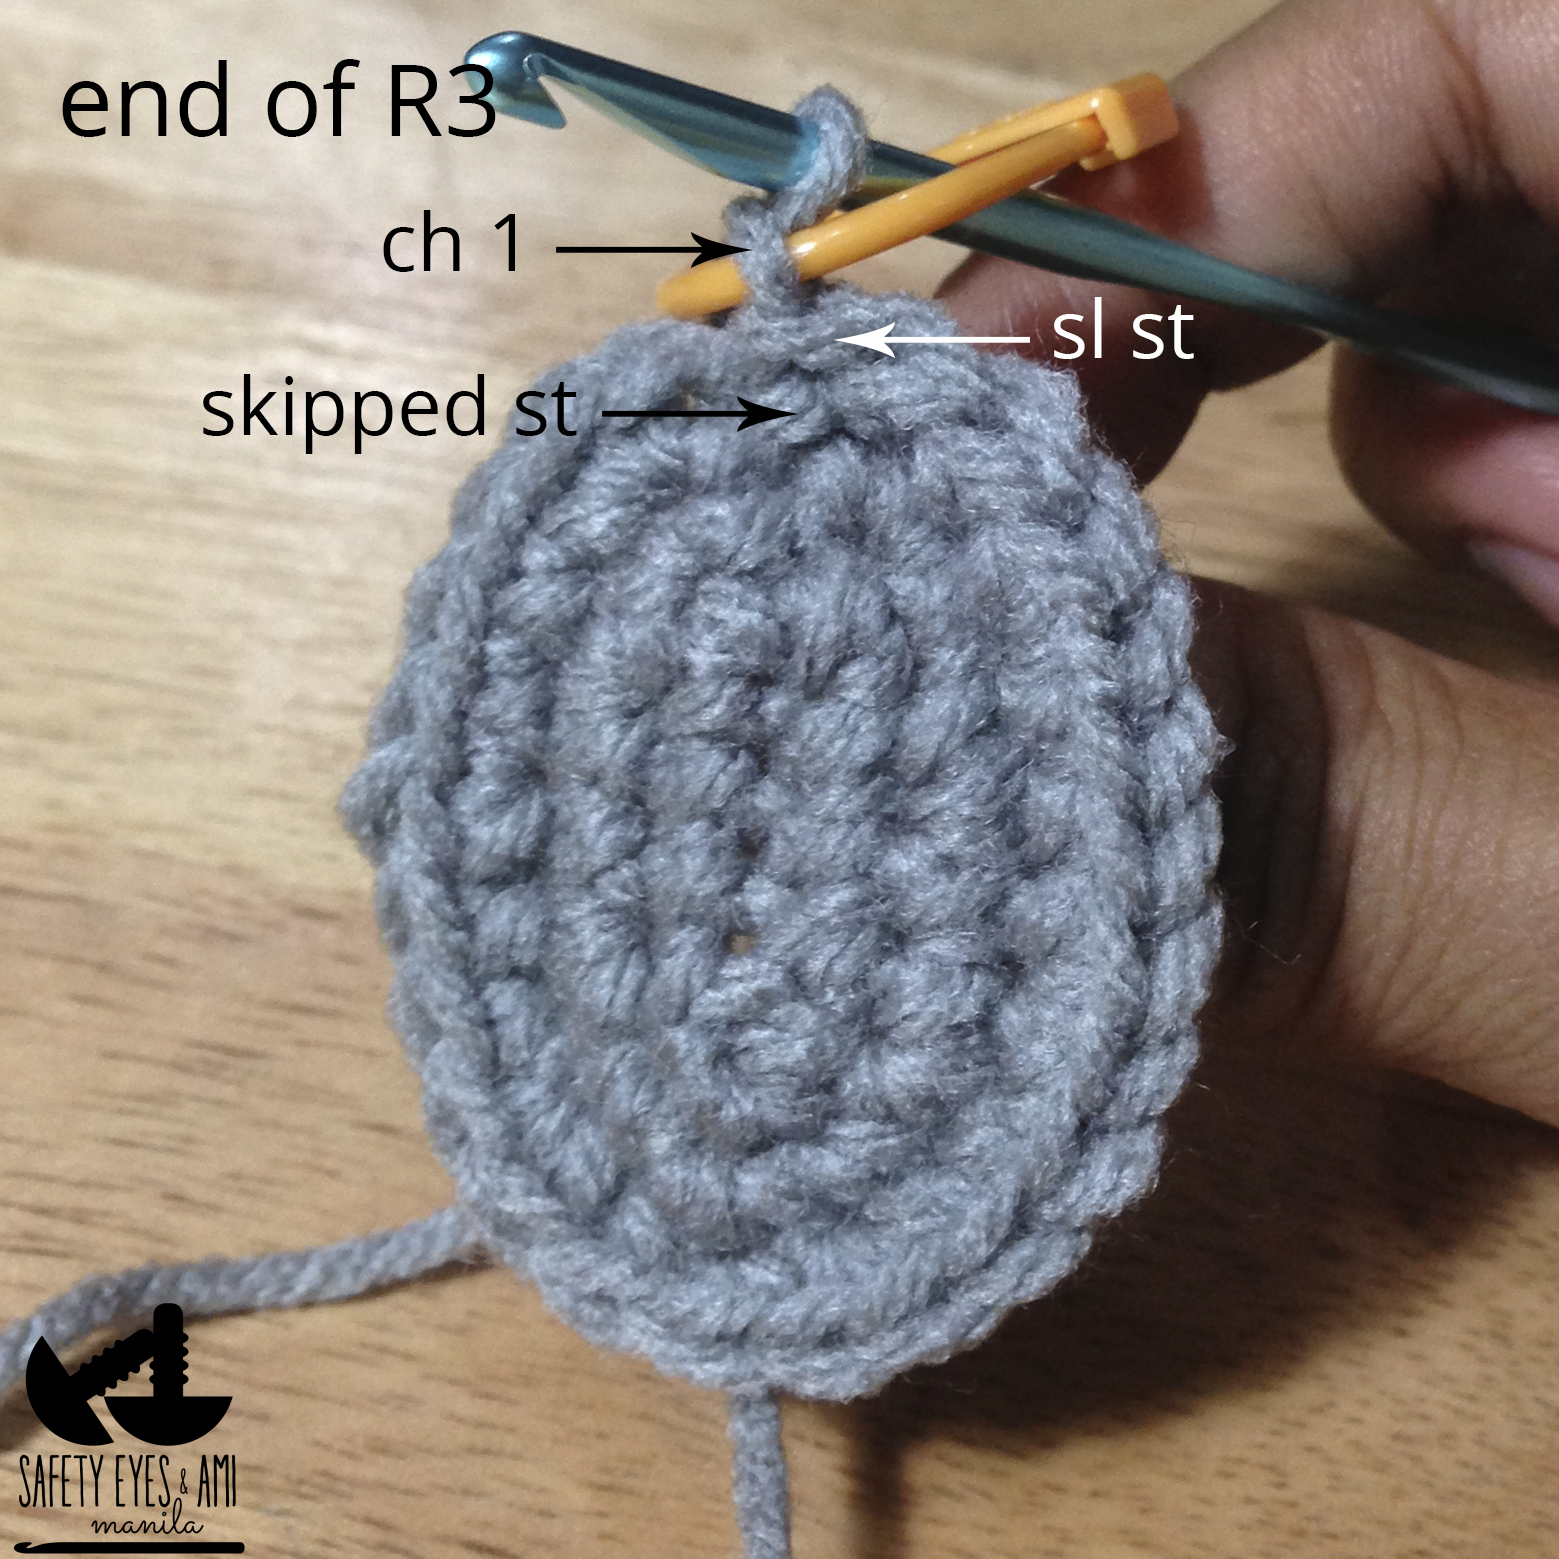
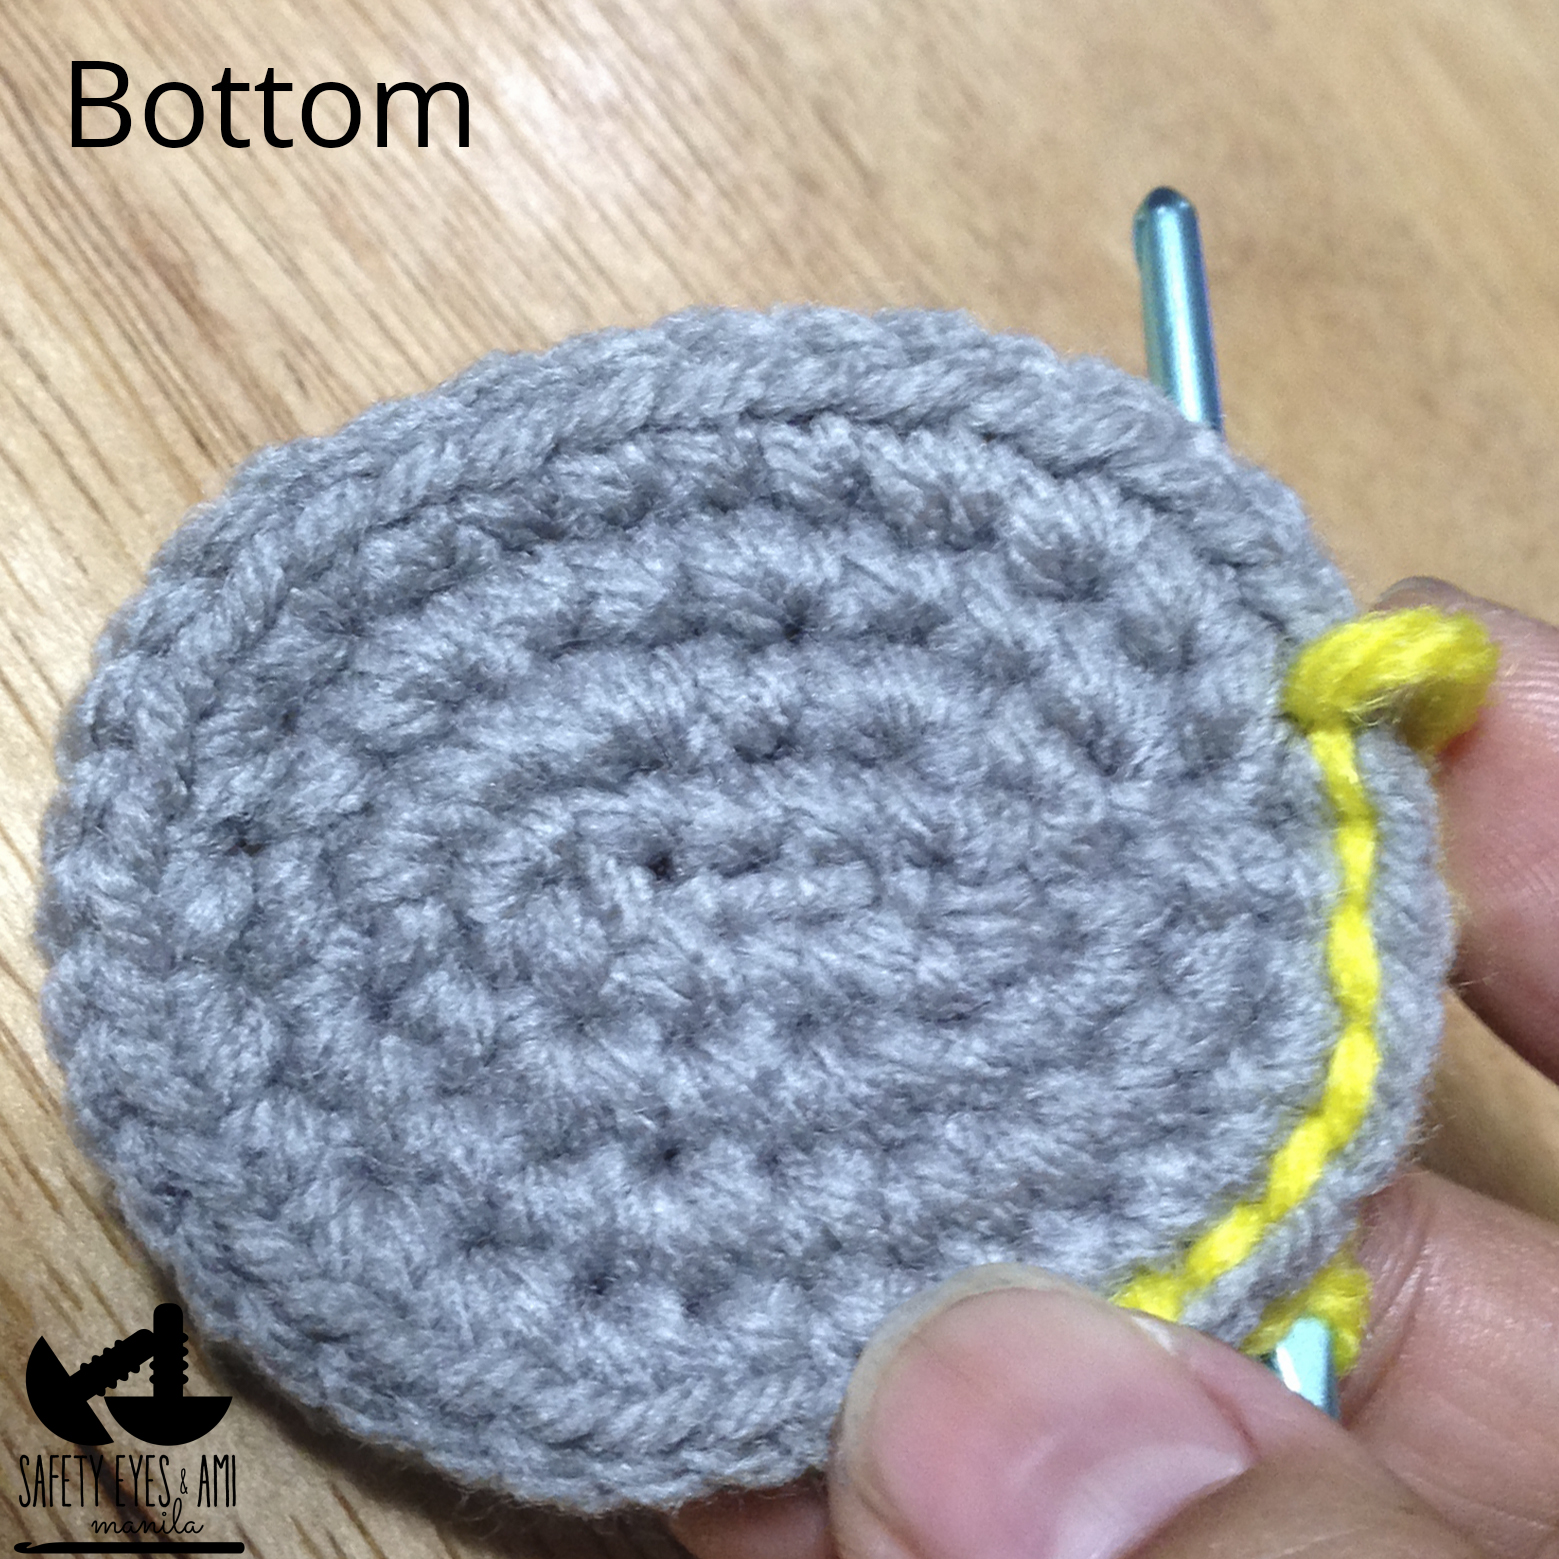
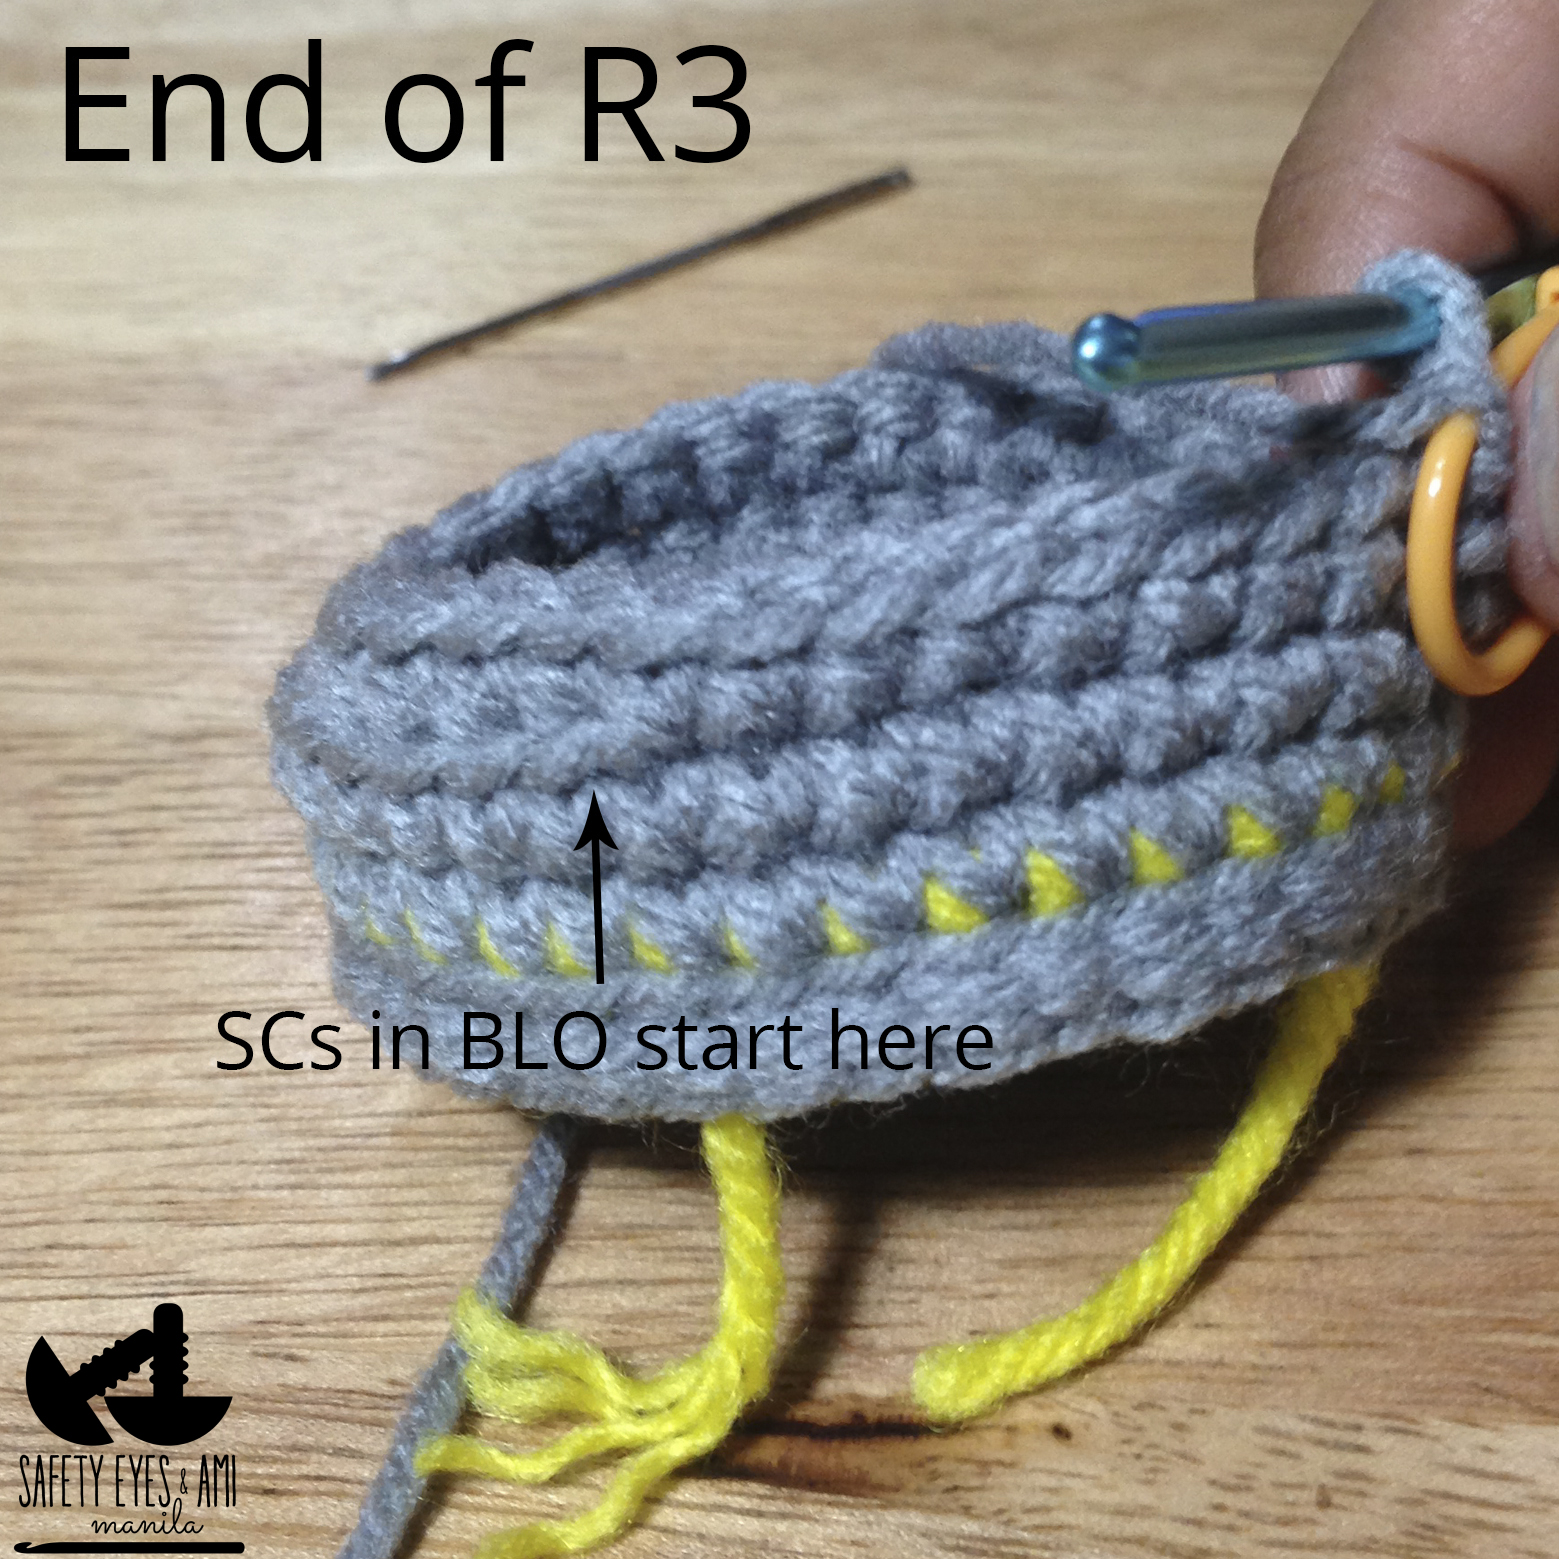
R2 sc around (36) skip last st, sl st into ch1 of previous round and ch1.R3 sc 8, [sc 6, dec 4x, sc 6] in BLO (back loop only), sc 8 (32) skip last st, sl st into ch1 of previous round. Ch1.
R4 dec, sc 12, dec 2x, sc12, dec (28) skip last st, sl st into ch1 of previous round. Ch1. R5 sc 10, dec 4x, sc 10 (24) skip last st, sl st into ch1 of previous round. Ch1.
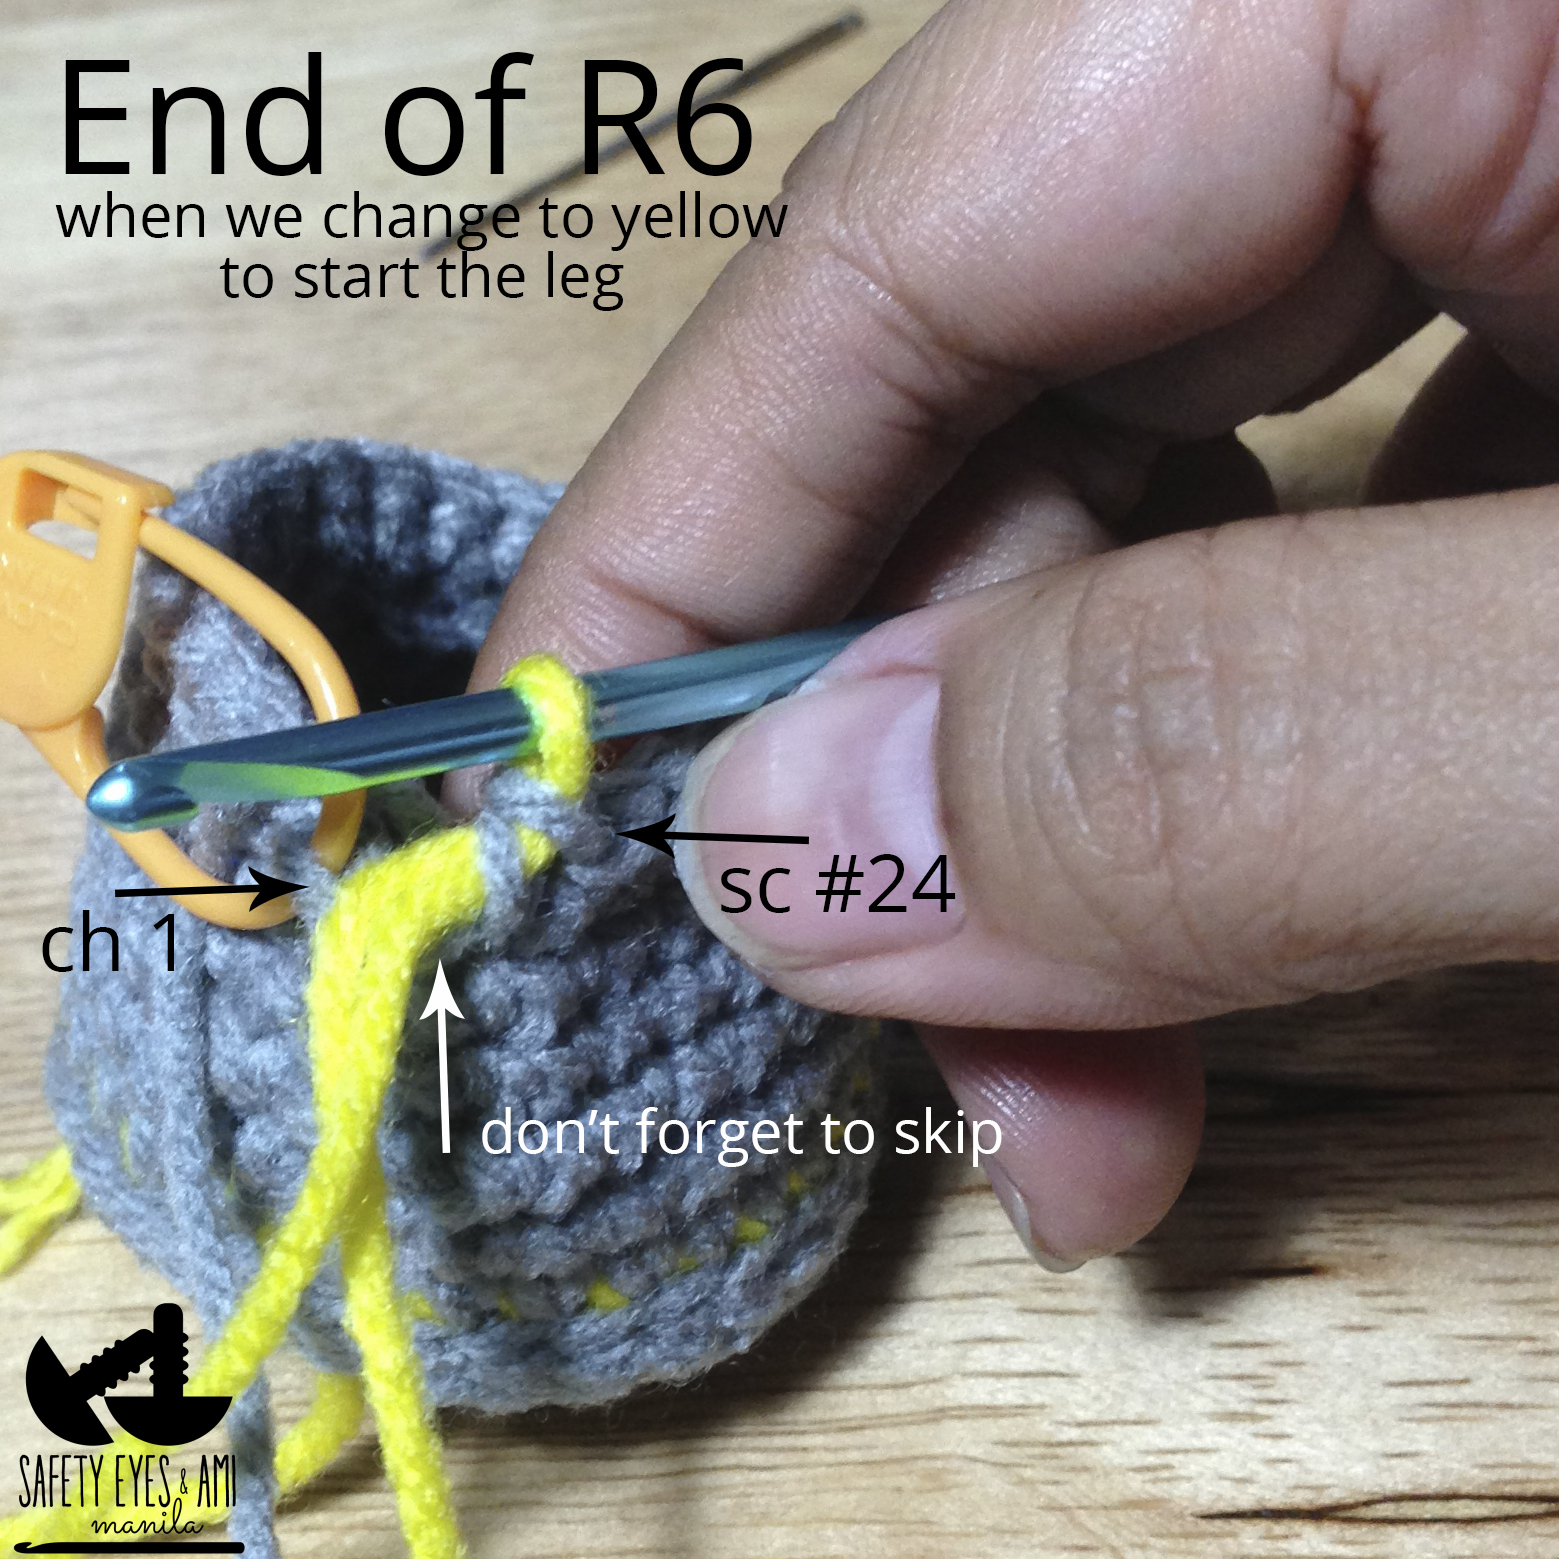
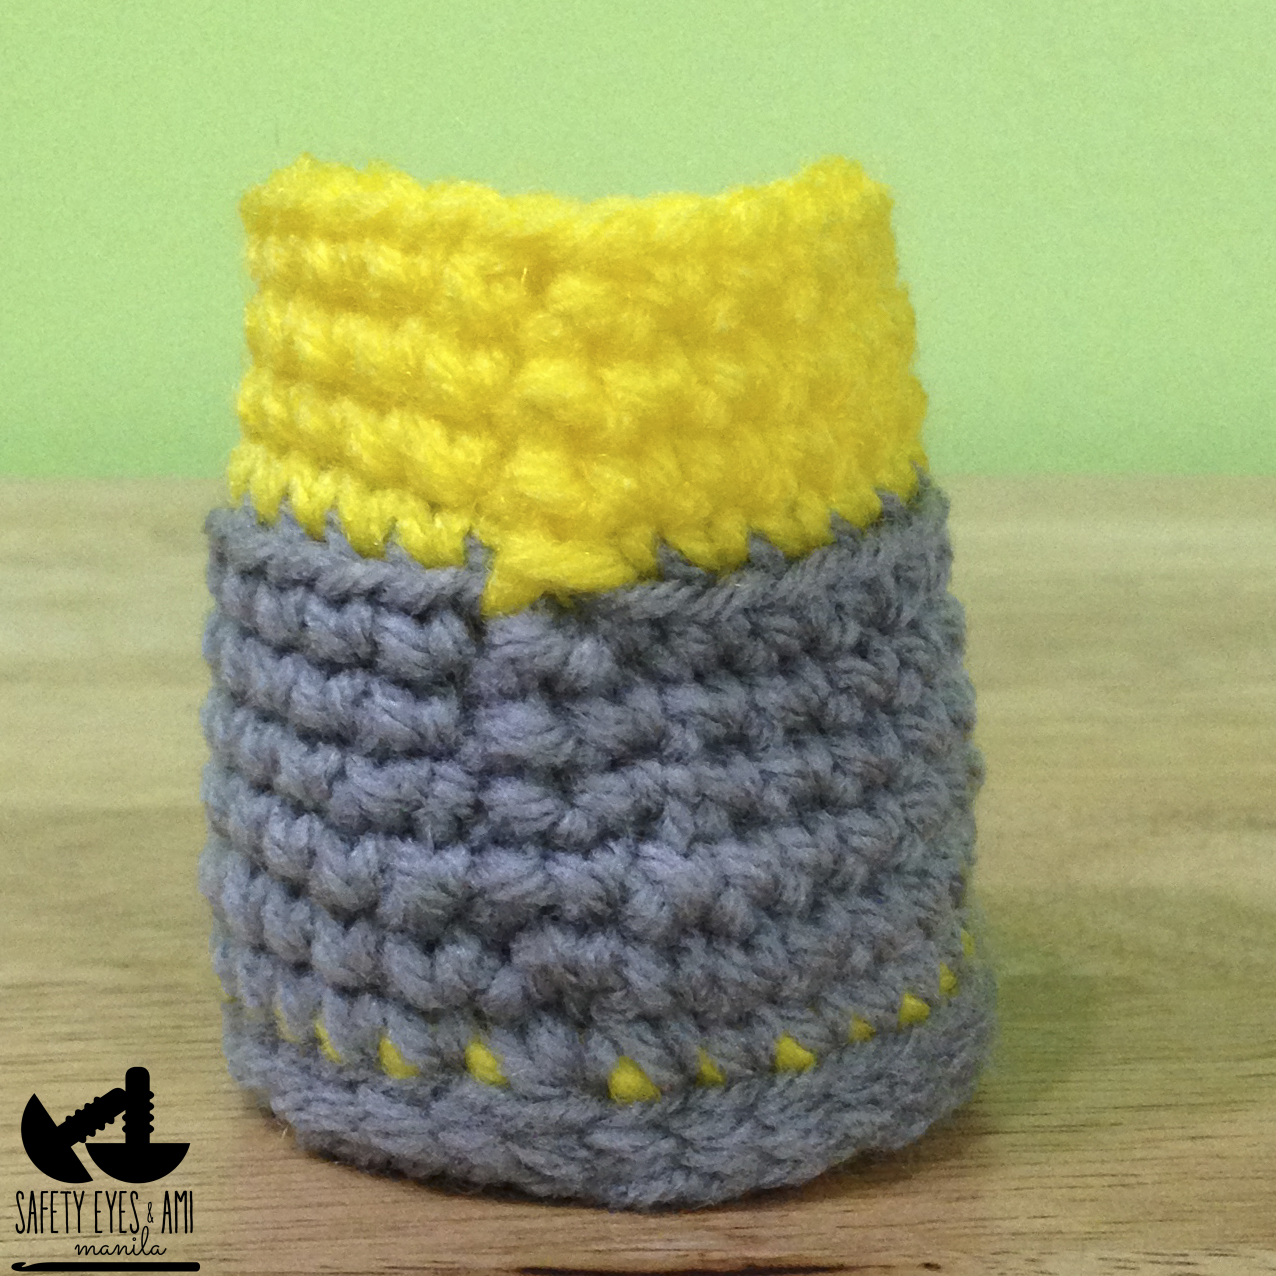
R6 sc around (24) change to yellow before your last yarn over so you pull through with yellow yarn. skip last st, sl st into ch1 of previous round. Ch1.
R7 sc around in BLO (24) skip last st, sl st into ch1 of previous round. Ch1. R8 - 10 sc around (24) skip last st, sl st into ch1 of previous round. Ch1.
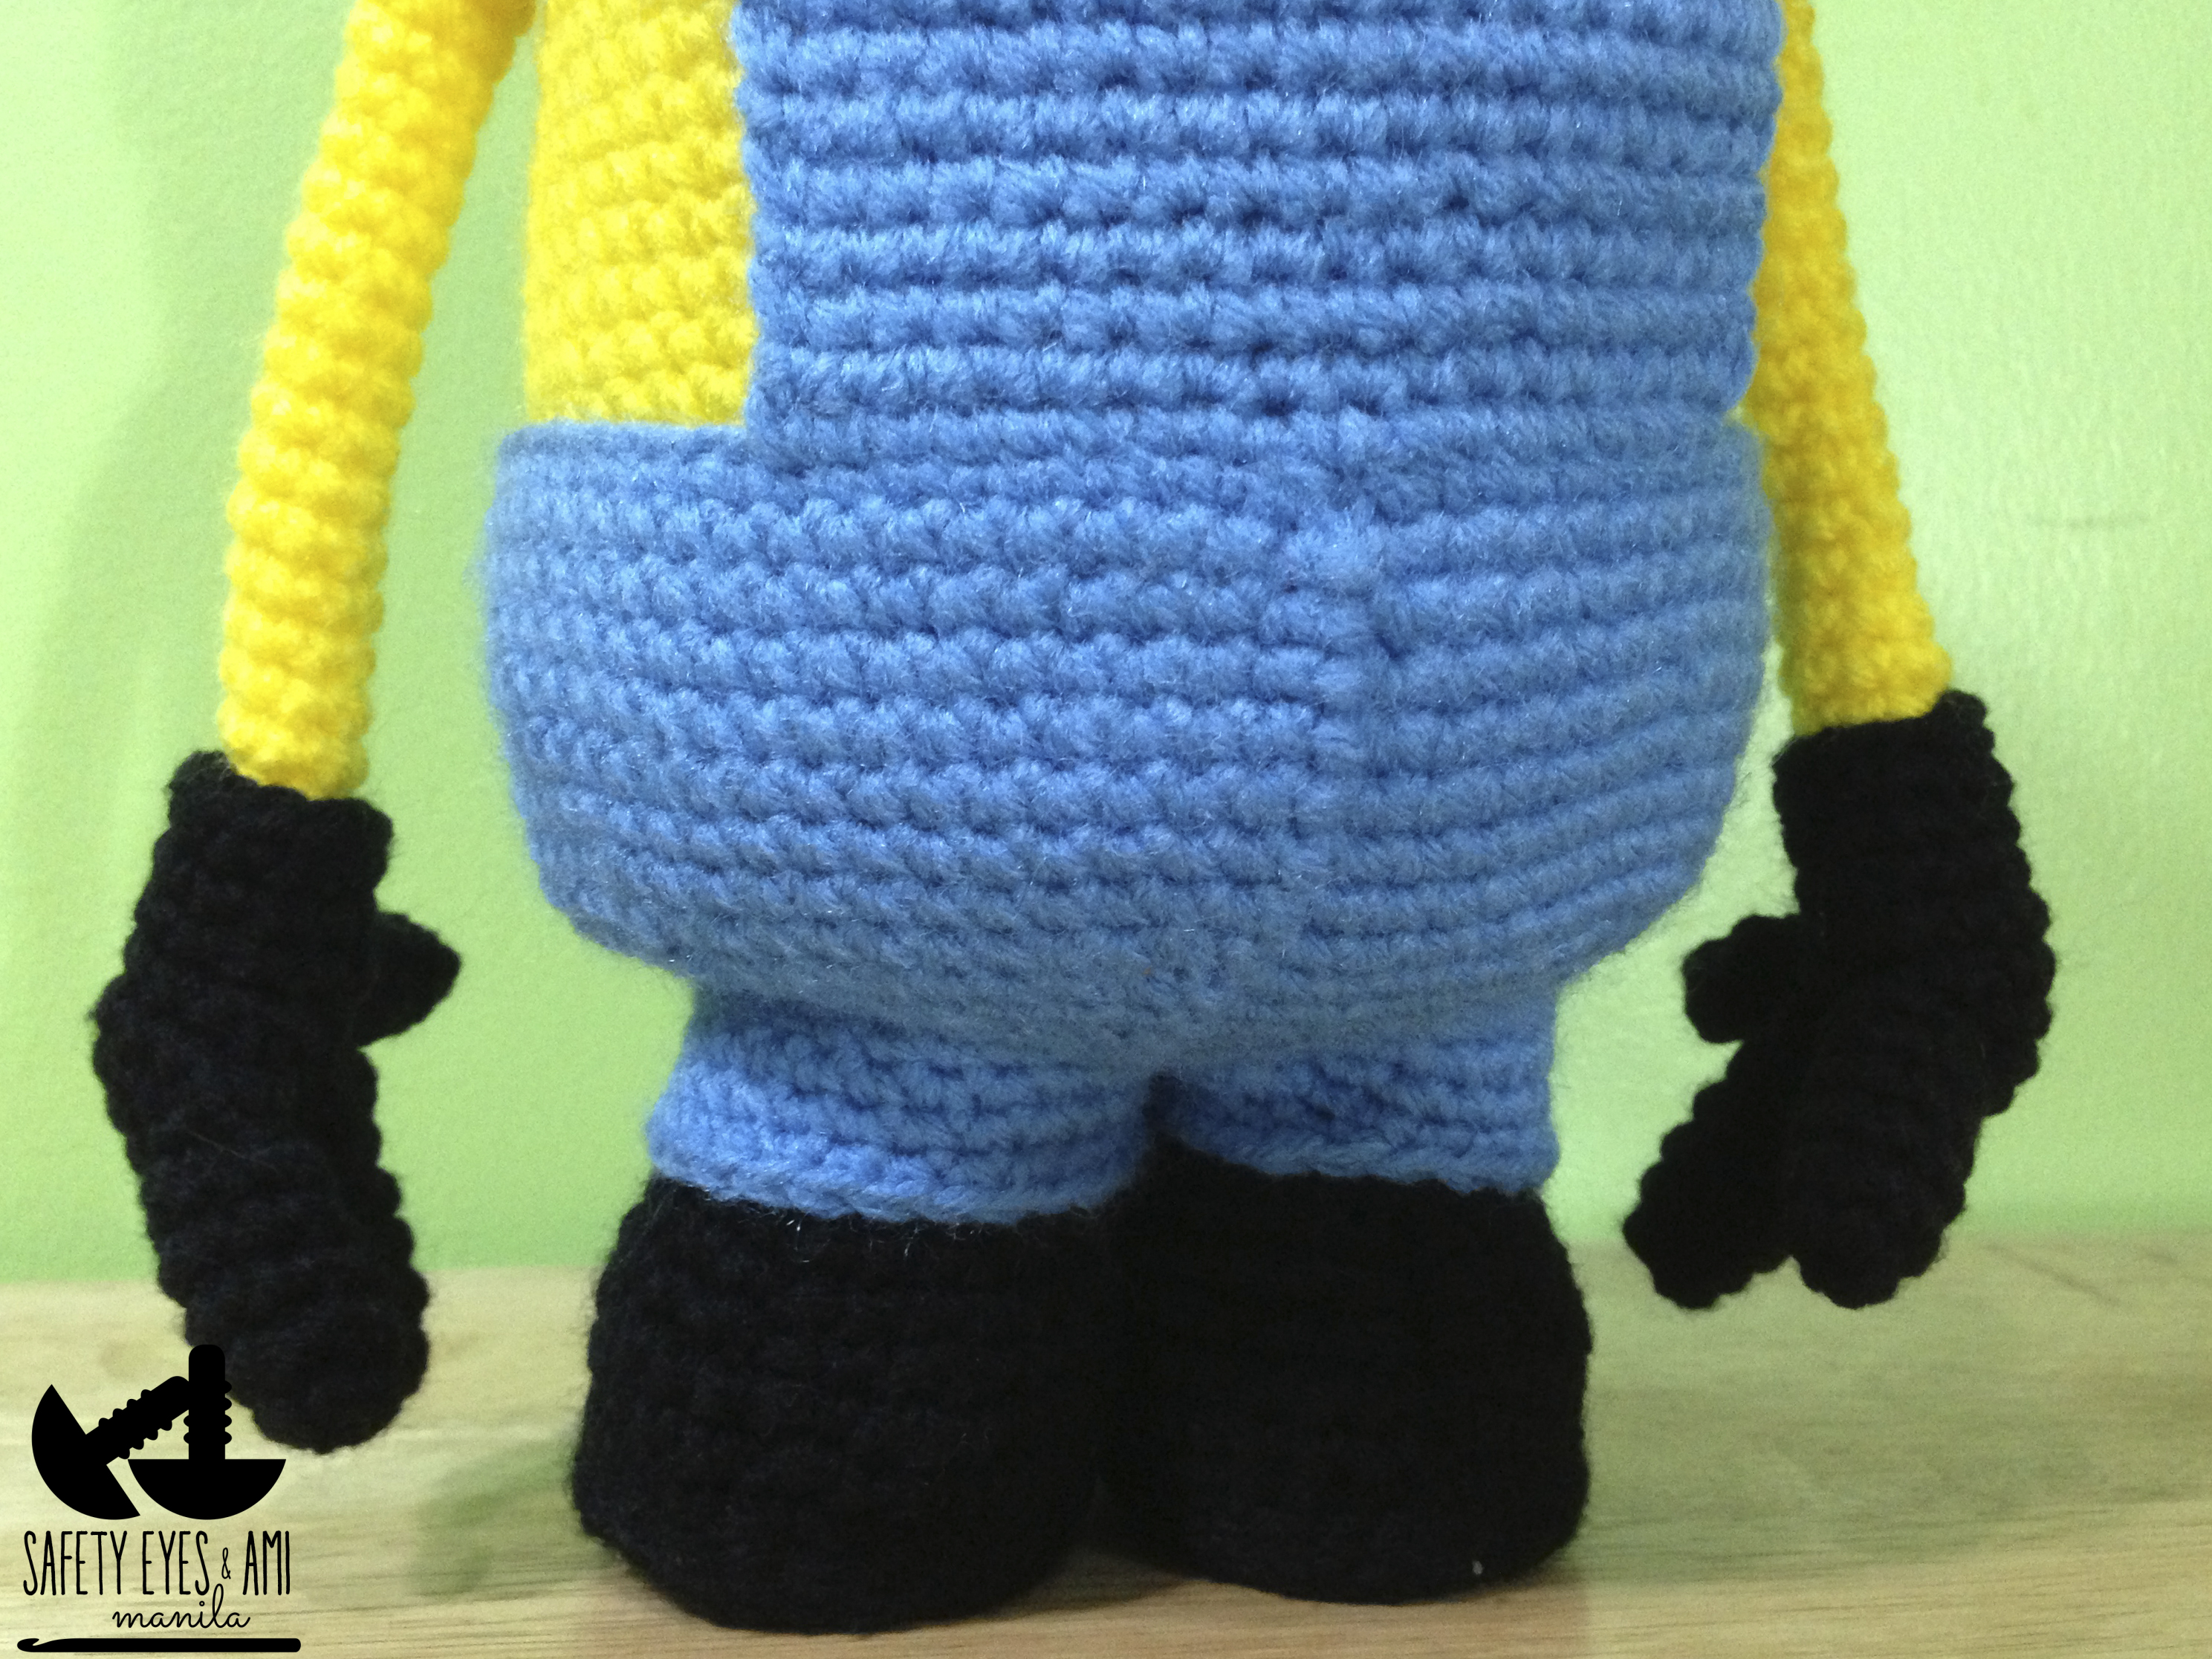
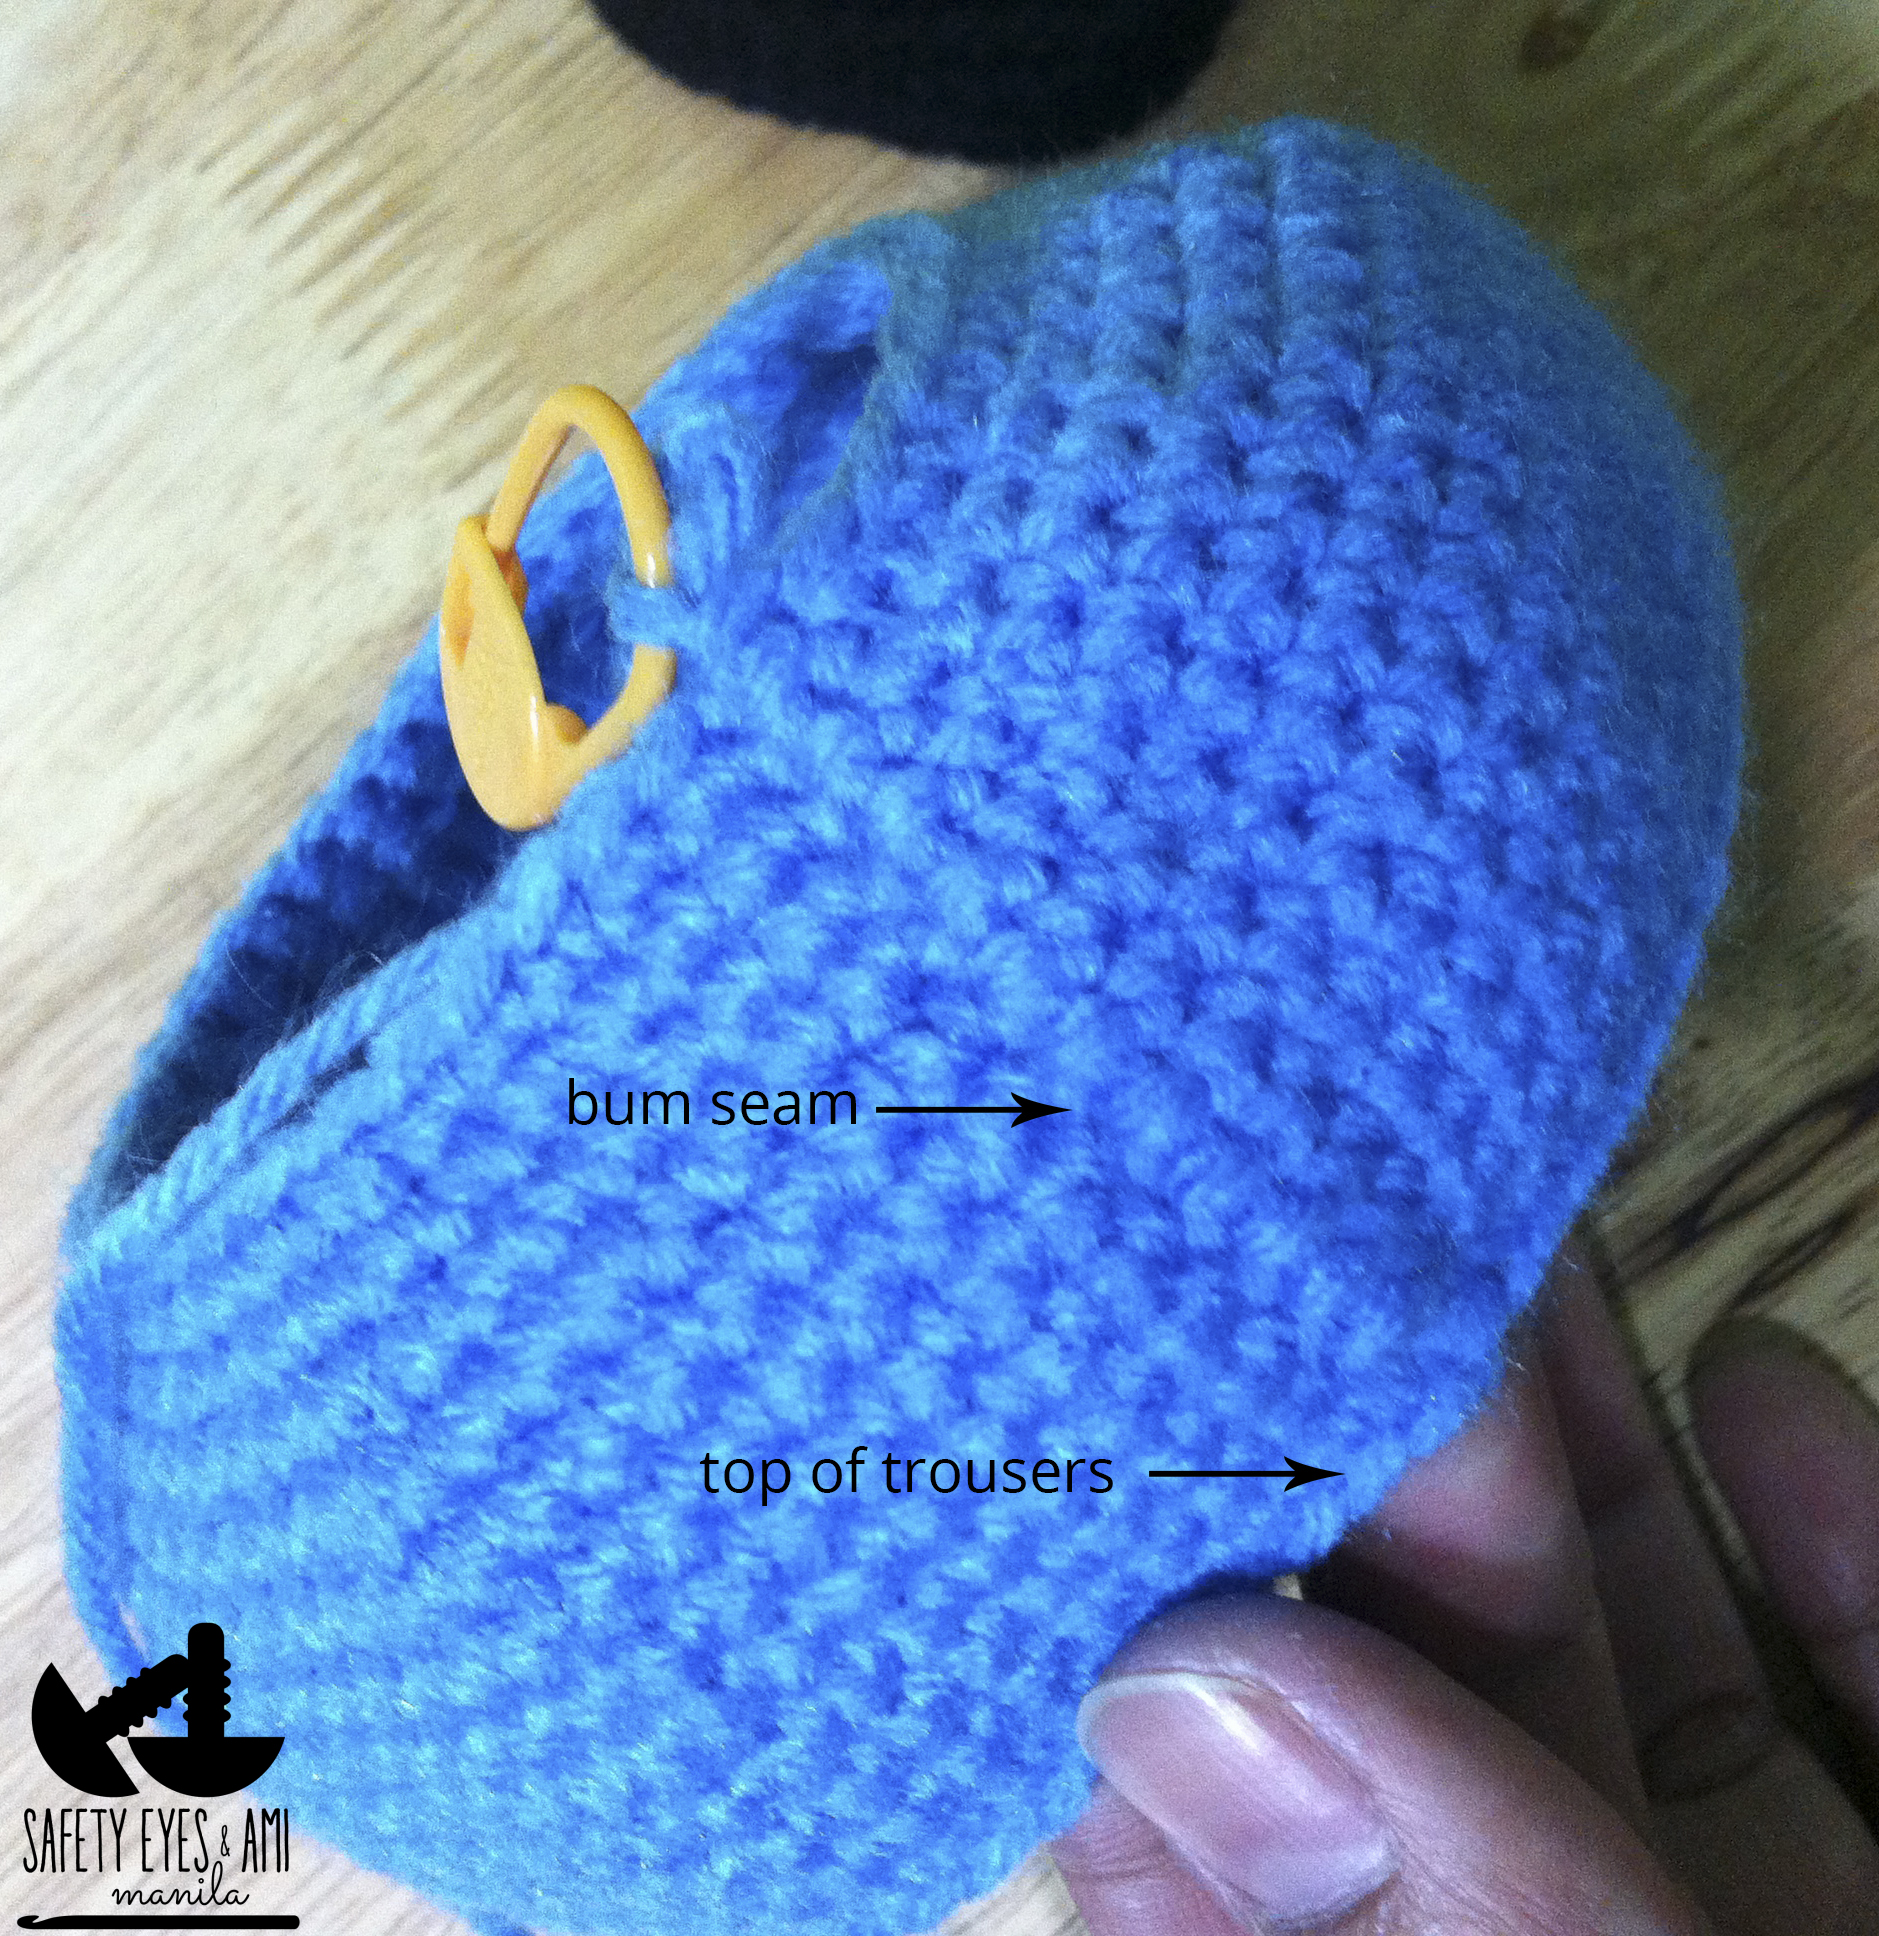
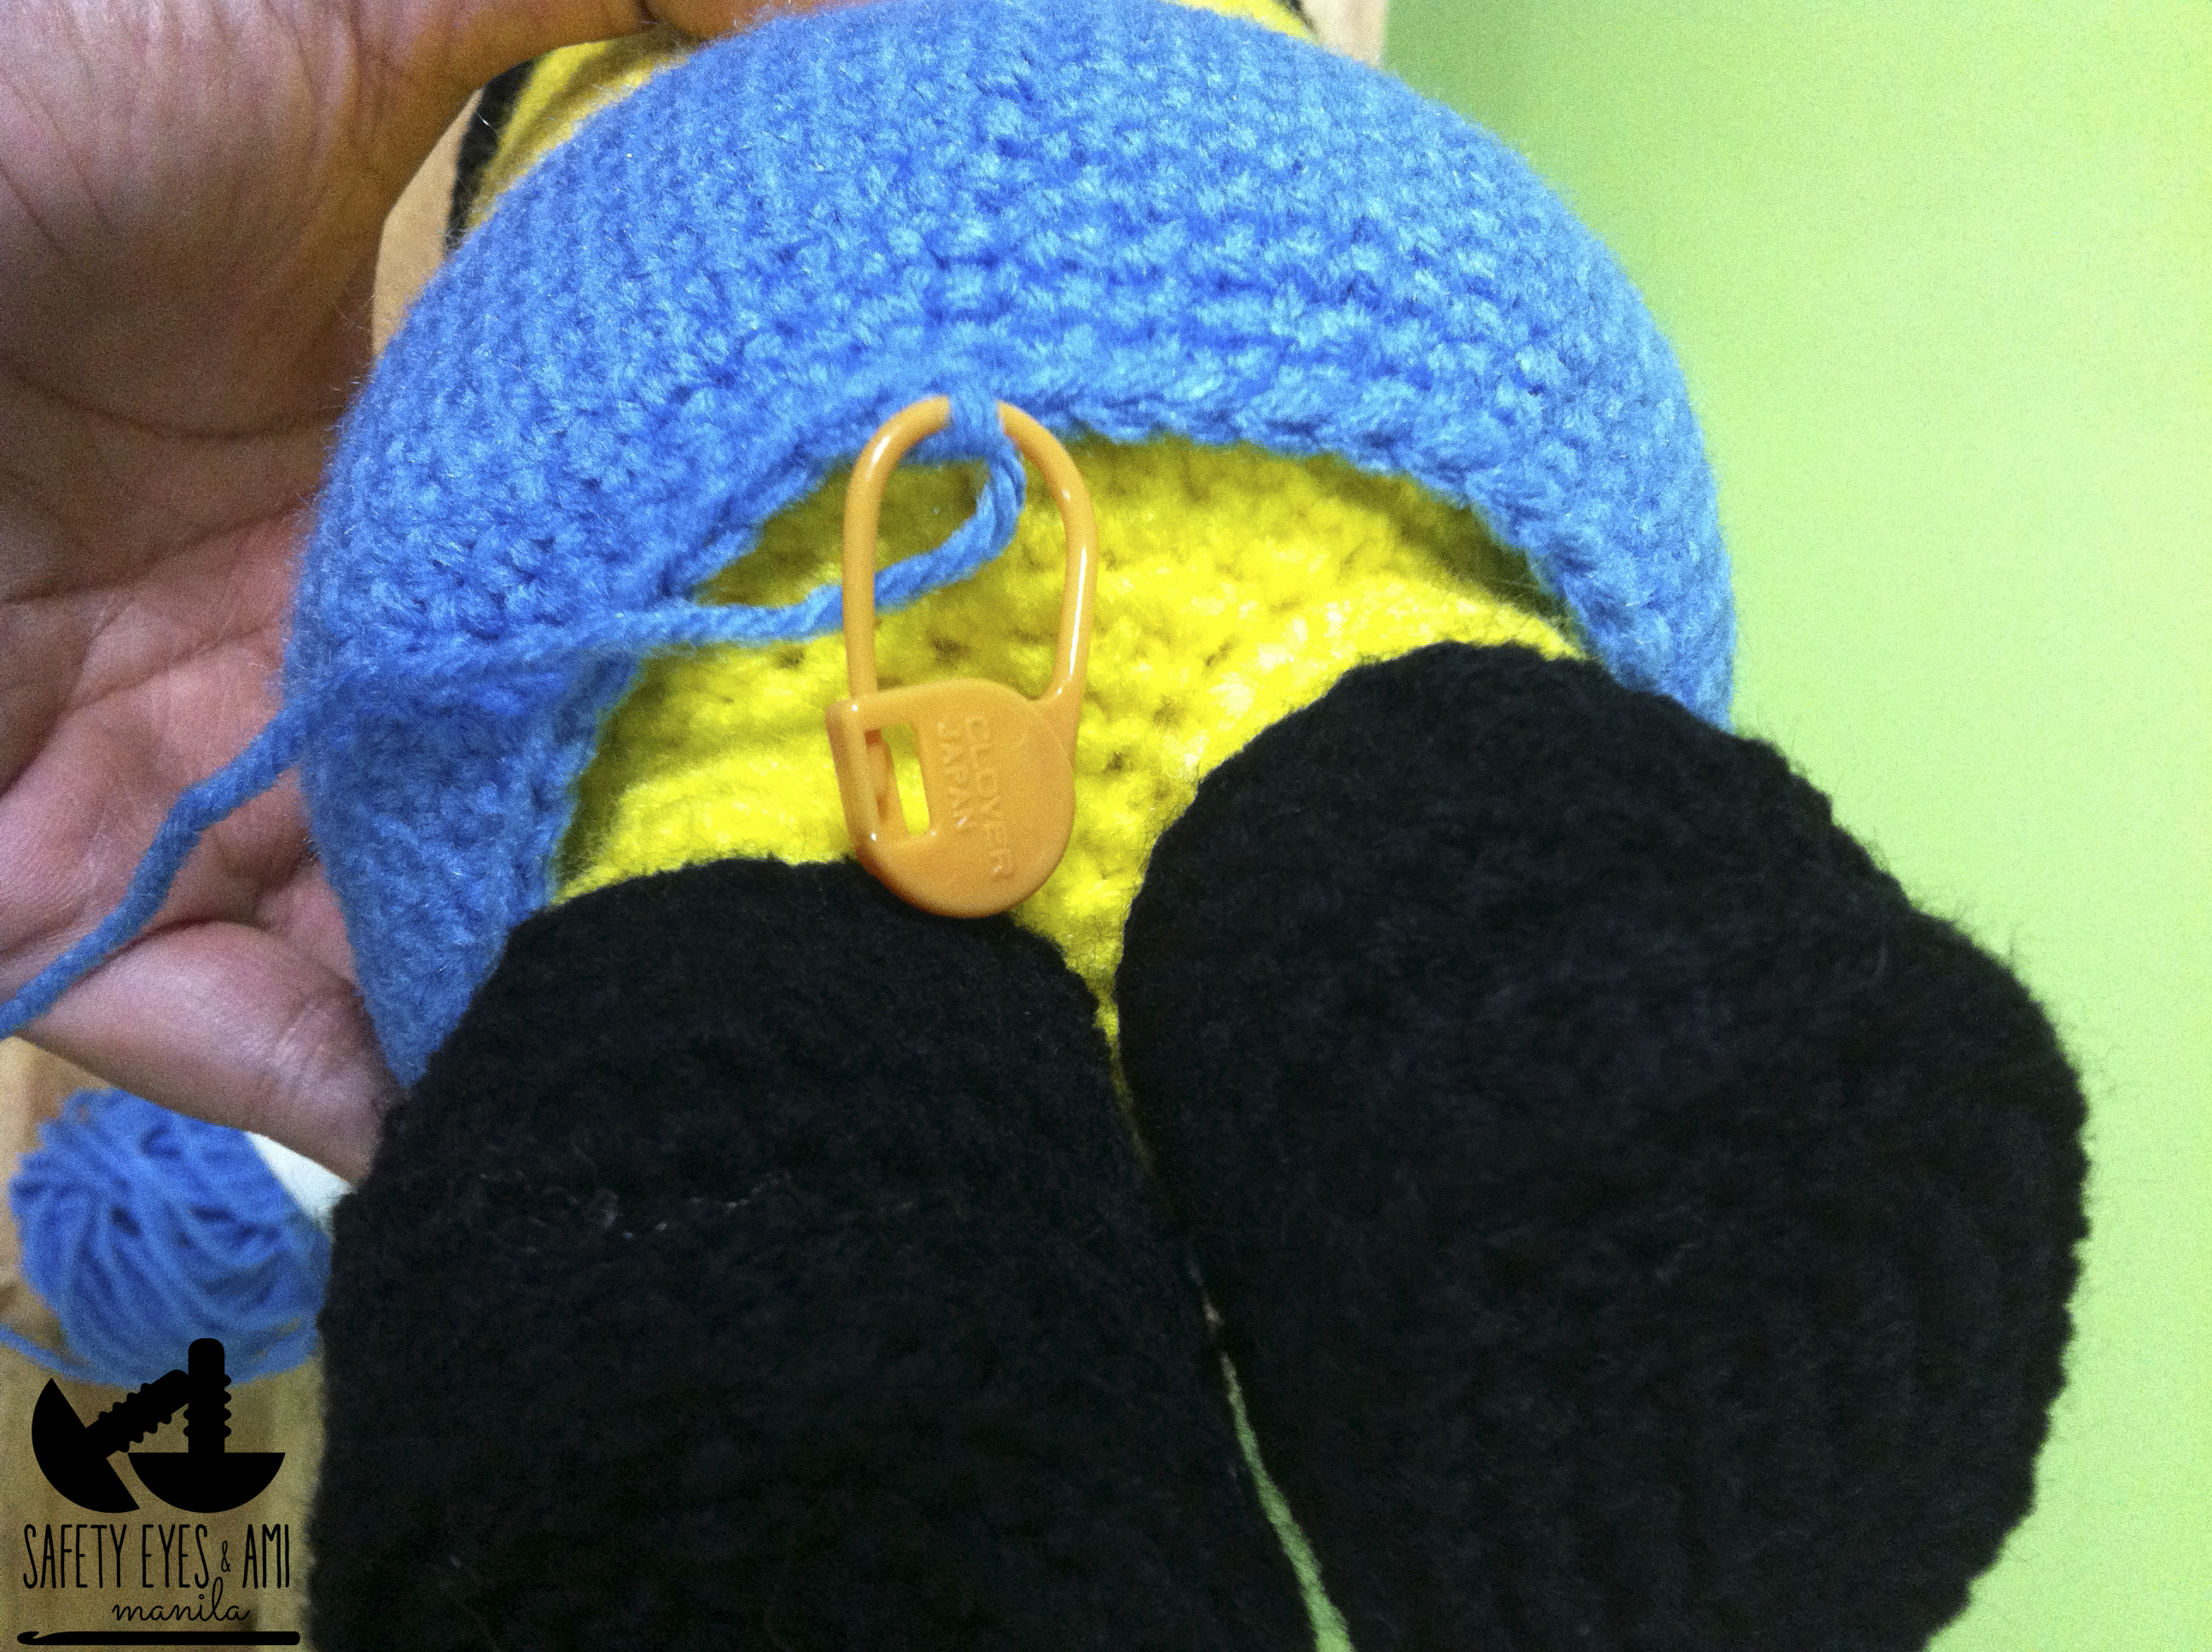
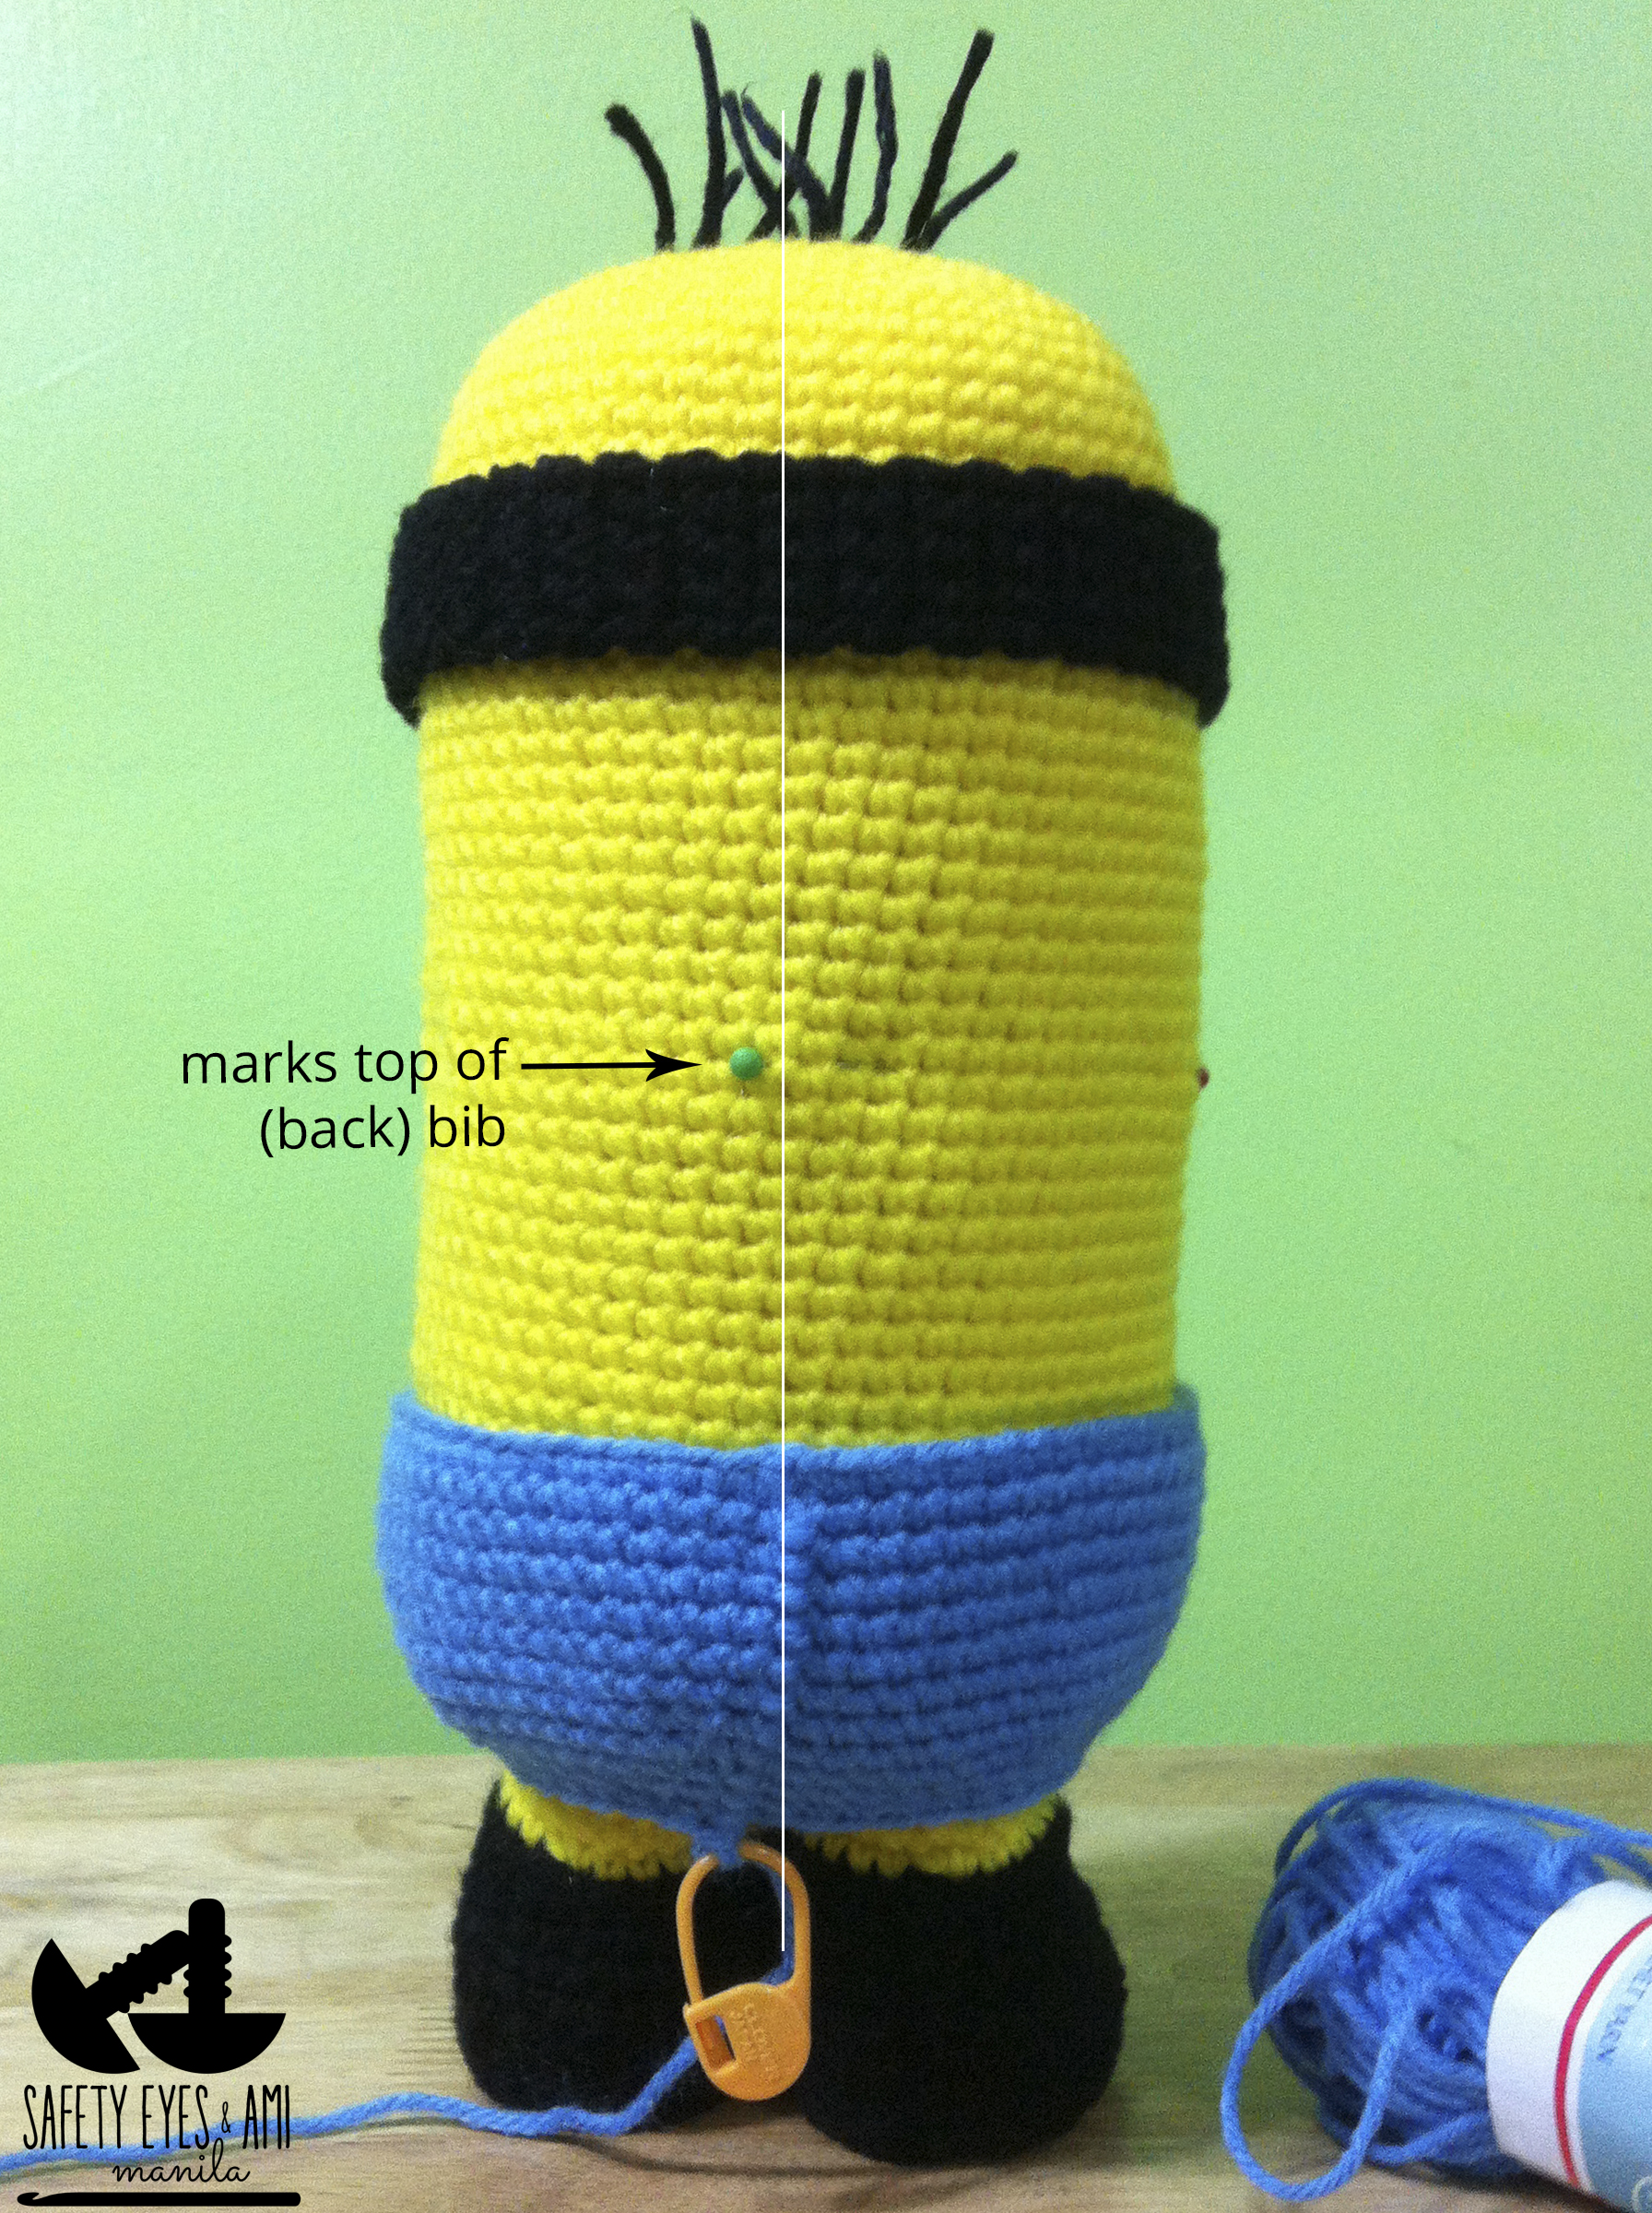
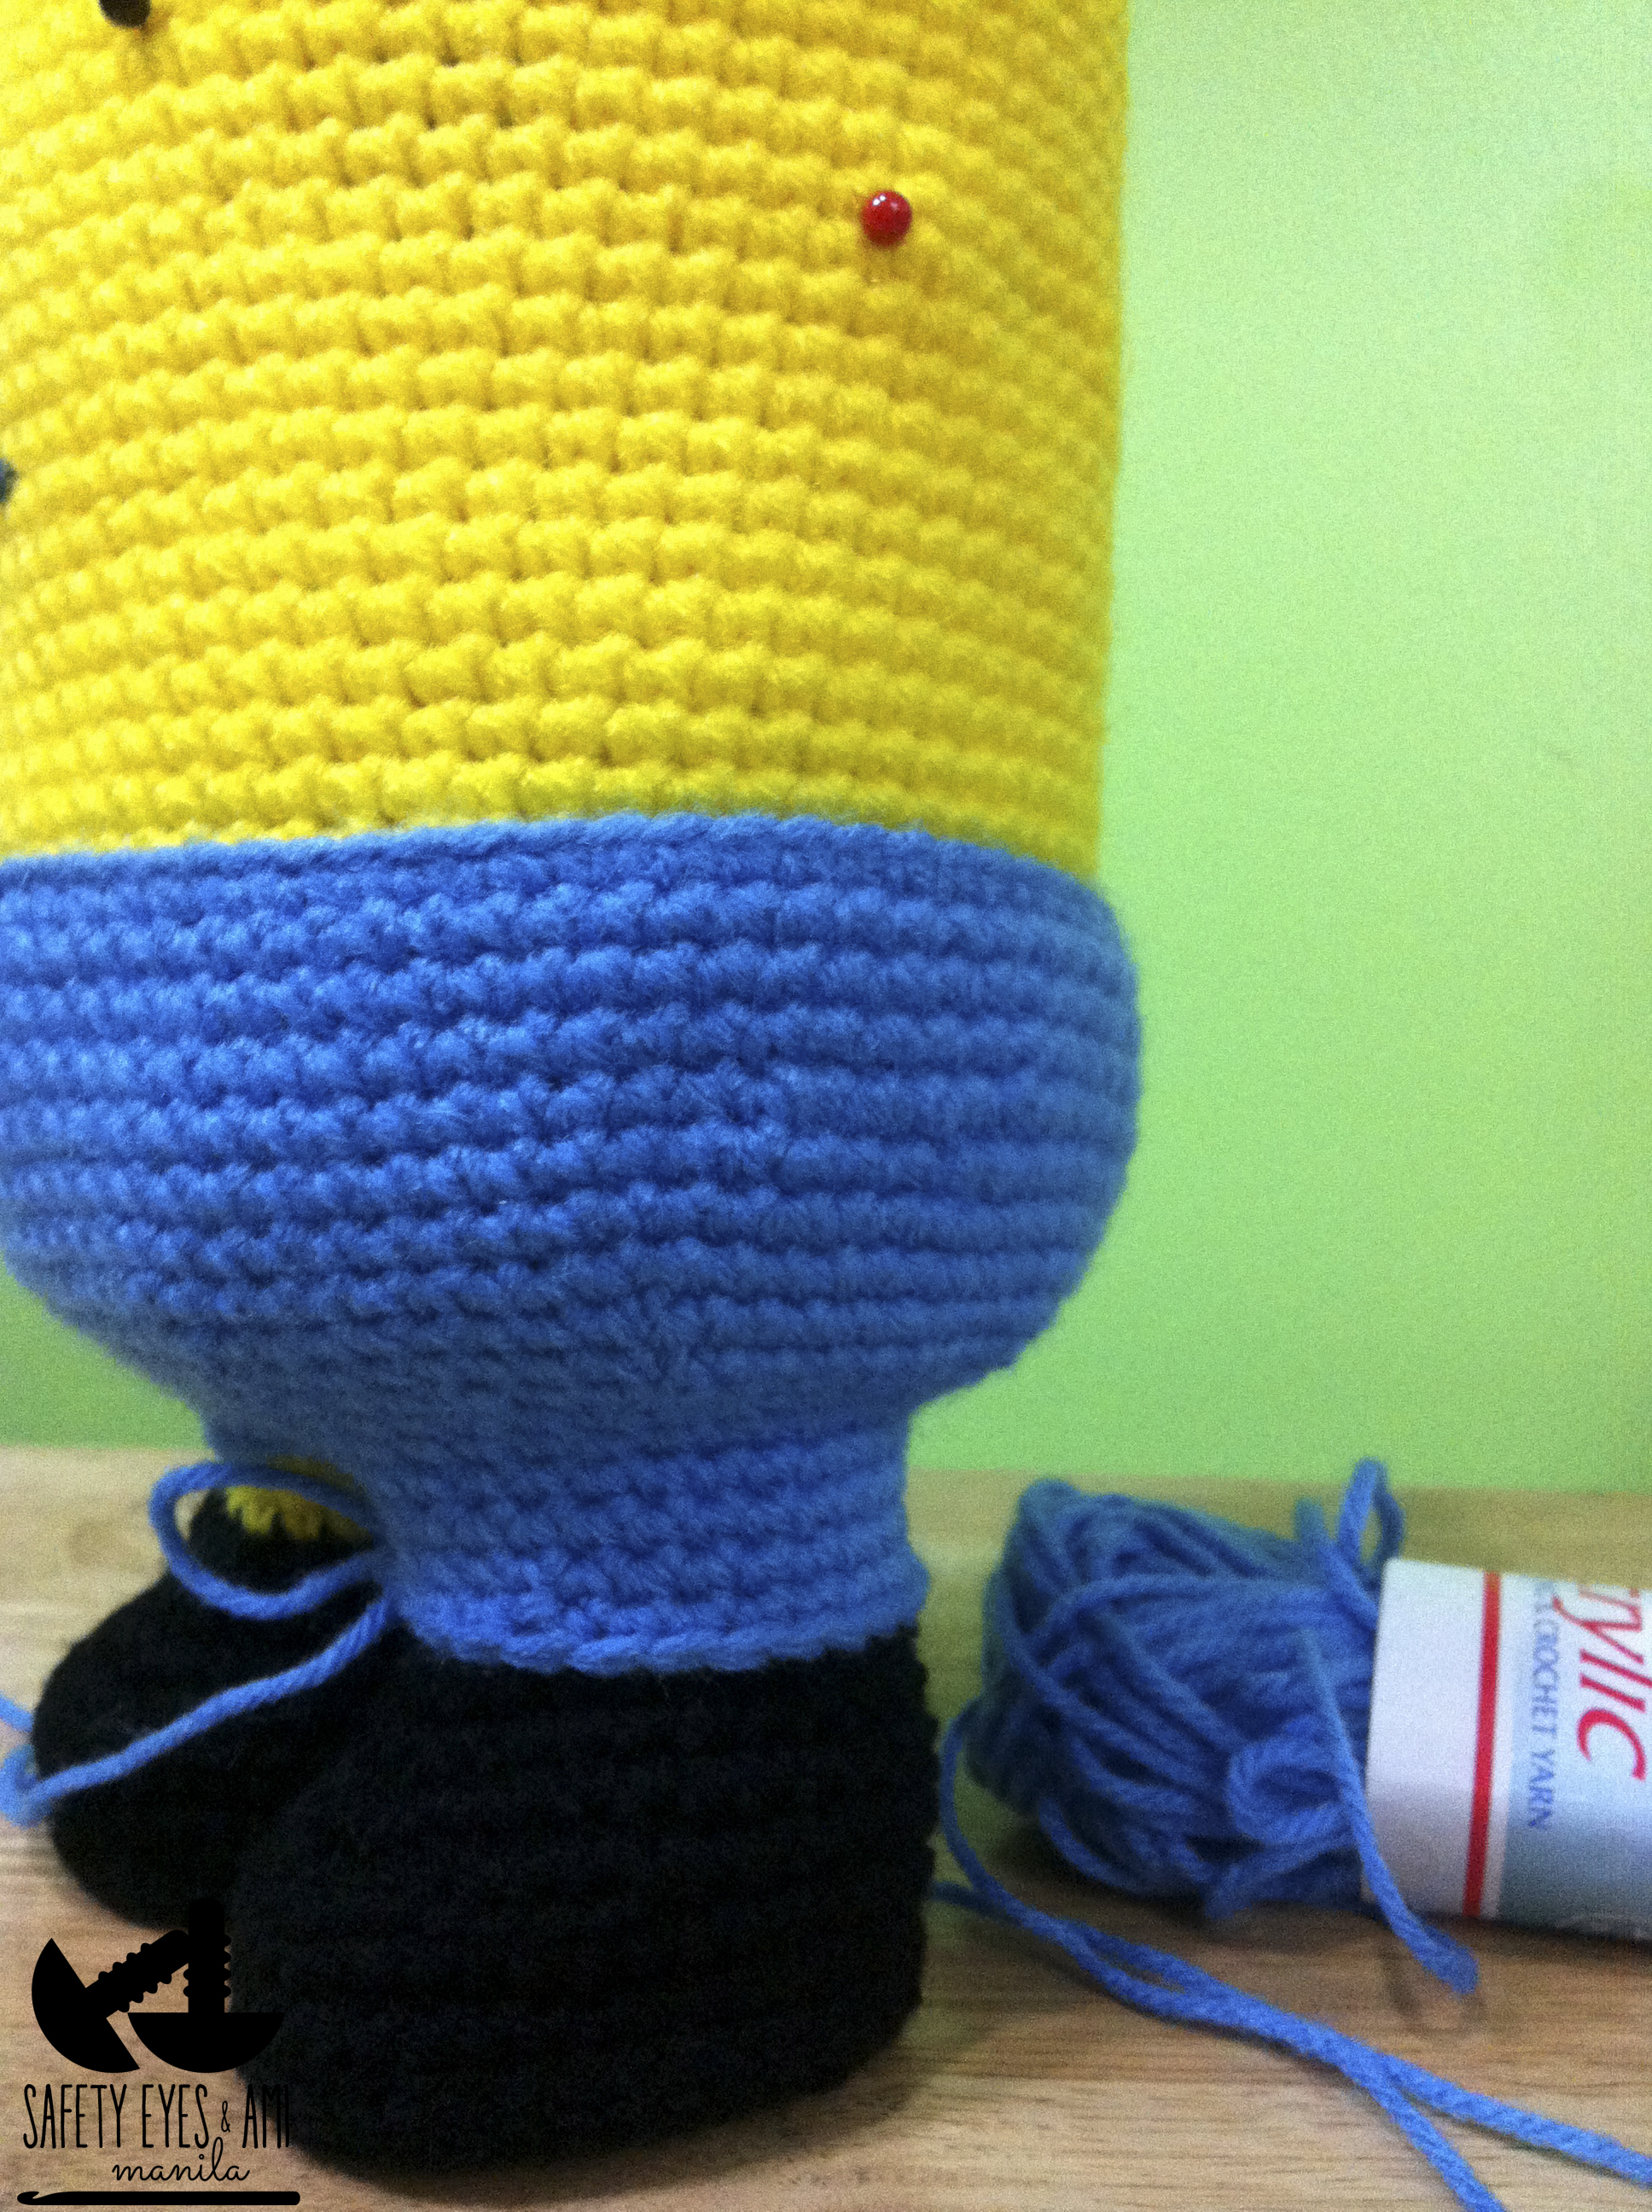
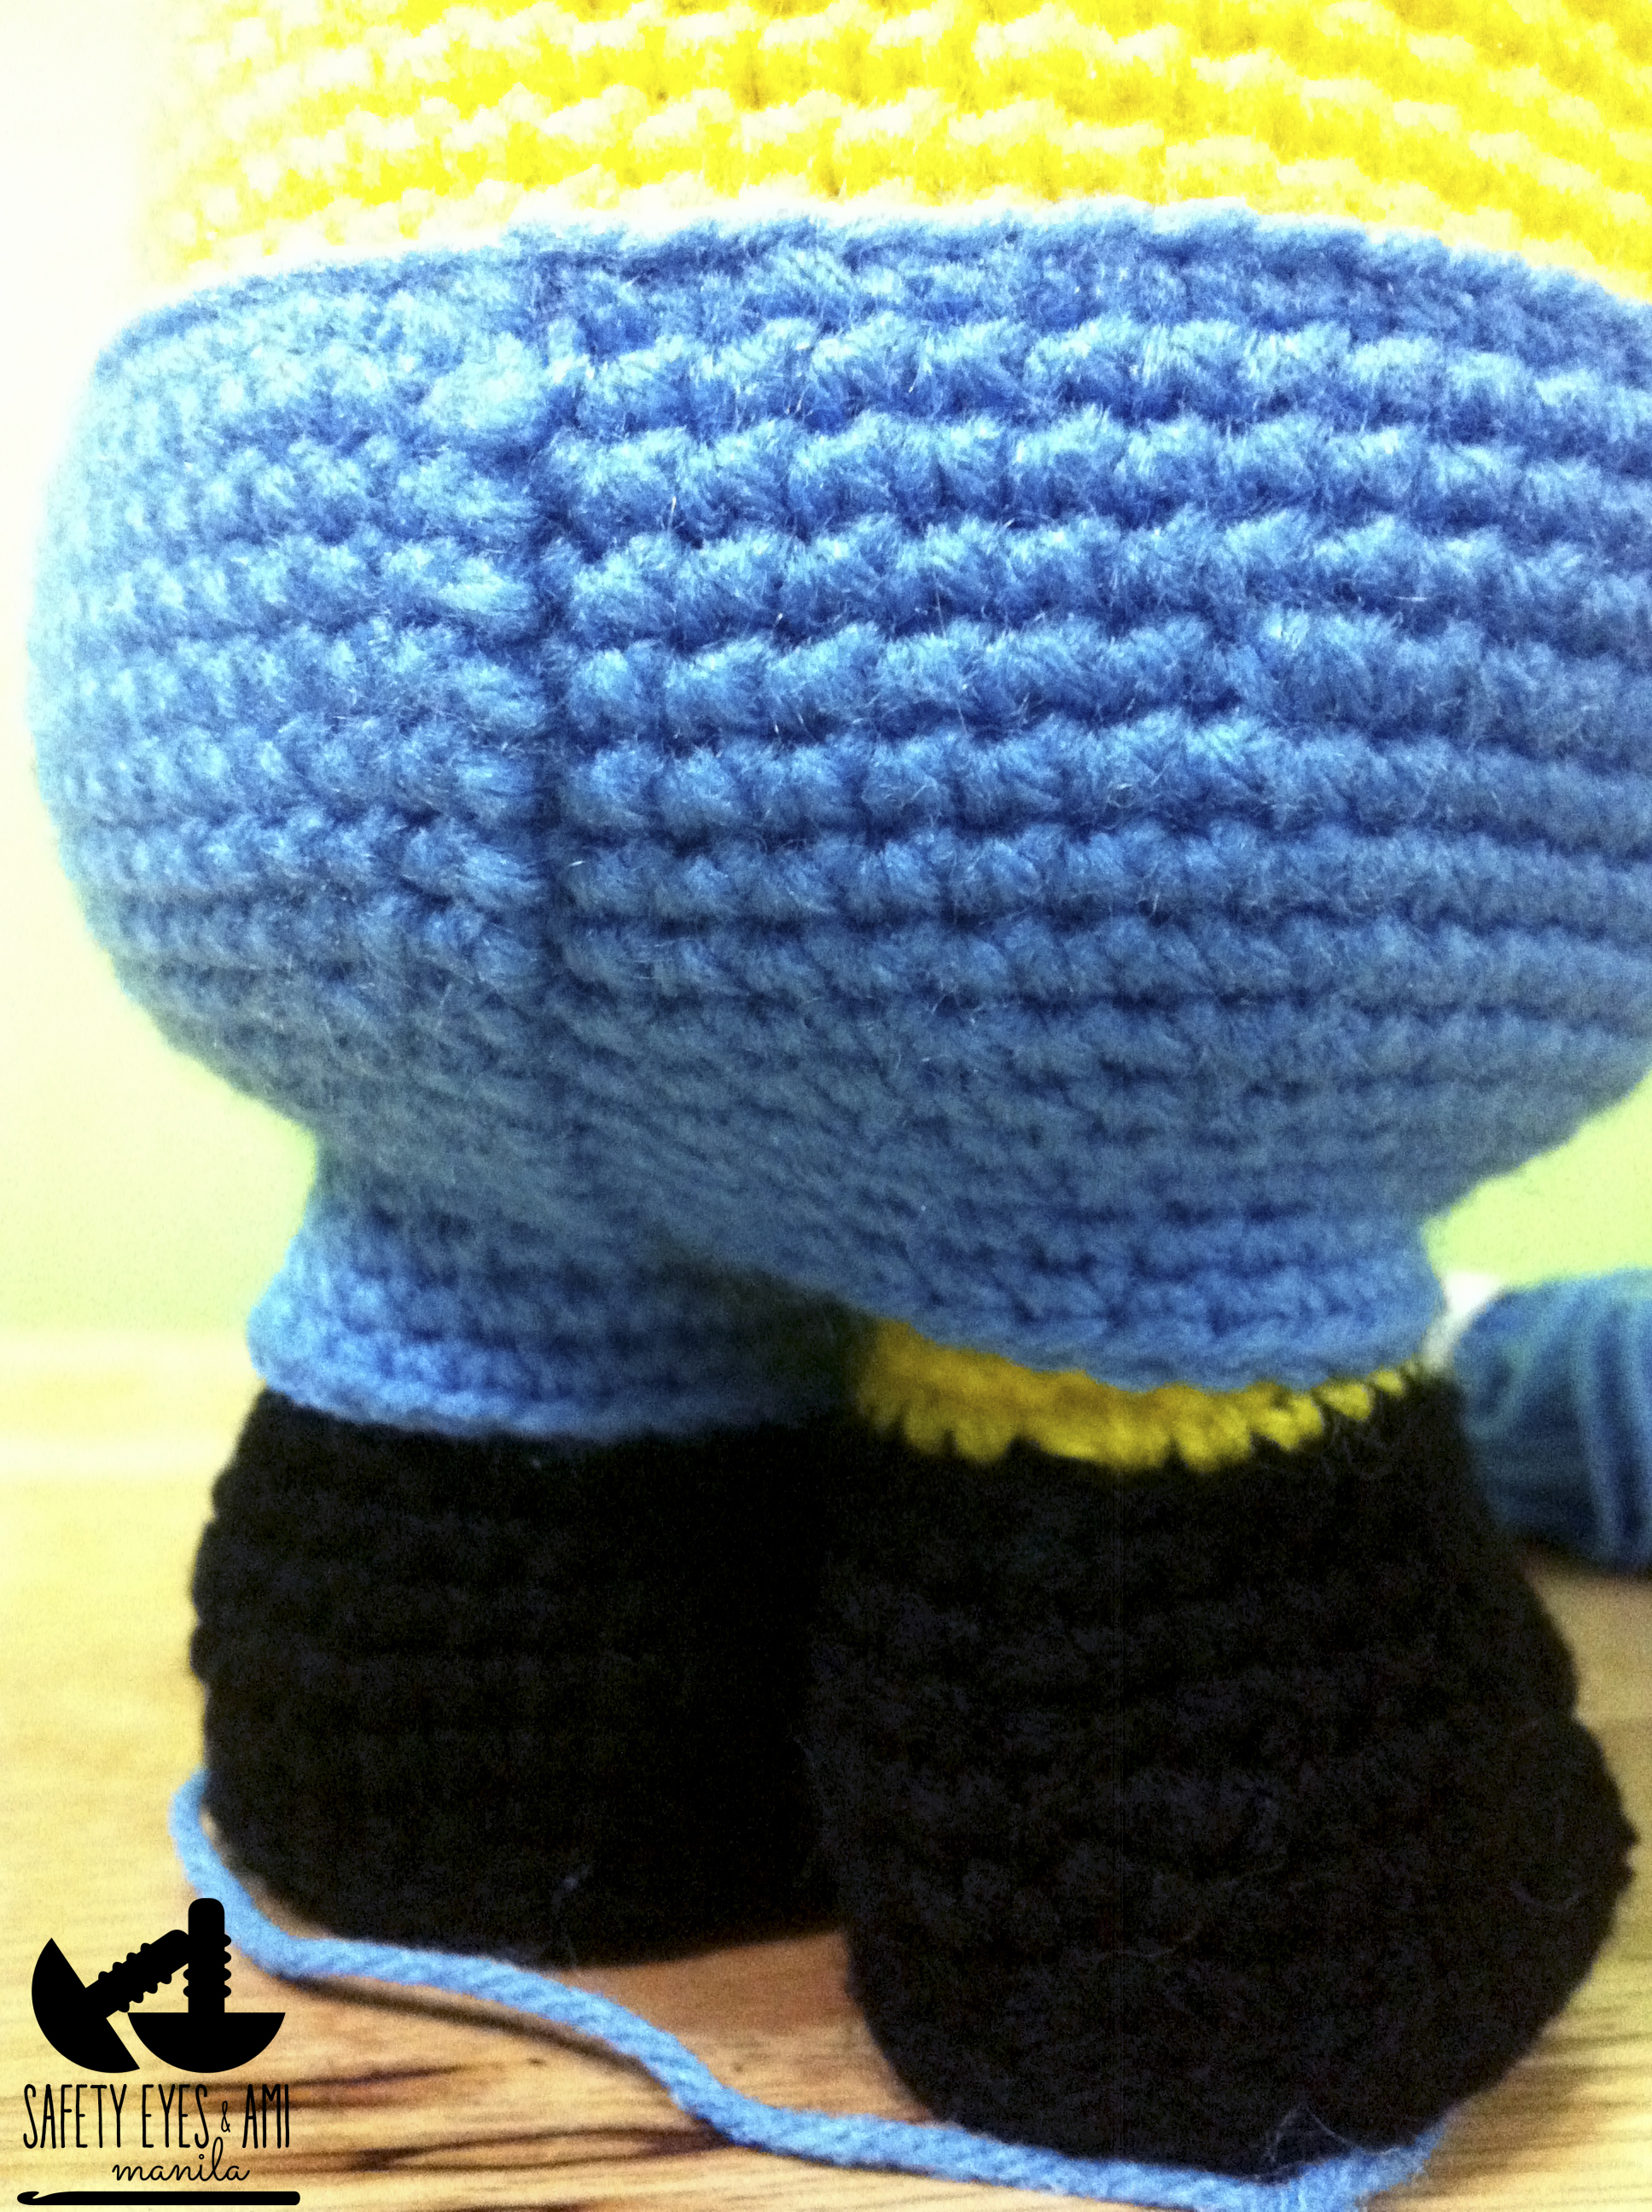
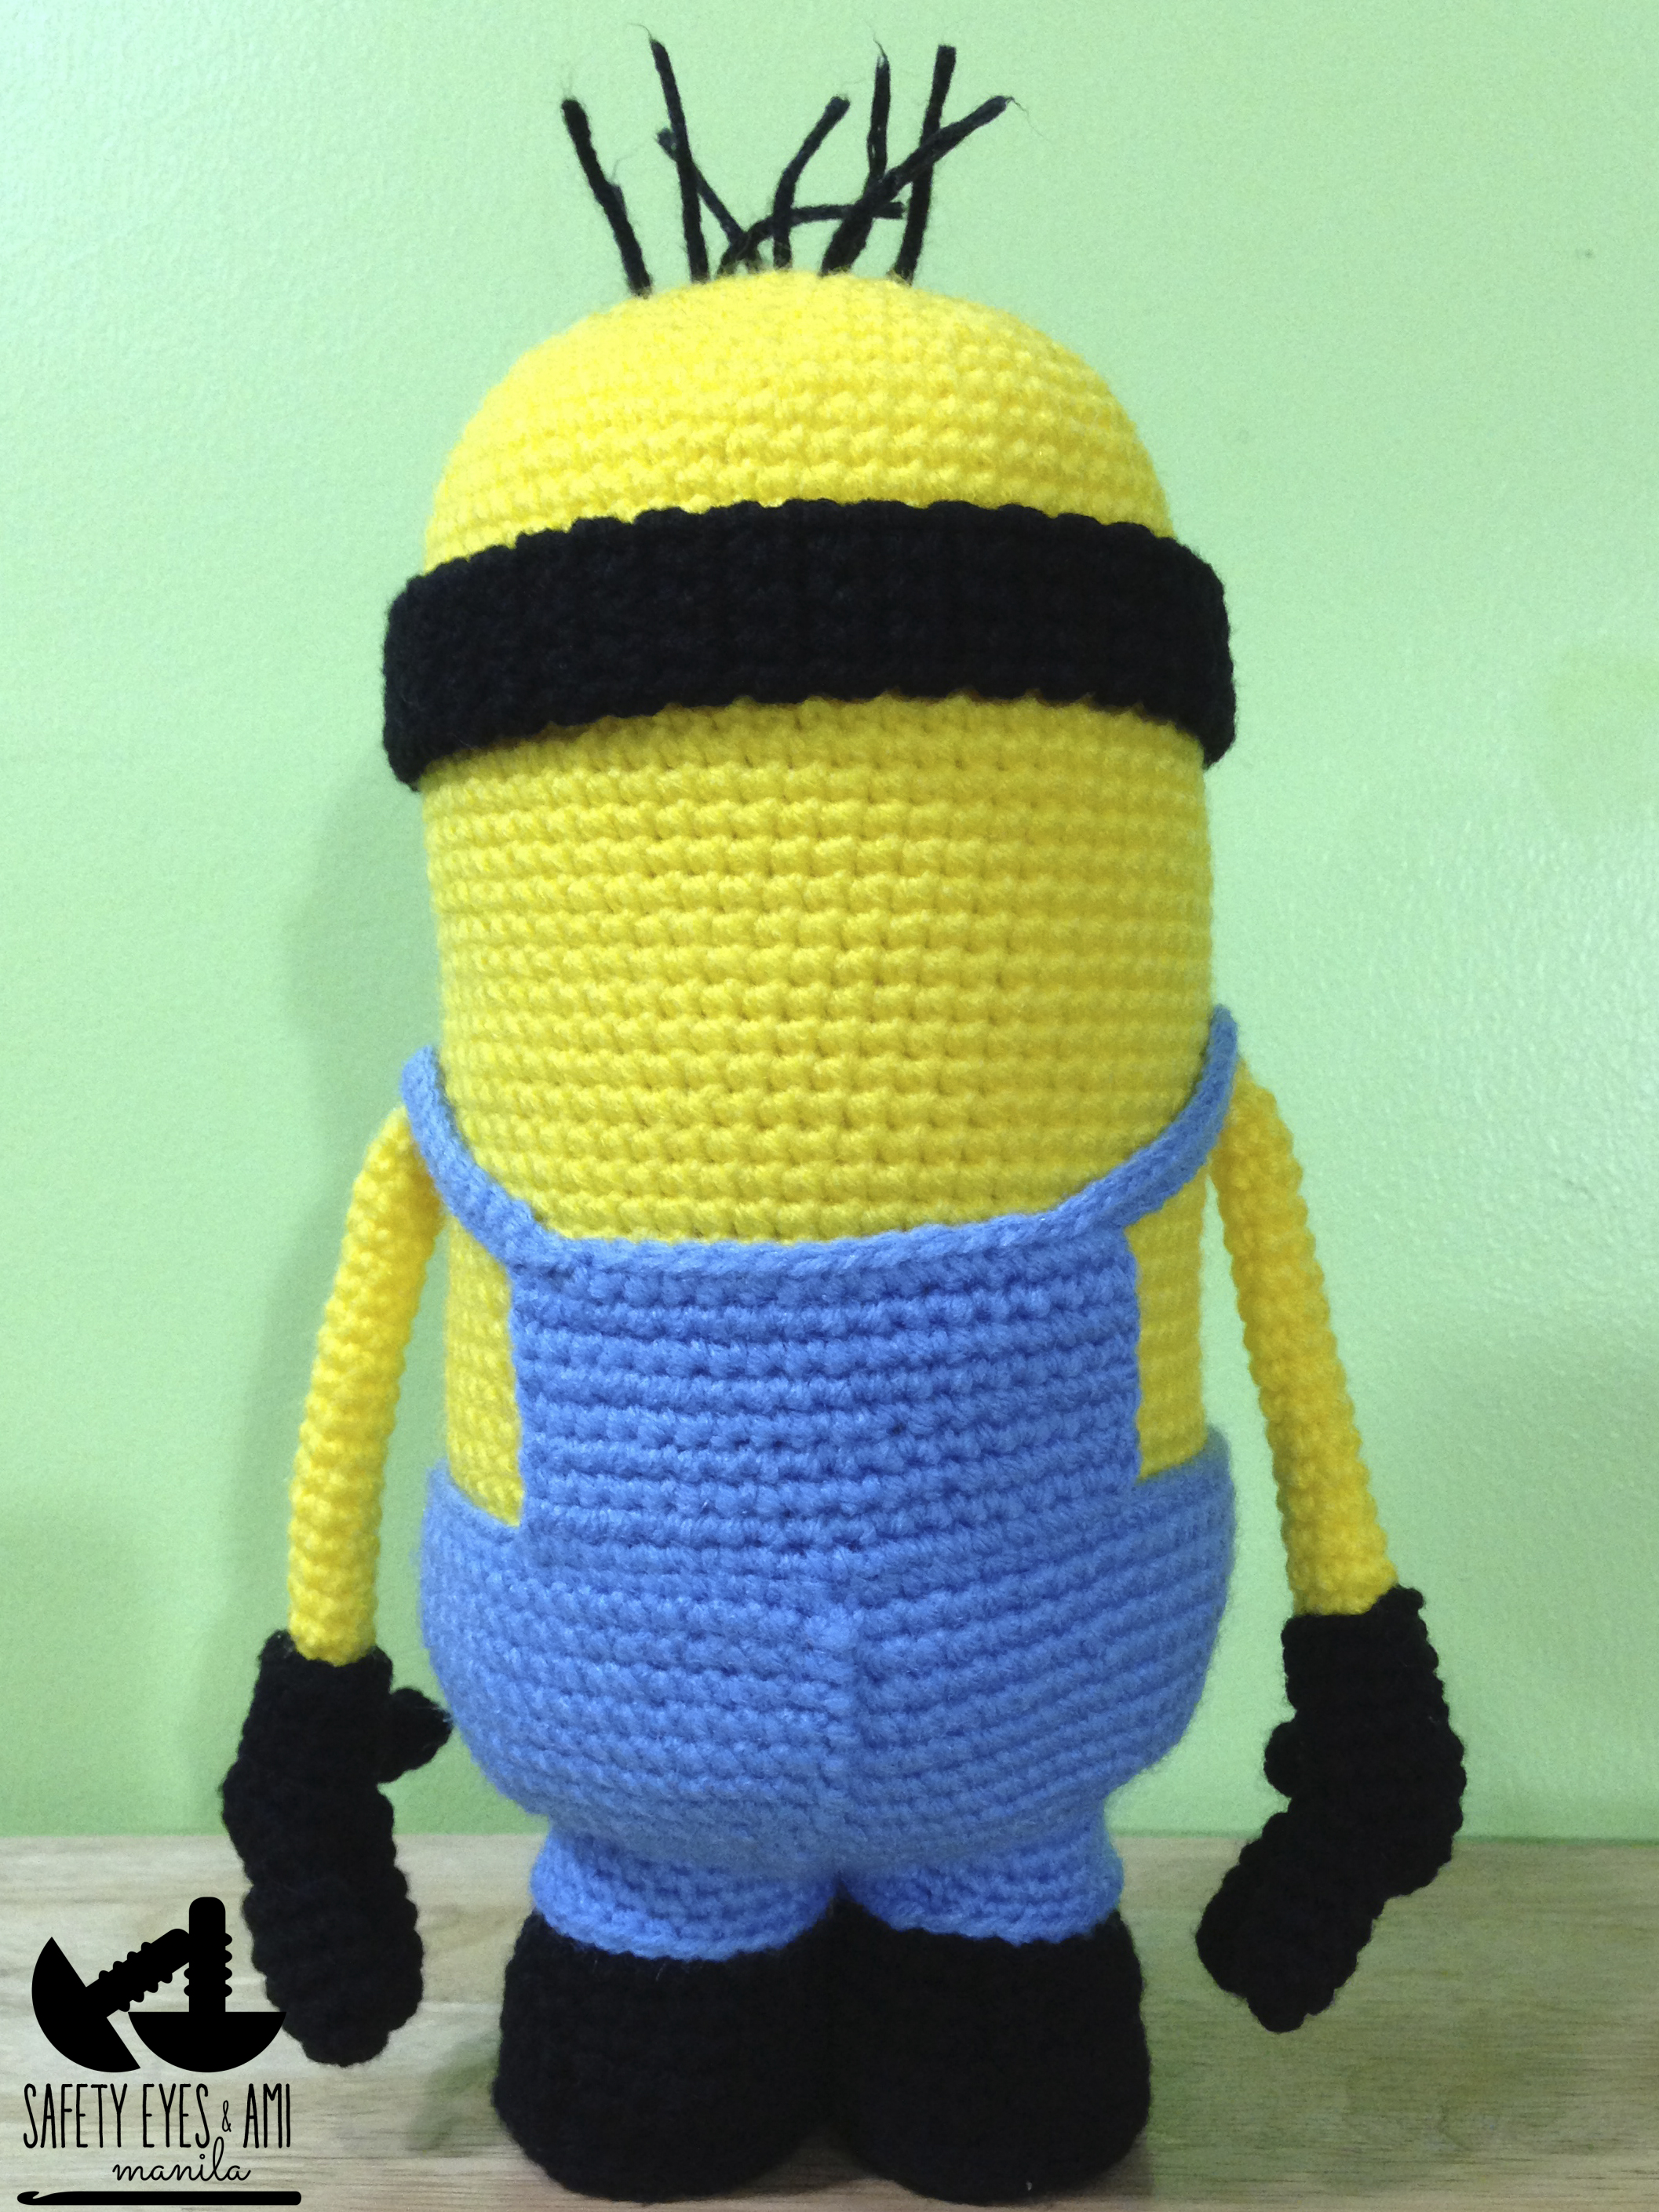
In the end you should have a fairly even color change. You can always cover any mess with the trouser legs later on :) Finish and close R10 like you did with the soles. Go ahead and make your 2nd boot. Try to keep the same amount of tension so your boots and legs end up about the same size. Sew the boots and legs to the body. I like to use stitches that go straight down and diagonally to make them look like crochet stitches.
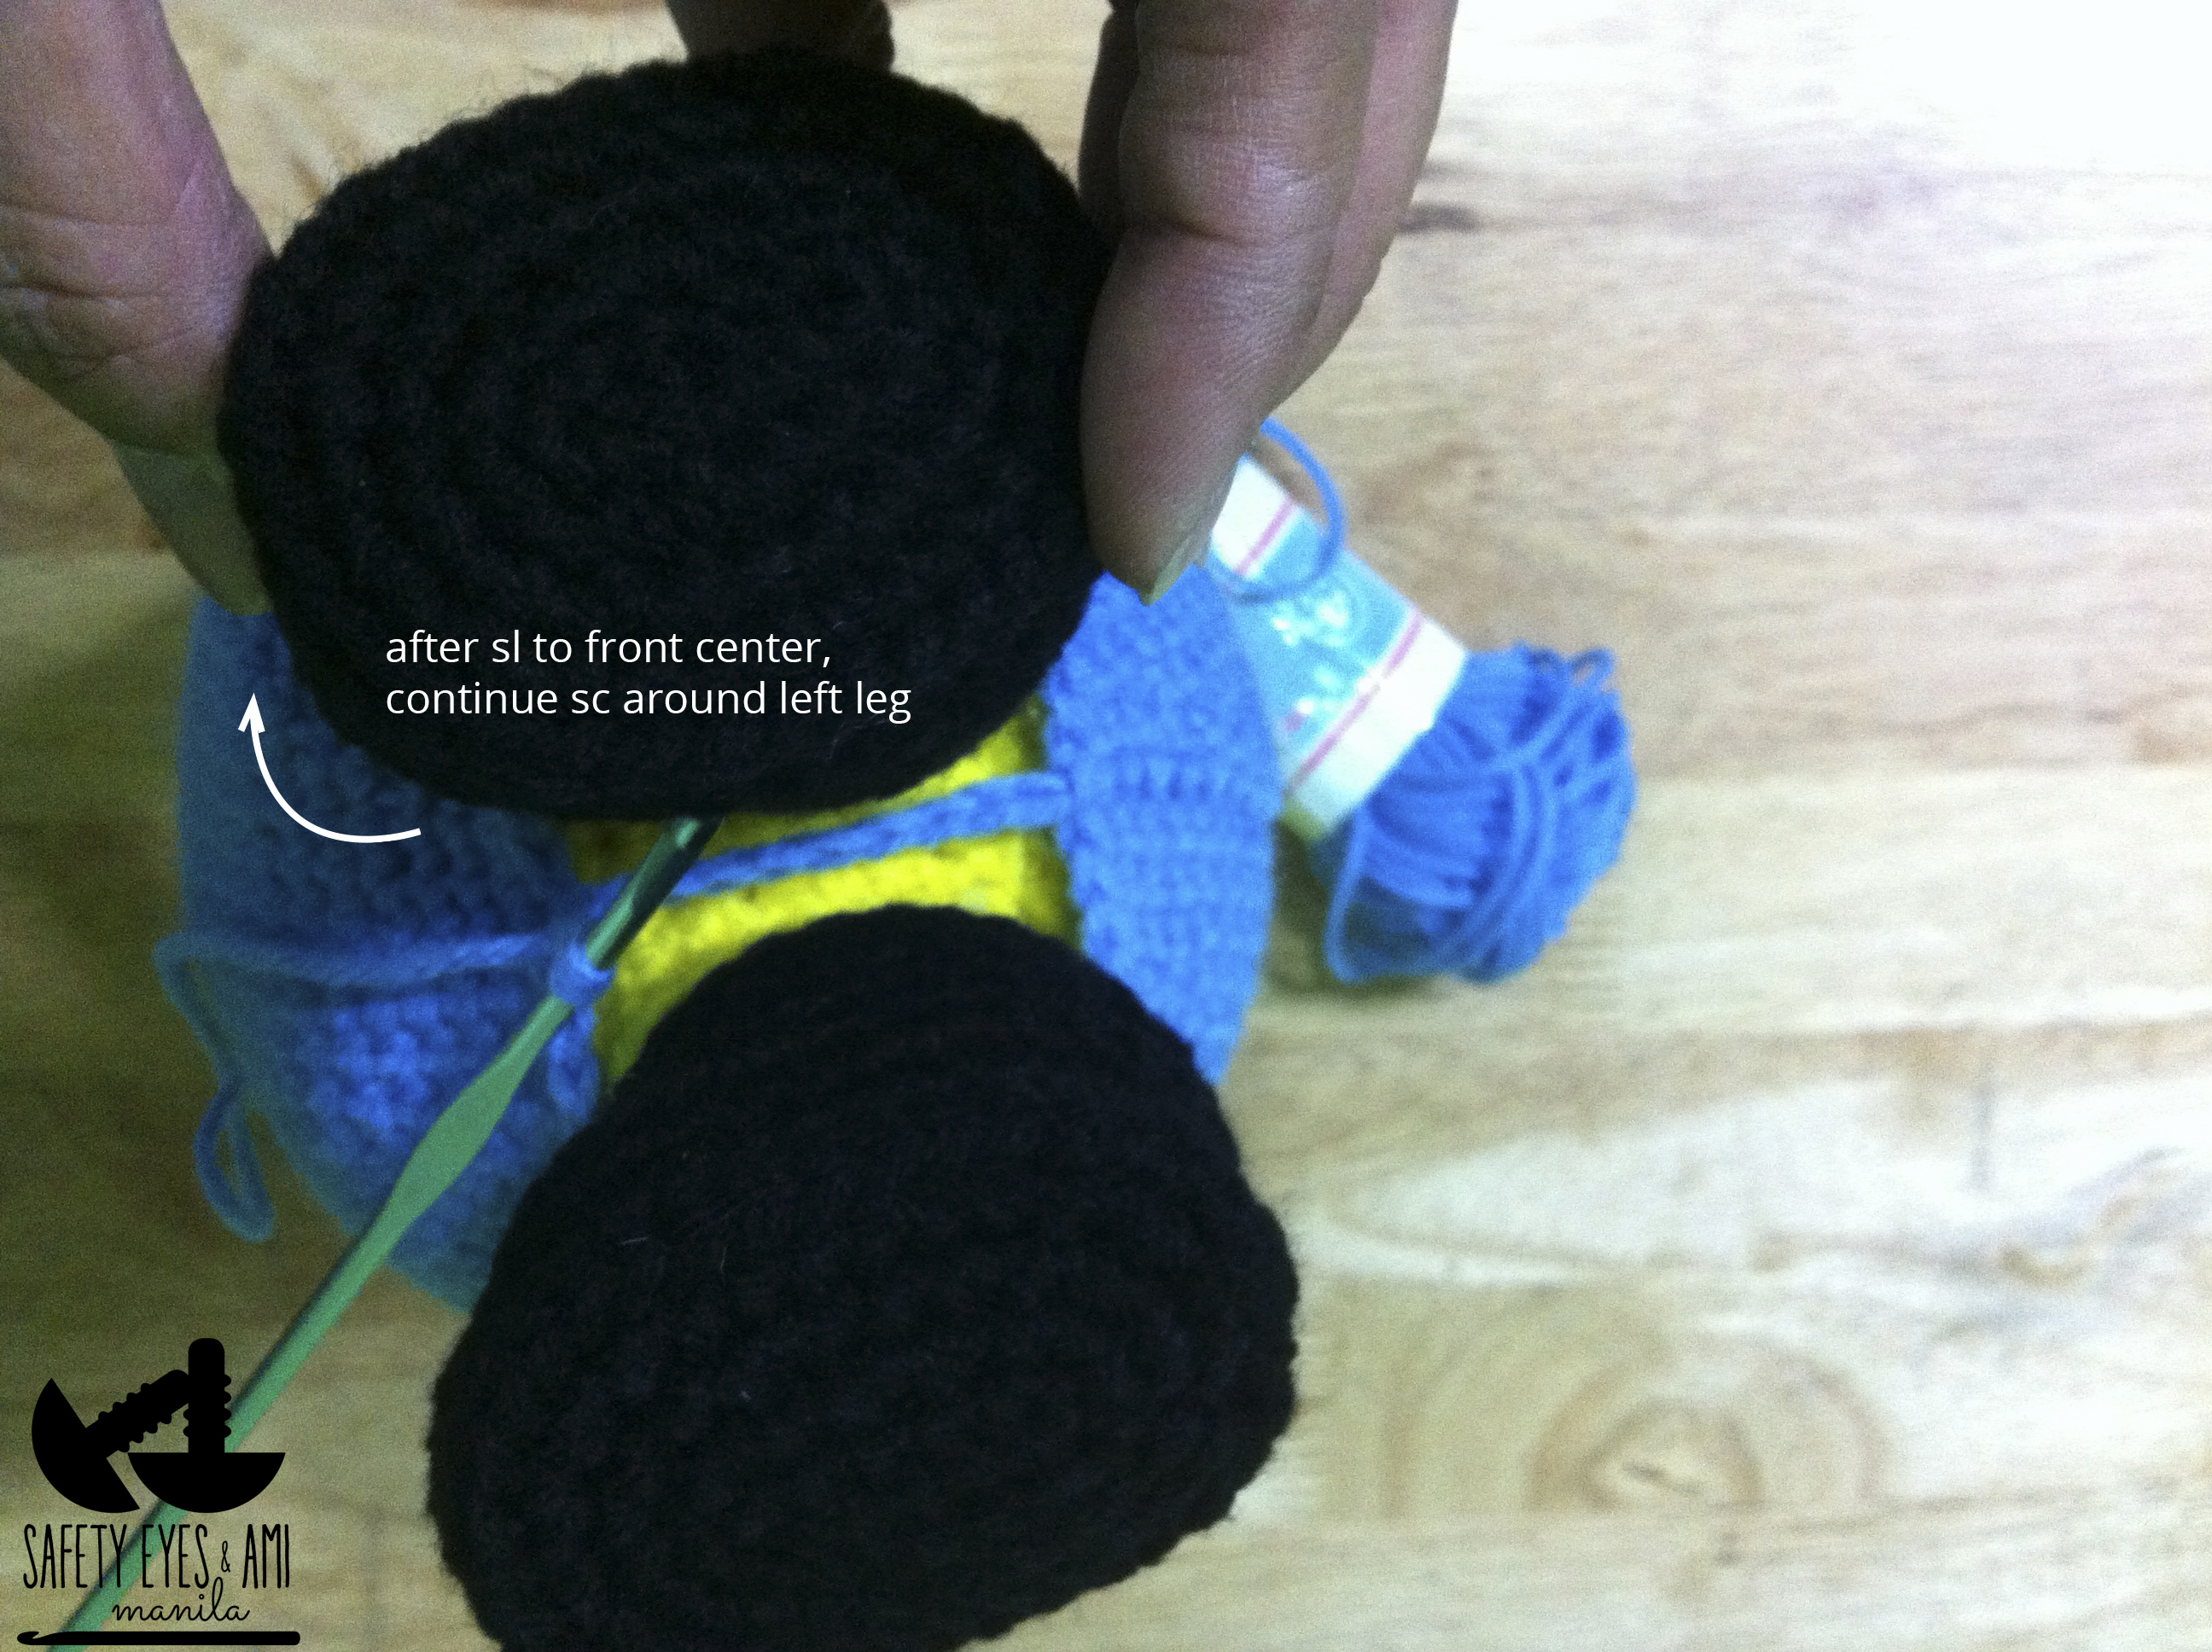
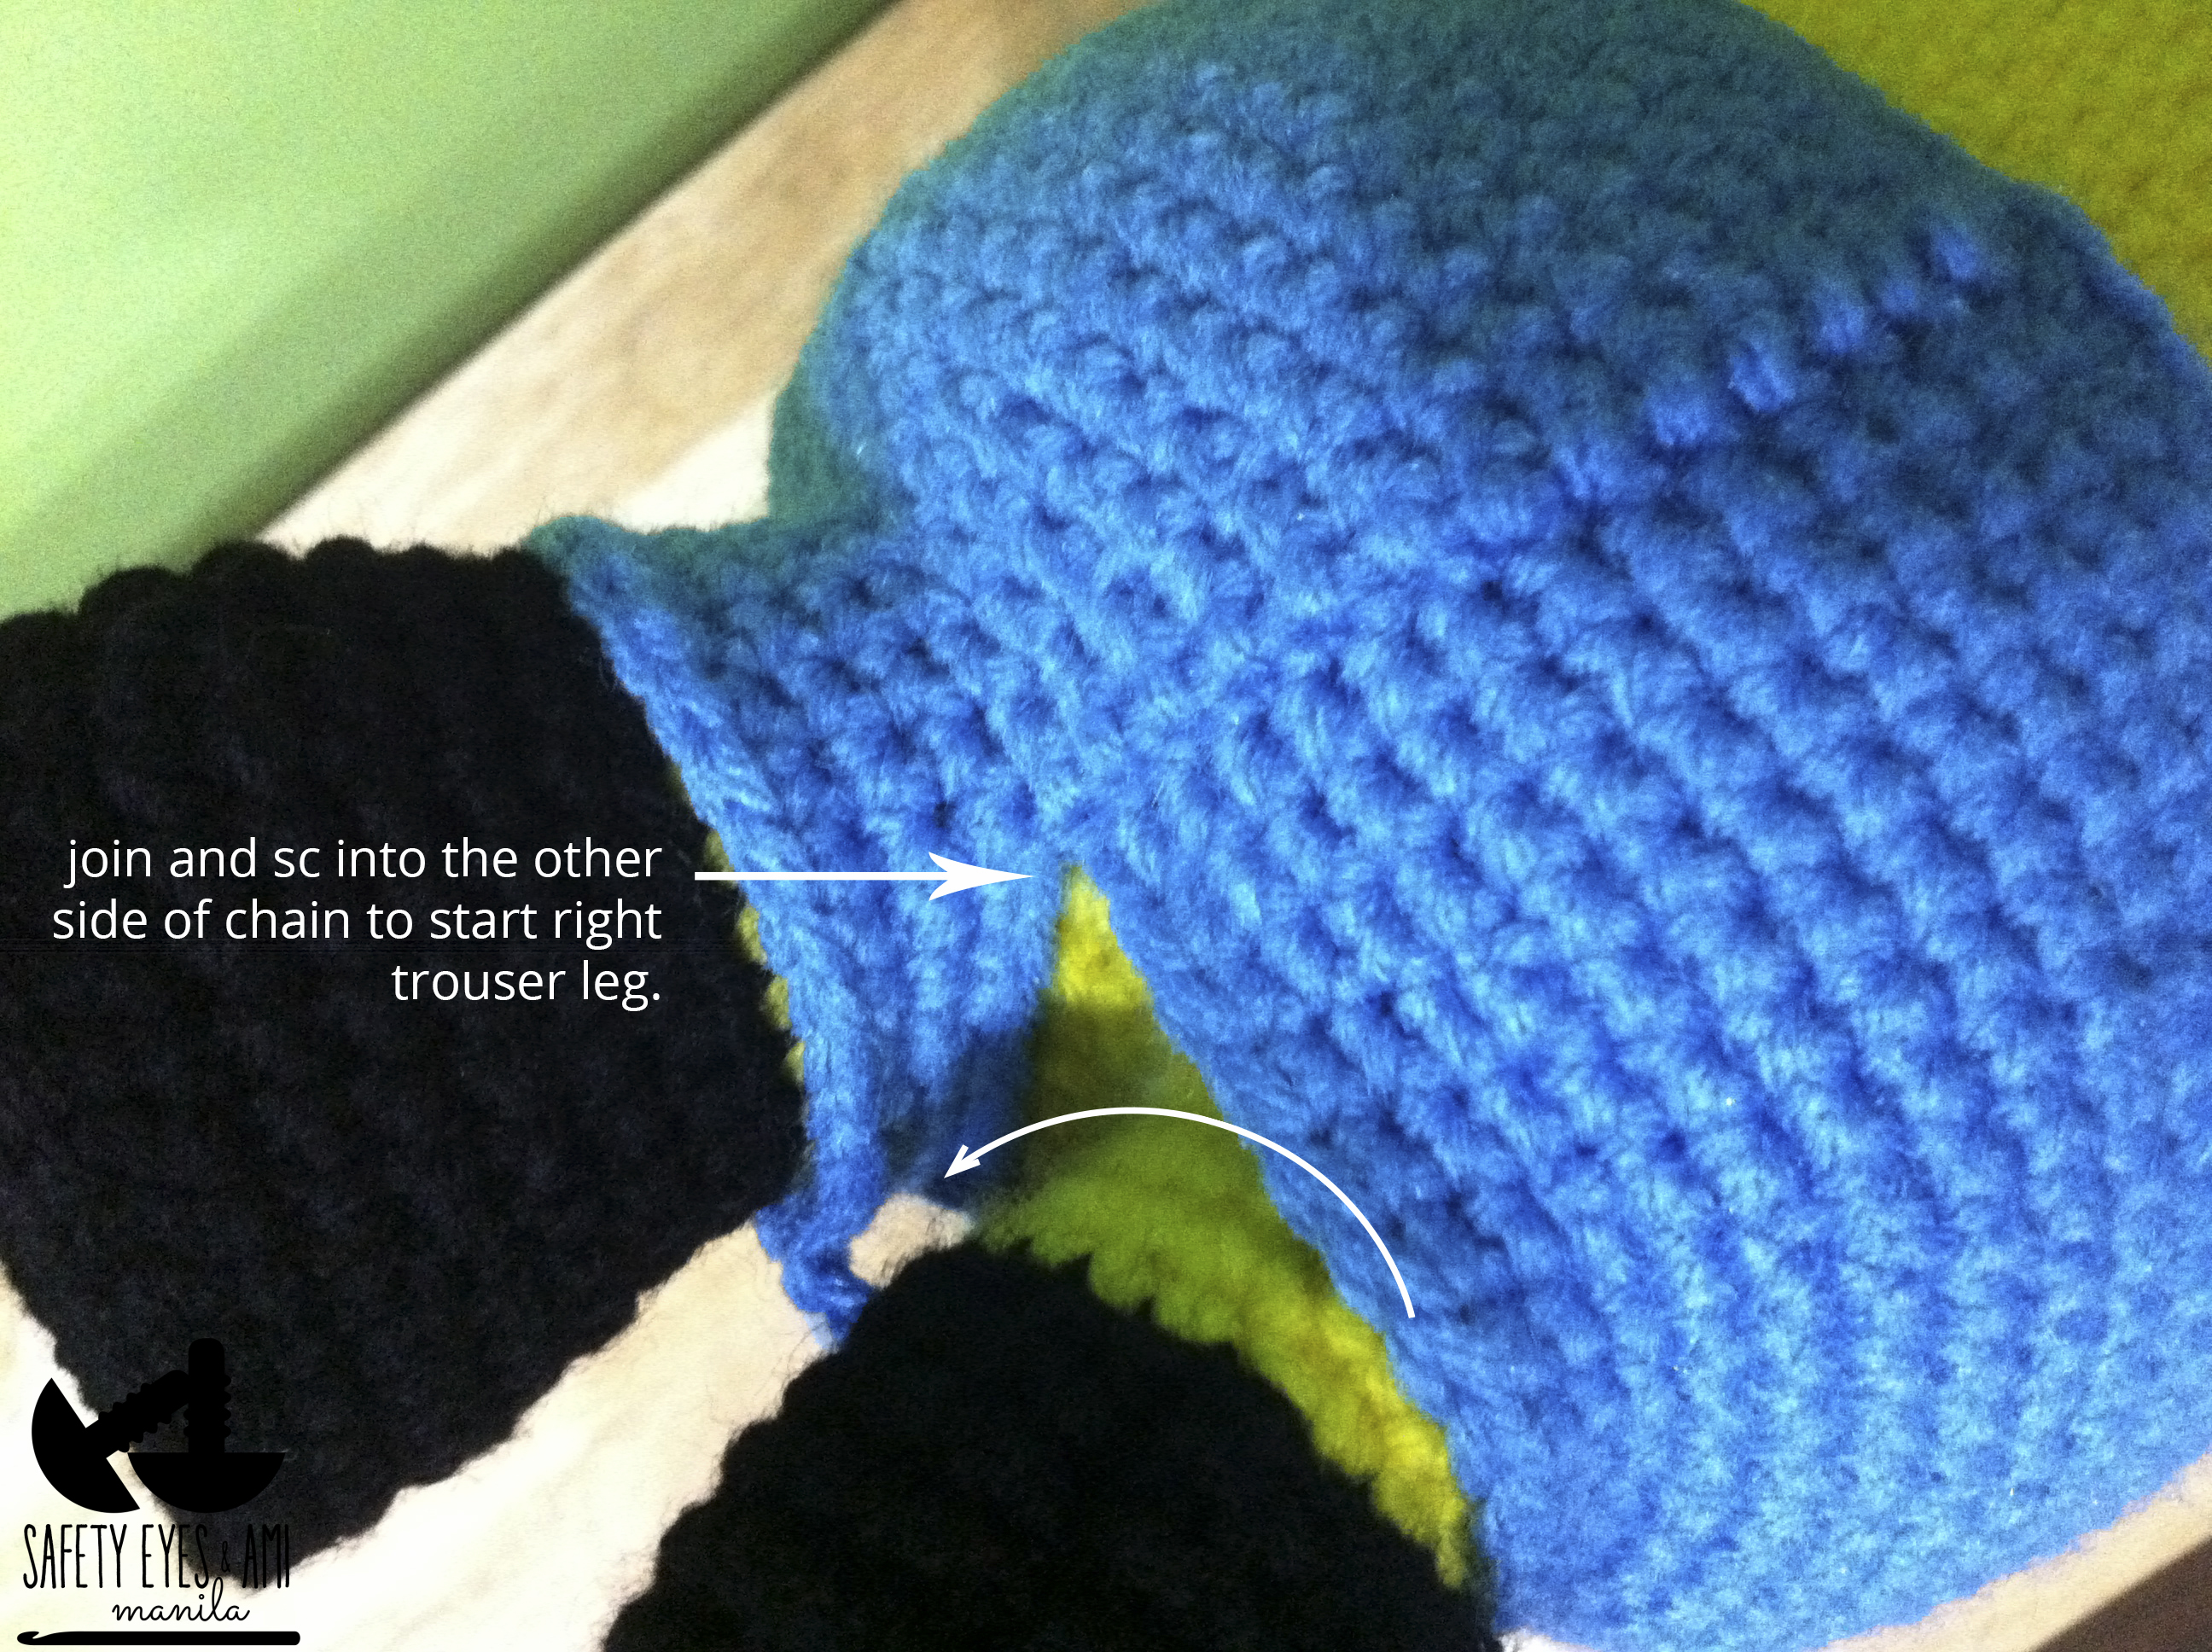
Sc continuously around the left leg until you reach the desired trouser length. You'll need to sc on one side of the chain making sure you leave the other side of the chain for the right trouser leg. Count your stitches at the end of the first round and try to make the same for the right leg. Mine didn't come out even. I think the right leg had a couple more stitches but in the end it really isn't very noticeable. Finish and close as usual.
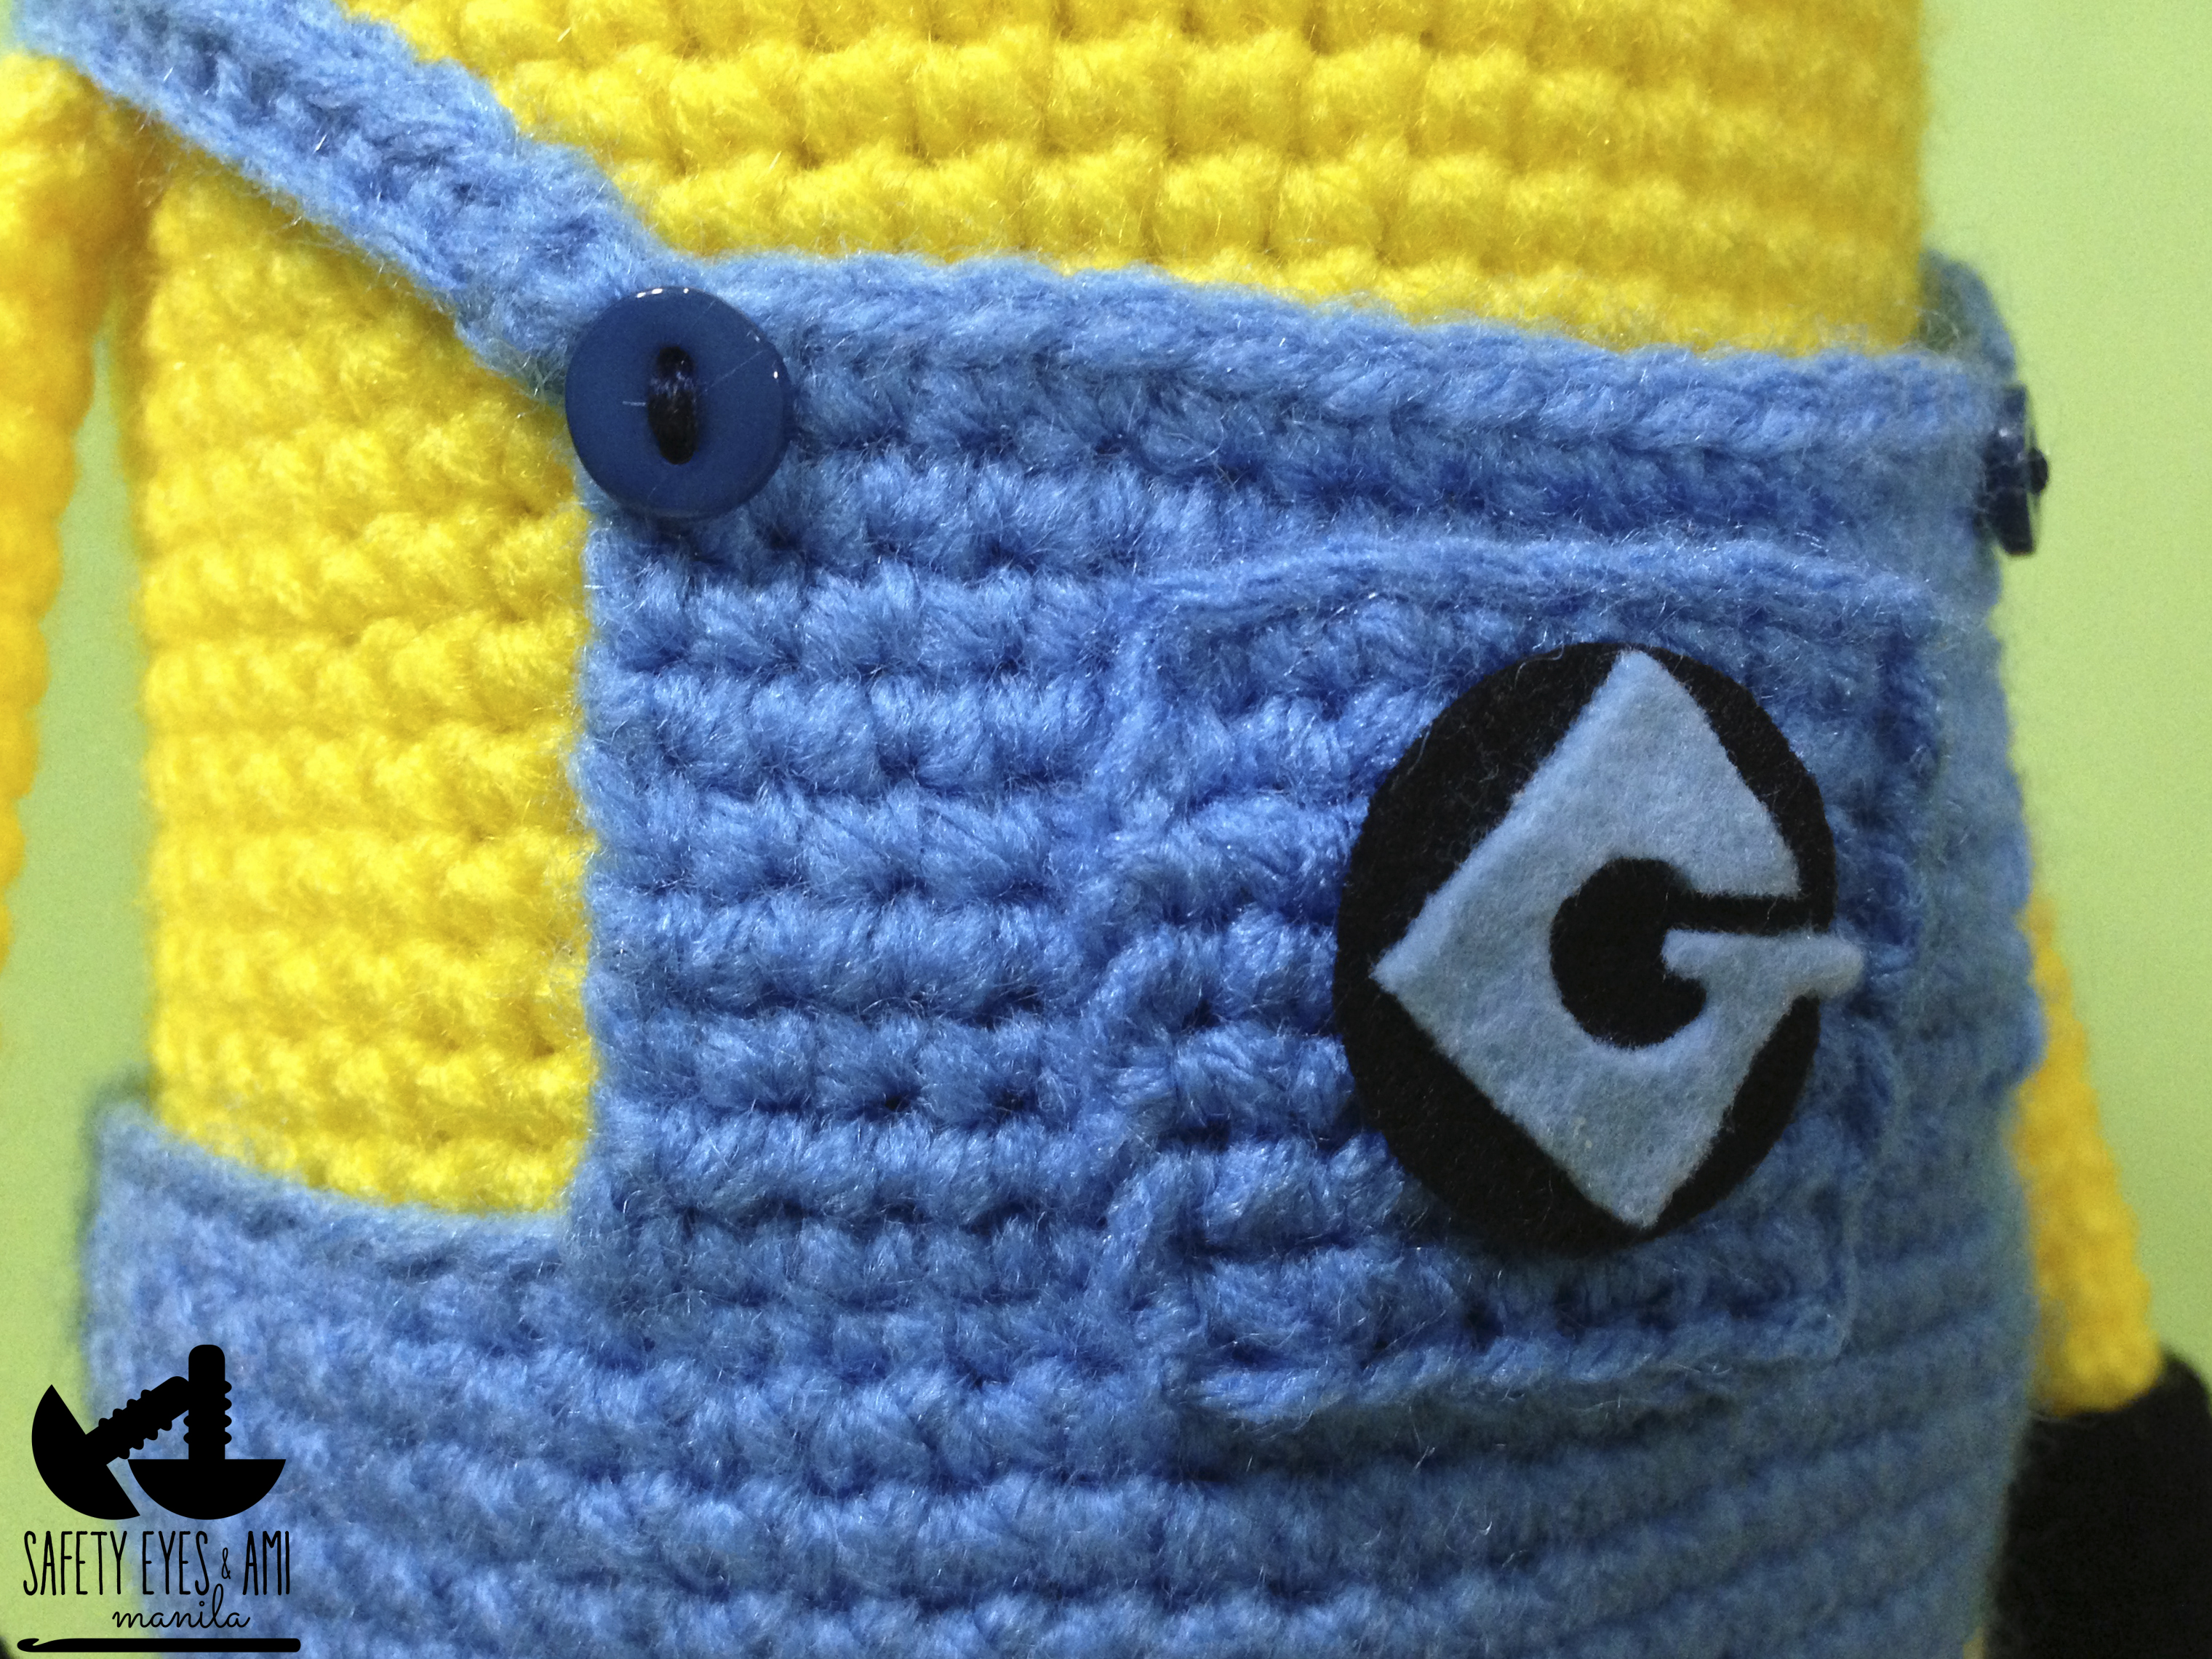
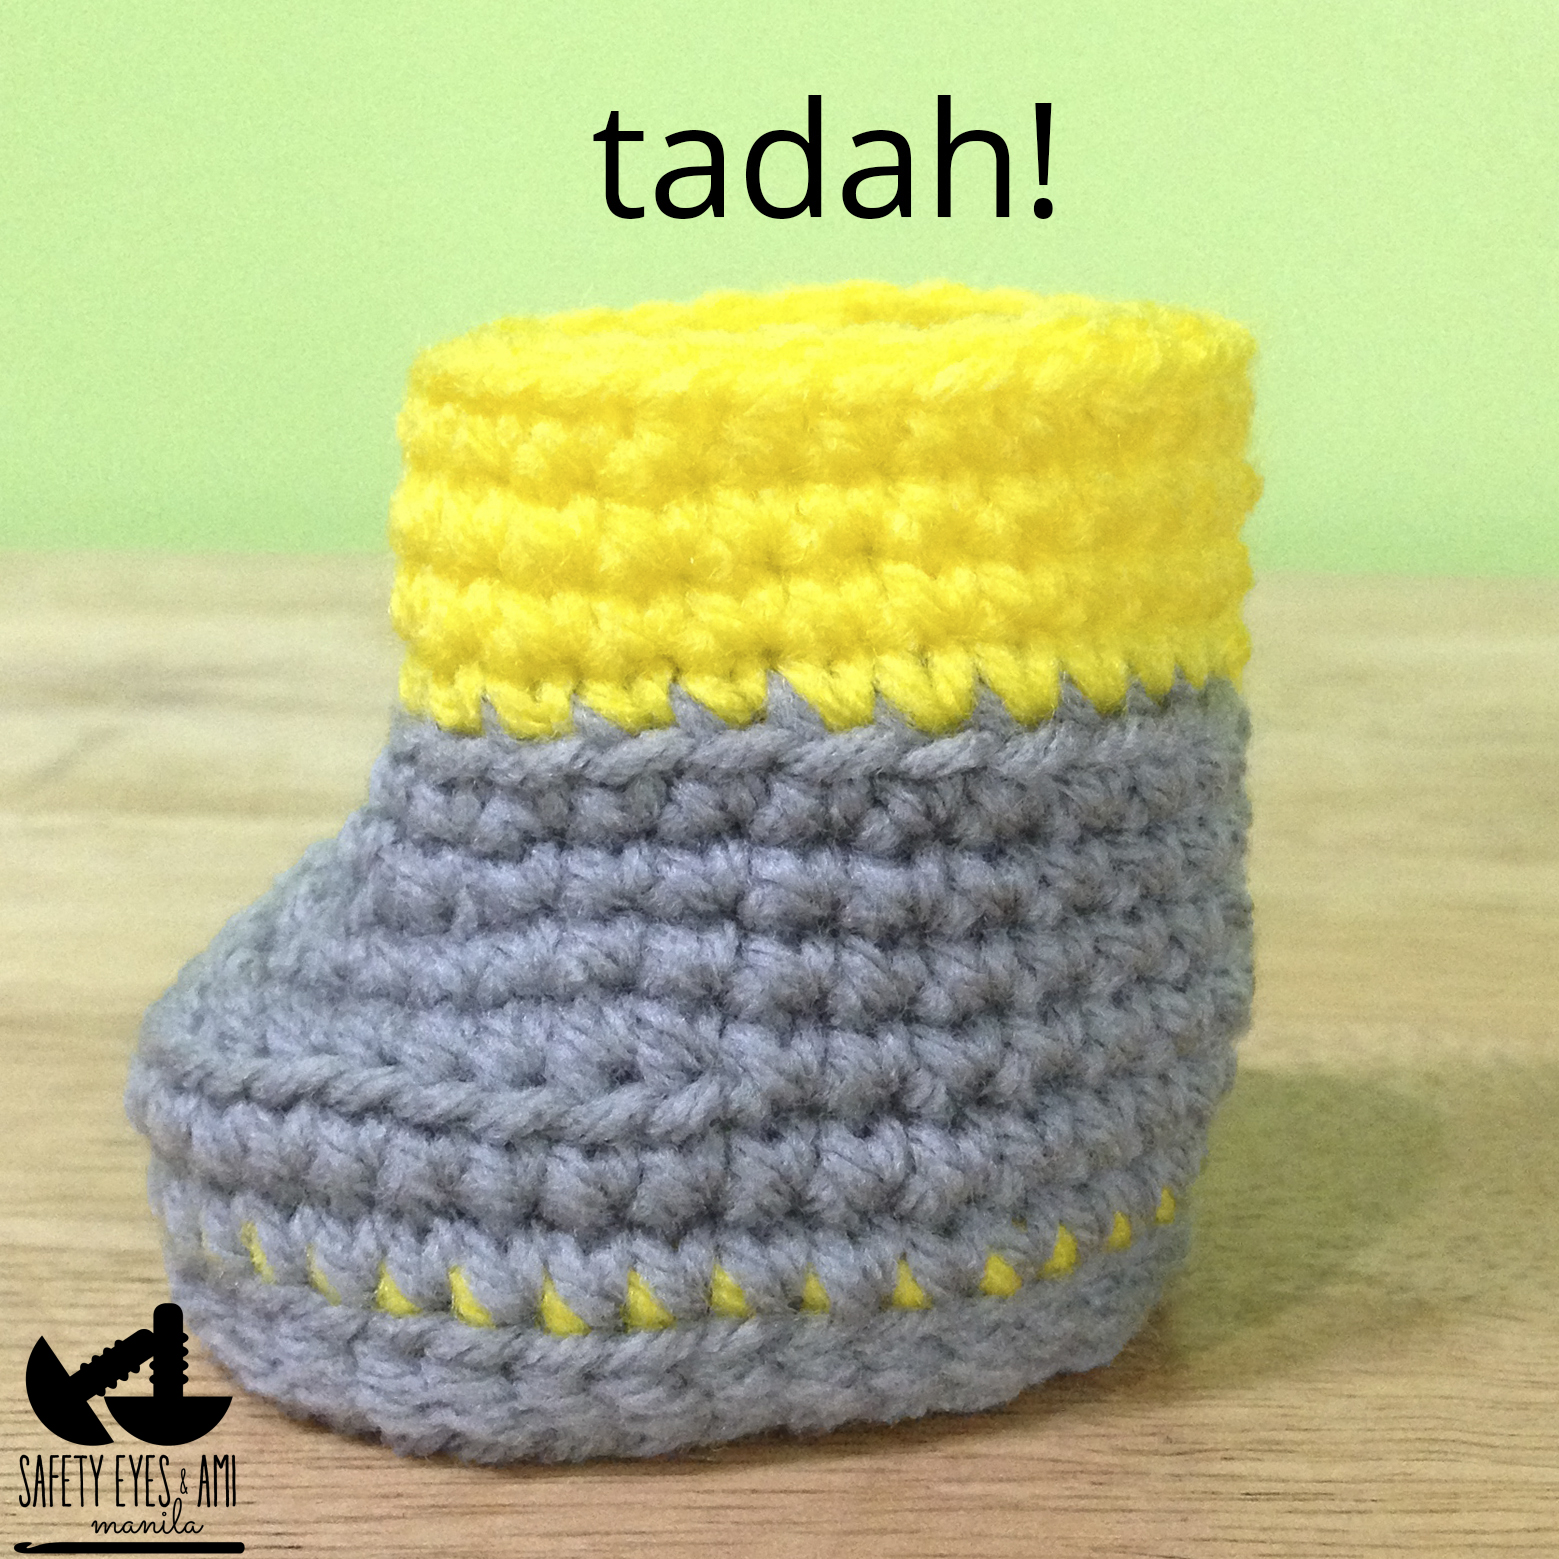
So here is my finished Minion! Because of his double sole boots and big feet, he can easily stand on his own. If you lift the hem of his trousers, you can see his yellow legs (tee hee hee). Unfortunately because of how the overalls are made, they will never come off like Stephanie's unless you make his trouser legs loose enough for his feet to pass through or make his feet smaller.
I hope you've found my instructions and photos helpful. You are free to share them but please, link back to this blog should you wish to share any of my photos or instructions. Again, I'd like to thank Stephanie of AllAboutAmi for sharing her pattern and inspiring me to experiment and share :)
50 Comments
Sandie
8/19/2013 10:00:44 am
Thank you for this wonderful tutorial, I am also a fan of All about ami.
Rosanna
8/19/2013 10:07:21 am
Thank you Sandie! AllAboutAmi was one of the first blogs I read when I was trying to learn how to crochet =)
Sandie
8/19/2013 08:54:20 pm
Thank you for your help. I have started my minion (wish me luck).
Rosanna
8/19/2013 11:30:17 pm
I agree. Stephanie's blog was a big part of my learning. I'm really excited for you Sandie! I hope you have loads of fun making your minion =) I have a Flickr account (bogeezr) where there are photos of the 1 eyed minion in case you need some inspiration =)
Jennifer
9/24/2013 08:58:27 pm
I love the adjustments you made to this pattern! I am new to amigurumi and I'm making this adorable minion for my son's second birthday. I am stuck on the start of your cute boots... R1 starts "inc, sc 3, make 3 sc in last chain...sc 4, inc. (12)" I keep counting 14 stitches. What am I missing?
Rosanna Z. Romero
9/24/2013 11:29:40 pm
Well spotted Jennifer! Just omit the last inc in R1 and you'll have 12 :) I'll be sure to edit my pattern. Thanks!
Jennifer
9/25/2013 06:02:20 am
Thank you Rosanna! I really appreciate your quick response and offer of help if needed :) I can't wait to see how this little guy turns out! Now I'm off to crochet!
Rosanna Z. Romero
9/25/2013 06:11:23 am
No worries. Glad you pointed it out.
shadows
12/10/2013 12:34:15 pm
Thanks for your pattern !
Rosanna Z. Romero
12/10/2013 01:30:16 pm
Hello! I just checked my blog on the Minion and all the photos are there. Maybe you just need to wait a bit for all the photos to load? Or refresh your browser?
shadows
12/10/2013 05:19:38 pm
Thanks for your reply !
Rosanna Z. Romero
12/10/2013 05:37:41 pm
You're welcome! Have fun! =)
Roxanne
1/28/2014 02:20:51 pm
Thanks so much for the detailed pics. I think your adjustments to the pattern made this Minion so much cuter. Made this one for my cousin. I can't seem to get the bum seam right though. Mine was barely visible but I don't know what I did wrong.
Rosanna Z. Romero
1/28/2014 03:04:45 pm
Hi Roxanne! I can guess maybe your sl st and ch 1 at the end of your rounds may have been too tight? If you like, you can send me a photo at [email protected]. I'd be happy to help you figure it out for when you make your next Minion :)
Estelle Brown
8/26/2014 03:32:16 am
Made your minion for a shut-in friend who is minion crazy. She loved it so much she cried. You made her very happy. thank you.
Rosanna Z. Romero
8/26/2014 10:35:28 am
Thank you for that Estelle! Glad to be a part if it! You have made me very happy too. I'm glad to hear that your hard work paid off and your Minion has found a good home! I hope that this inspires you -as it has me- to continue to share your ami projects with others. I wish you and your friend well. Happy Crocheting!
Rosanna Z. Romero
9/29/2014 08:38:23 am
Well done! You're welcome :-) And thank you for sharing this with me.
Simone Lima
9/30/2014 07:47:35 pm
Wow... Your Minion is just perfect! It's the best I've ever seen in amigurumi. Thank you sooooo much for sharing your creativity.
Rosanna Z. Romero
10/3/2014 01:21:30 pm
Thank you so much Simone! I hope you enjoy making your own little Minion too!
May Lai
11/26/2014 07:55:19 am
Hi Yolanda,
Stacie
1/11/2015 08:13:59 am
Rosanna, your adaptation to Stephanie's minion is so clever and adorable. Thank you for sharing your pattern. Quick question, what did you use for his smile? Did you just glue a piece of black yarn to him?
Rosanna Z. Romero
1/12/2015 09:57:41 am
Thank you Stacie!
Connie
1/31/2015 04:05:14 pm
Maybe I am missing it.. what size hook are you using and do you use the same hook through out the pattern .
Connie
3/24/2015 11:17:50 pm
Thank you for sharing your pattern I used yours and Stephanie Lau alone with looking at some other patterns and combining them. I have made several little ones happy I have made 9 all different sizes Thanks again
Rosanna Z. Romero
2/1/2015 10:55:56 am
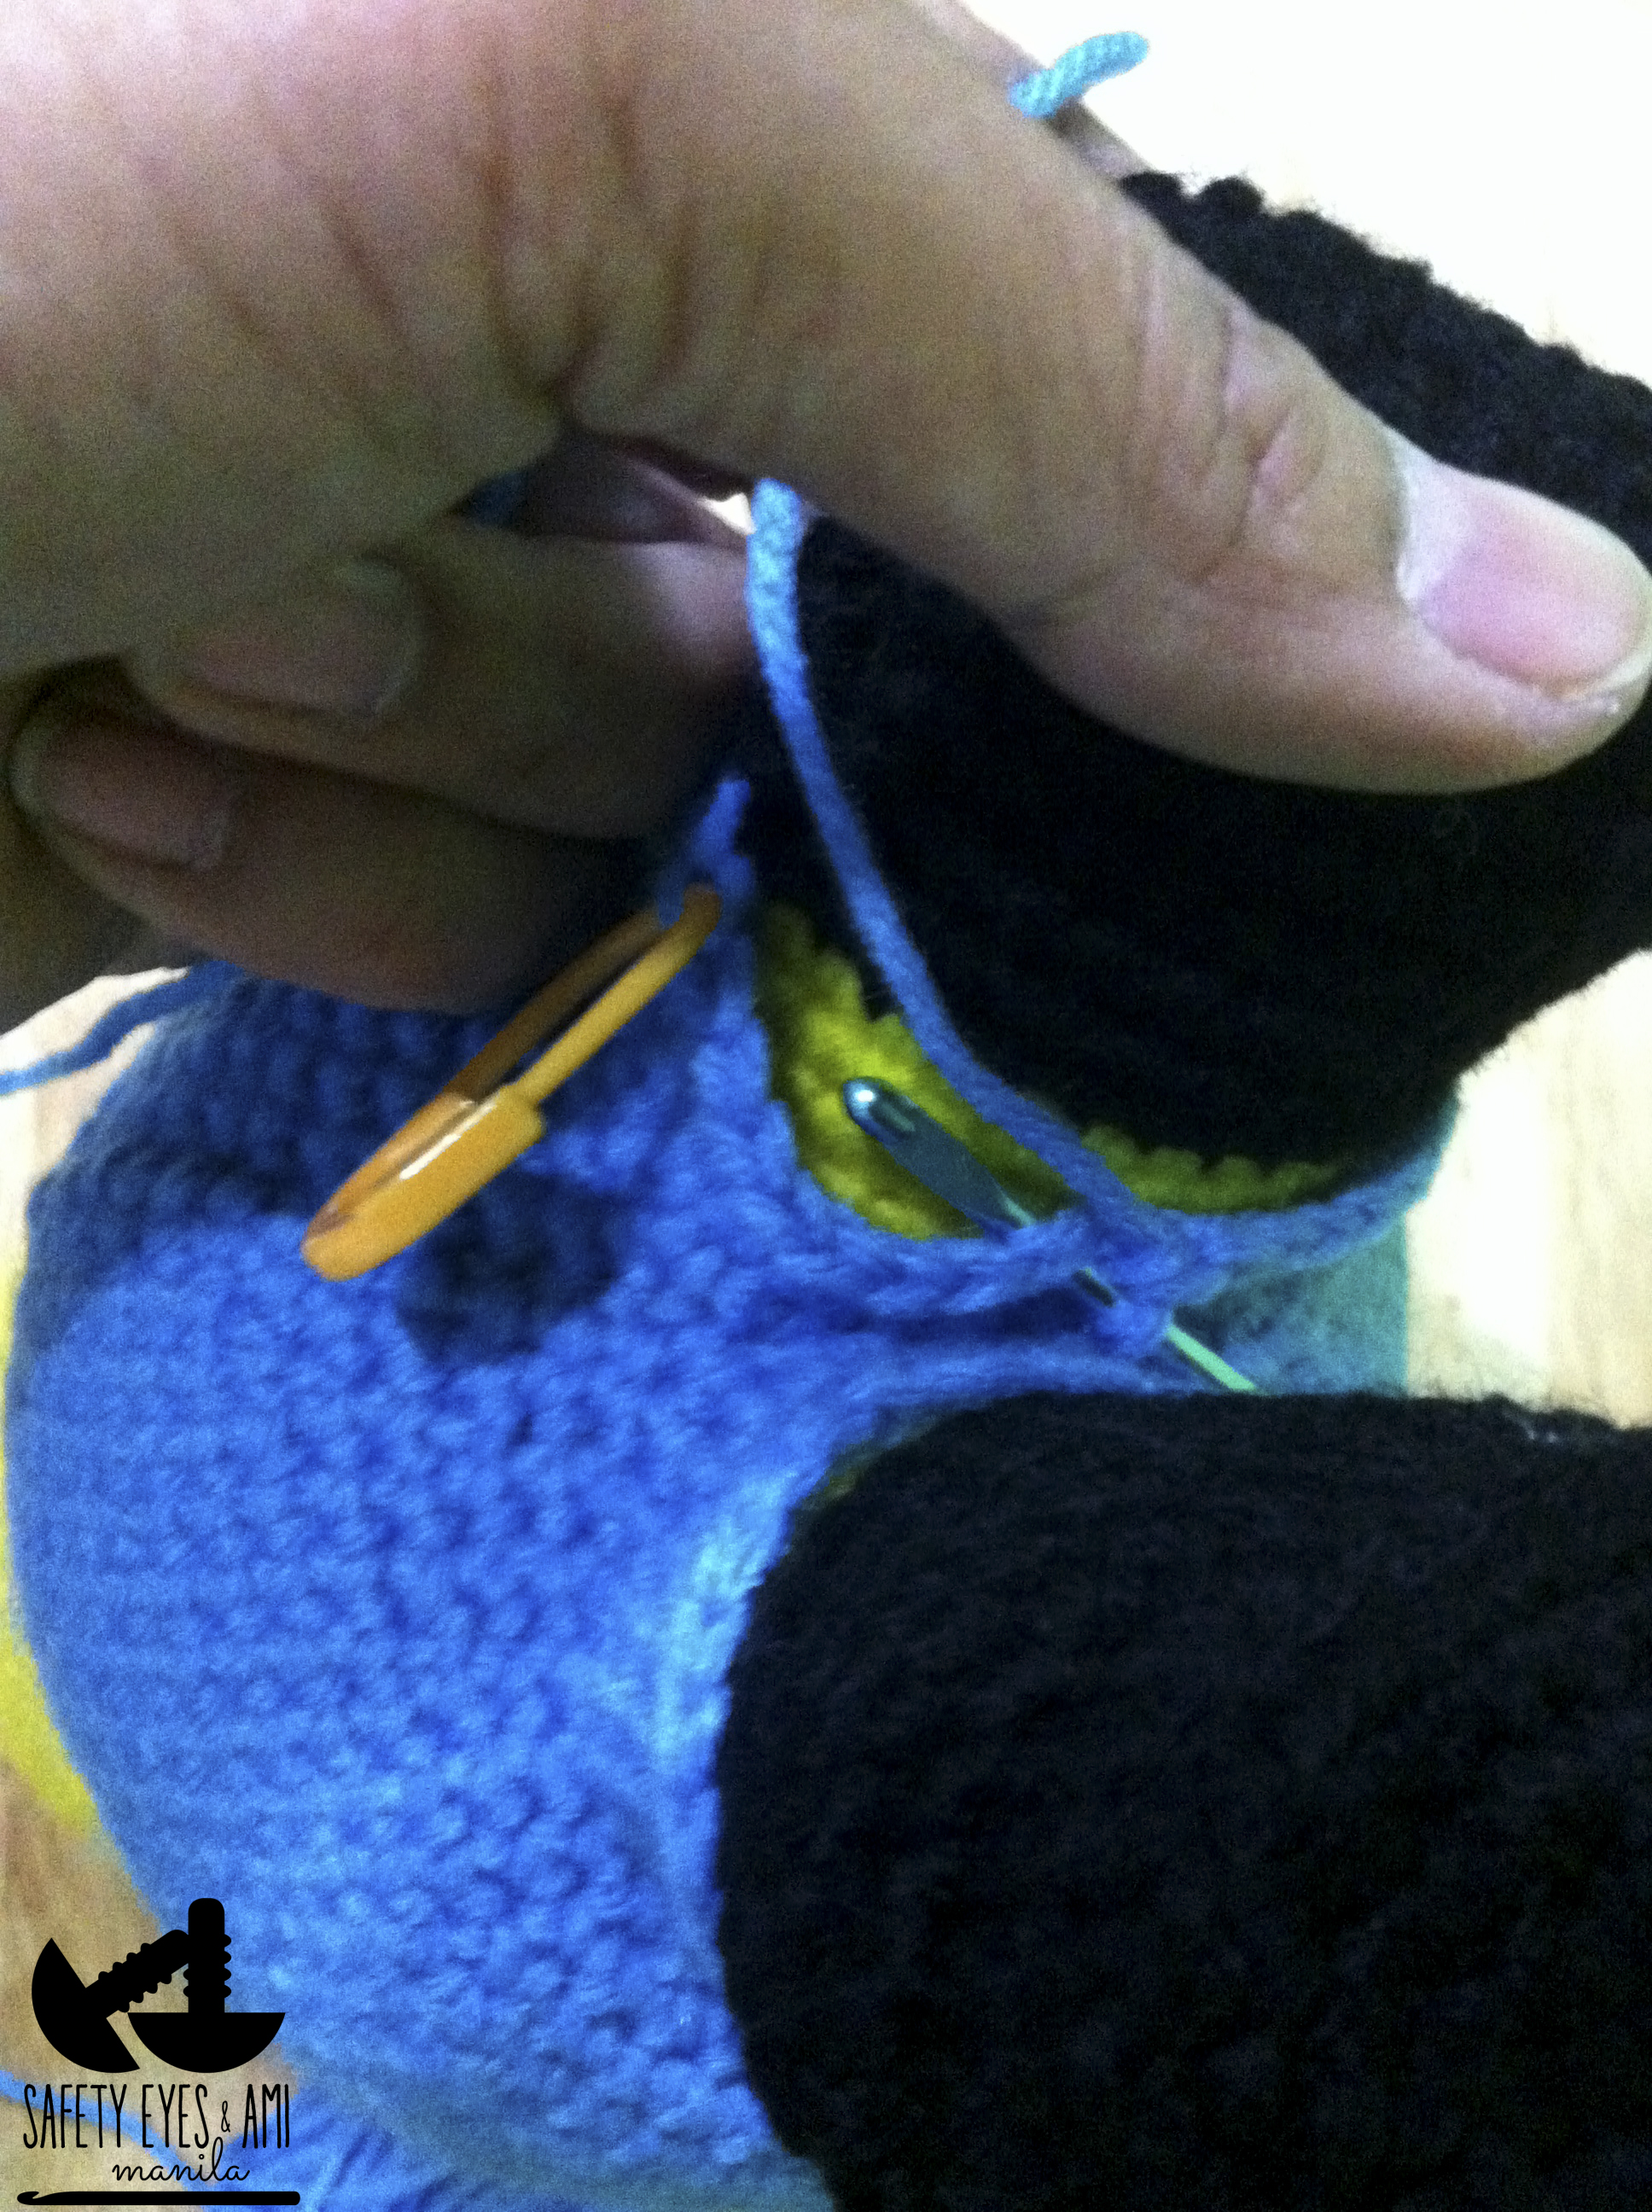
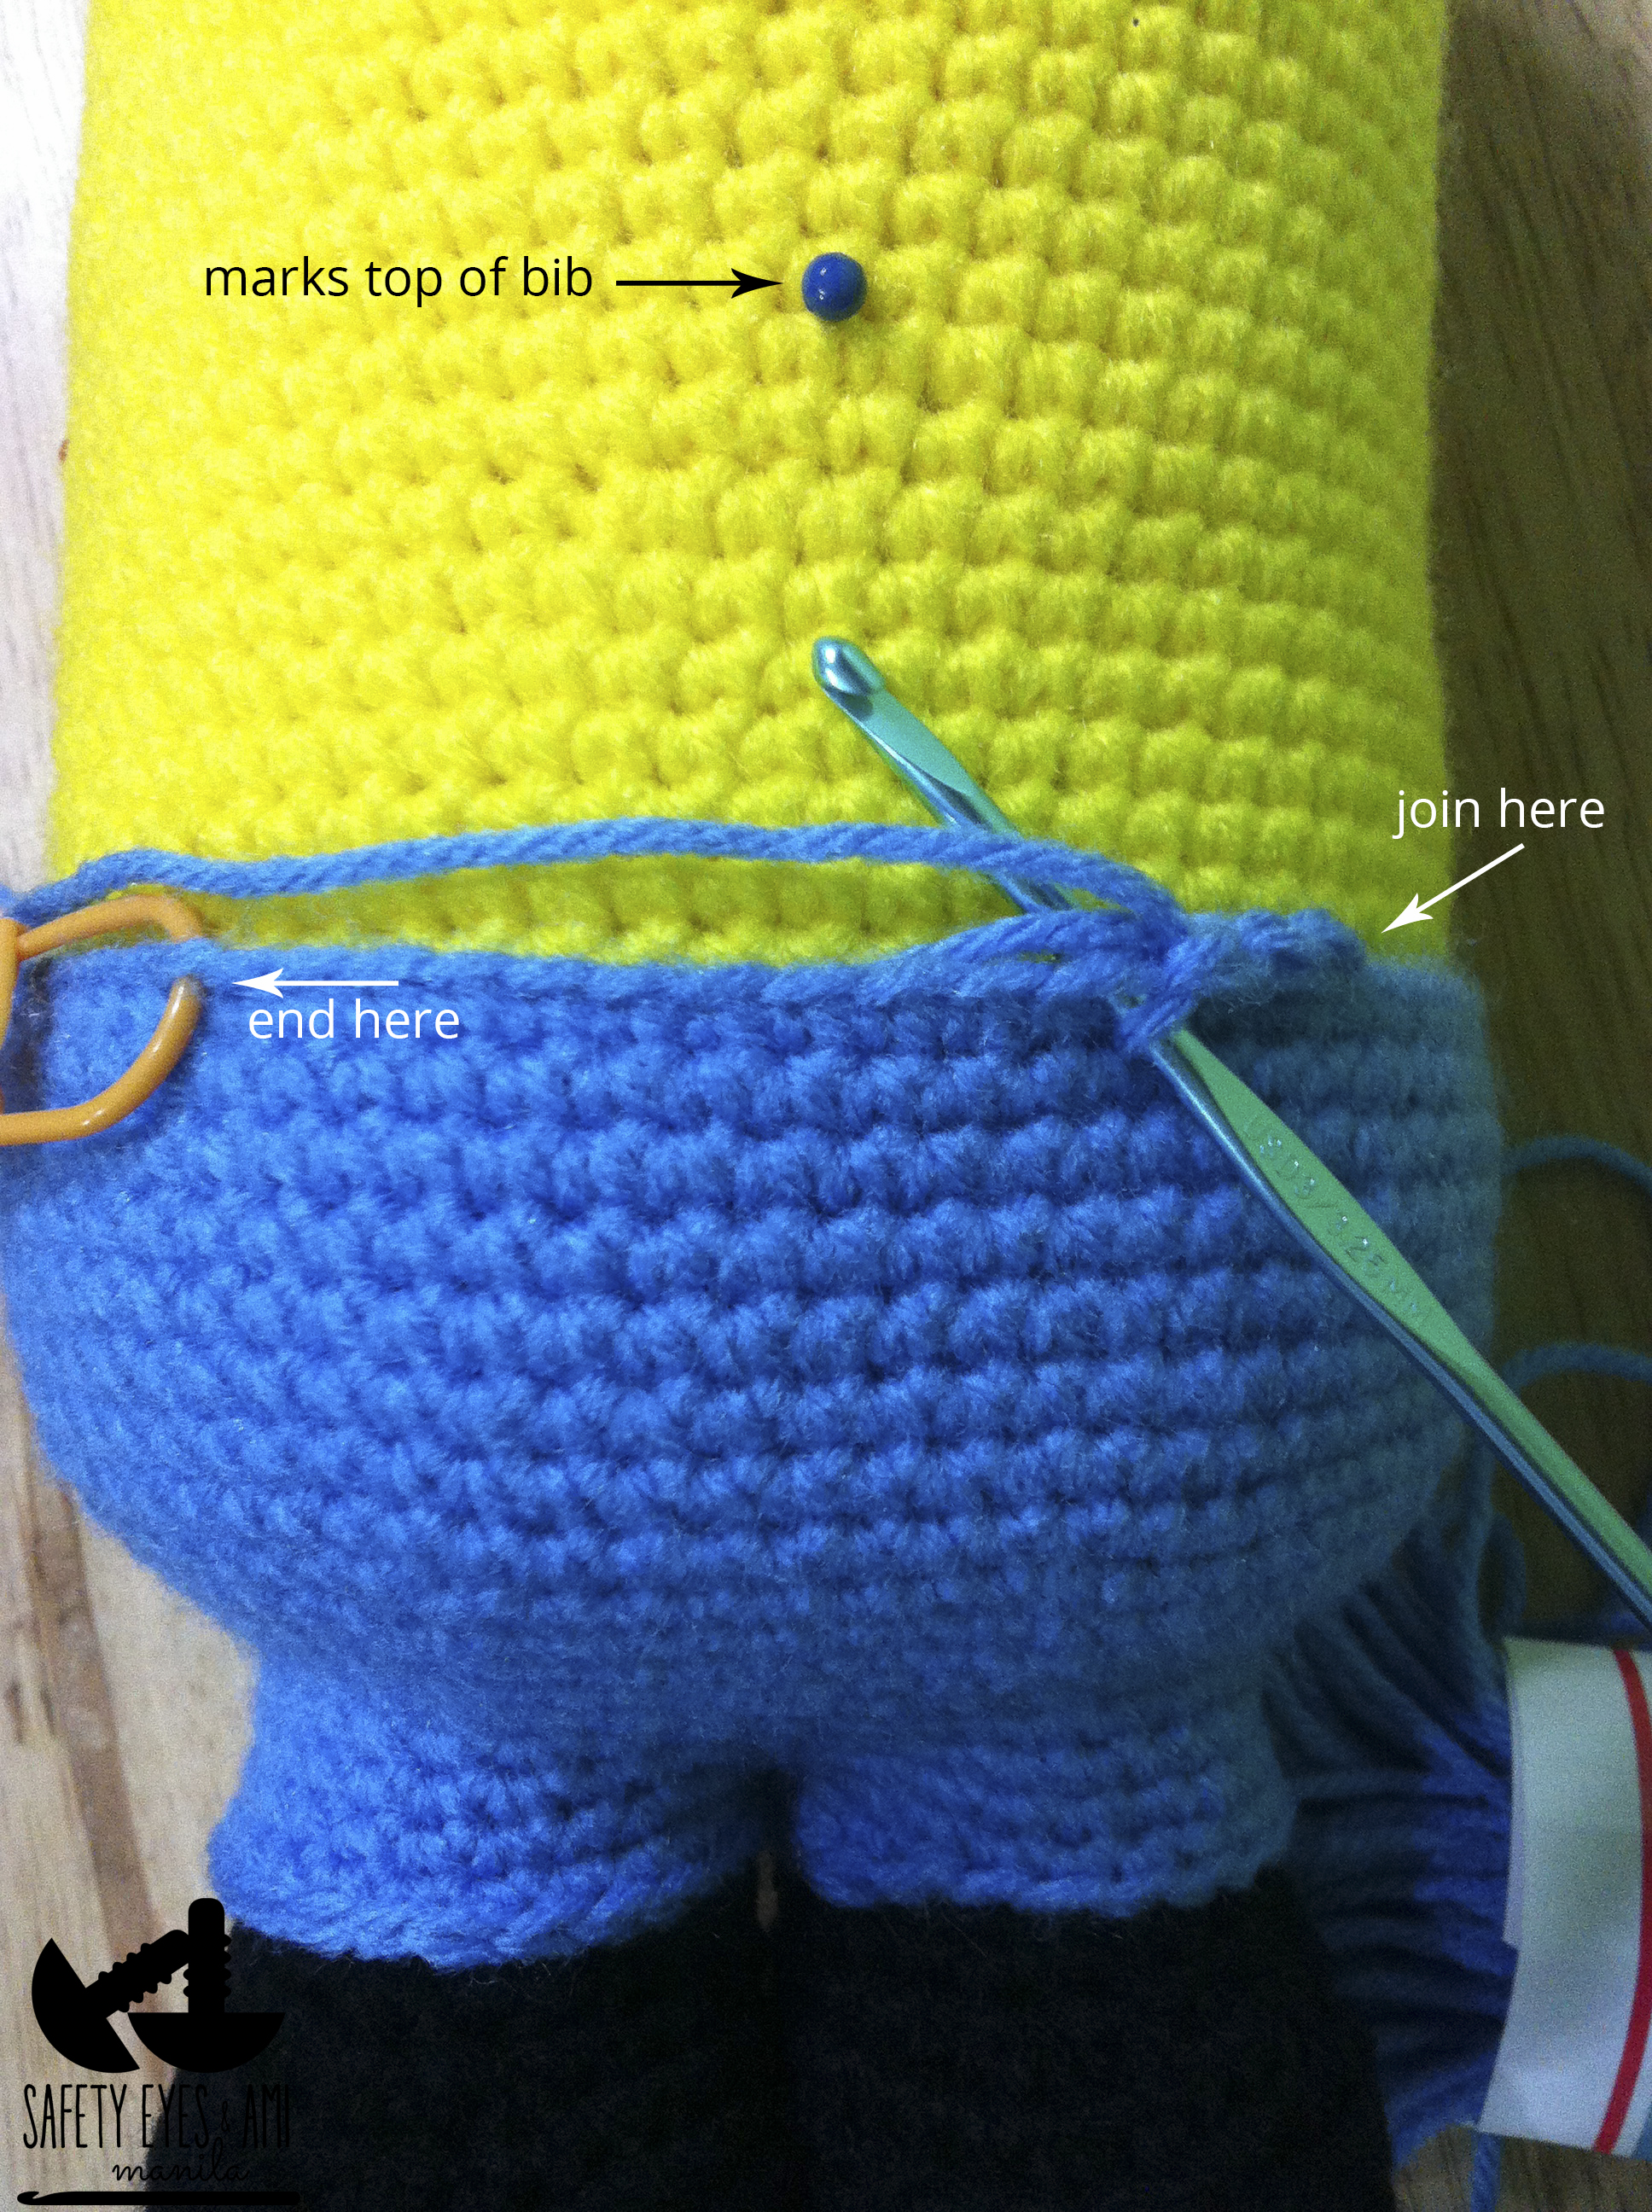
Hello Connie! I used a 3.25 hook. You may be able to see it if you zoom in on photo #1 of the BIB instructions. It's also on the photo that shows the SOLES when making the feet. But really, you can use another size hook depending on the thickness of your yarn :)
NinaK
8/7/2019 07:43:58 am
What yarn did you use? Thank you so much for publishing this. I have crocheted forever, but I am new to amigurumi and I love Minions. I have been having a hard time getting a good surface look. Still trying many yarn/hook variations.
Rosanna Z. Romero
2/1/2015 10:58:24 am
Hello Dori! This Minion is about 28-30cm tall. But you can make it taller or shorter depending on the yarn and hook you use and the number of rows you make for the body.
Alannah
2/19/2015 02:58:10 am
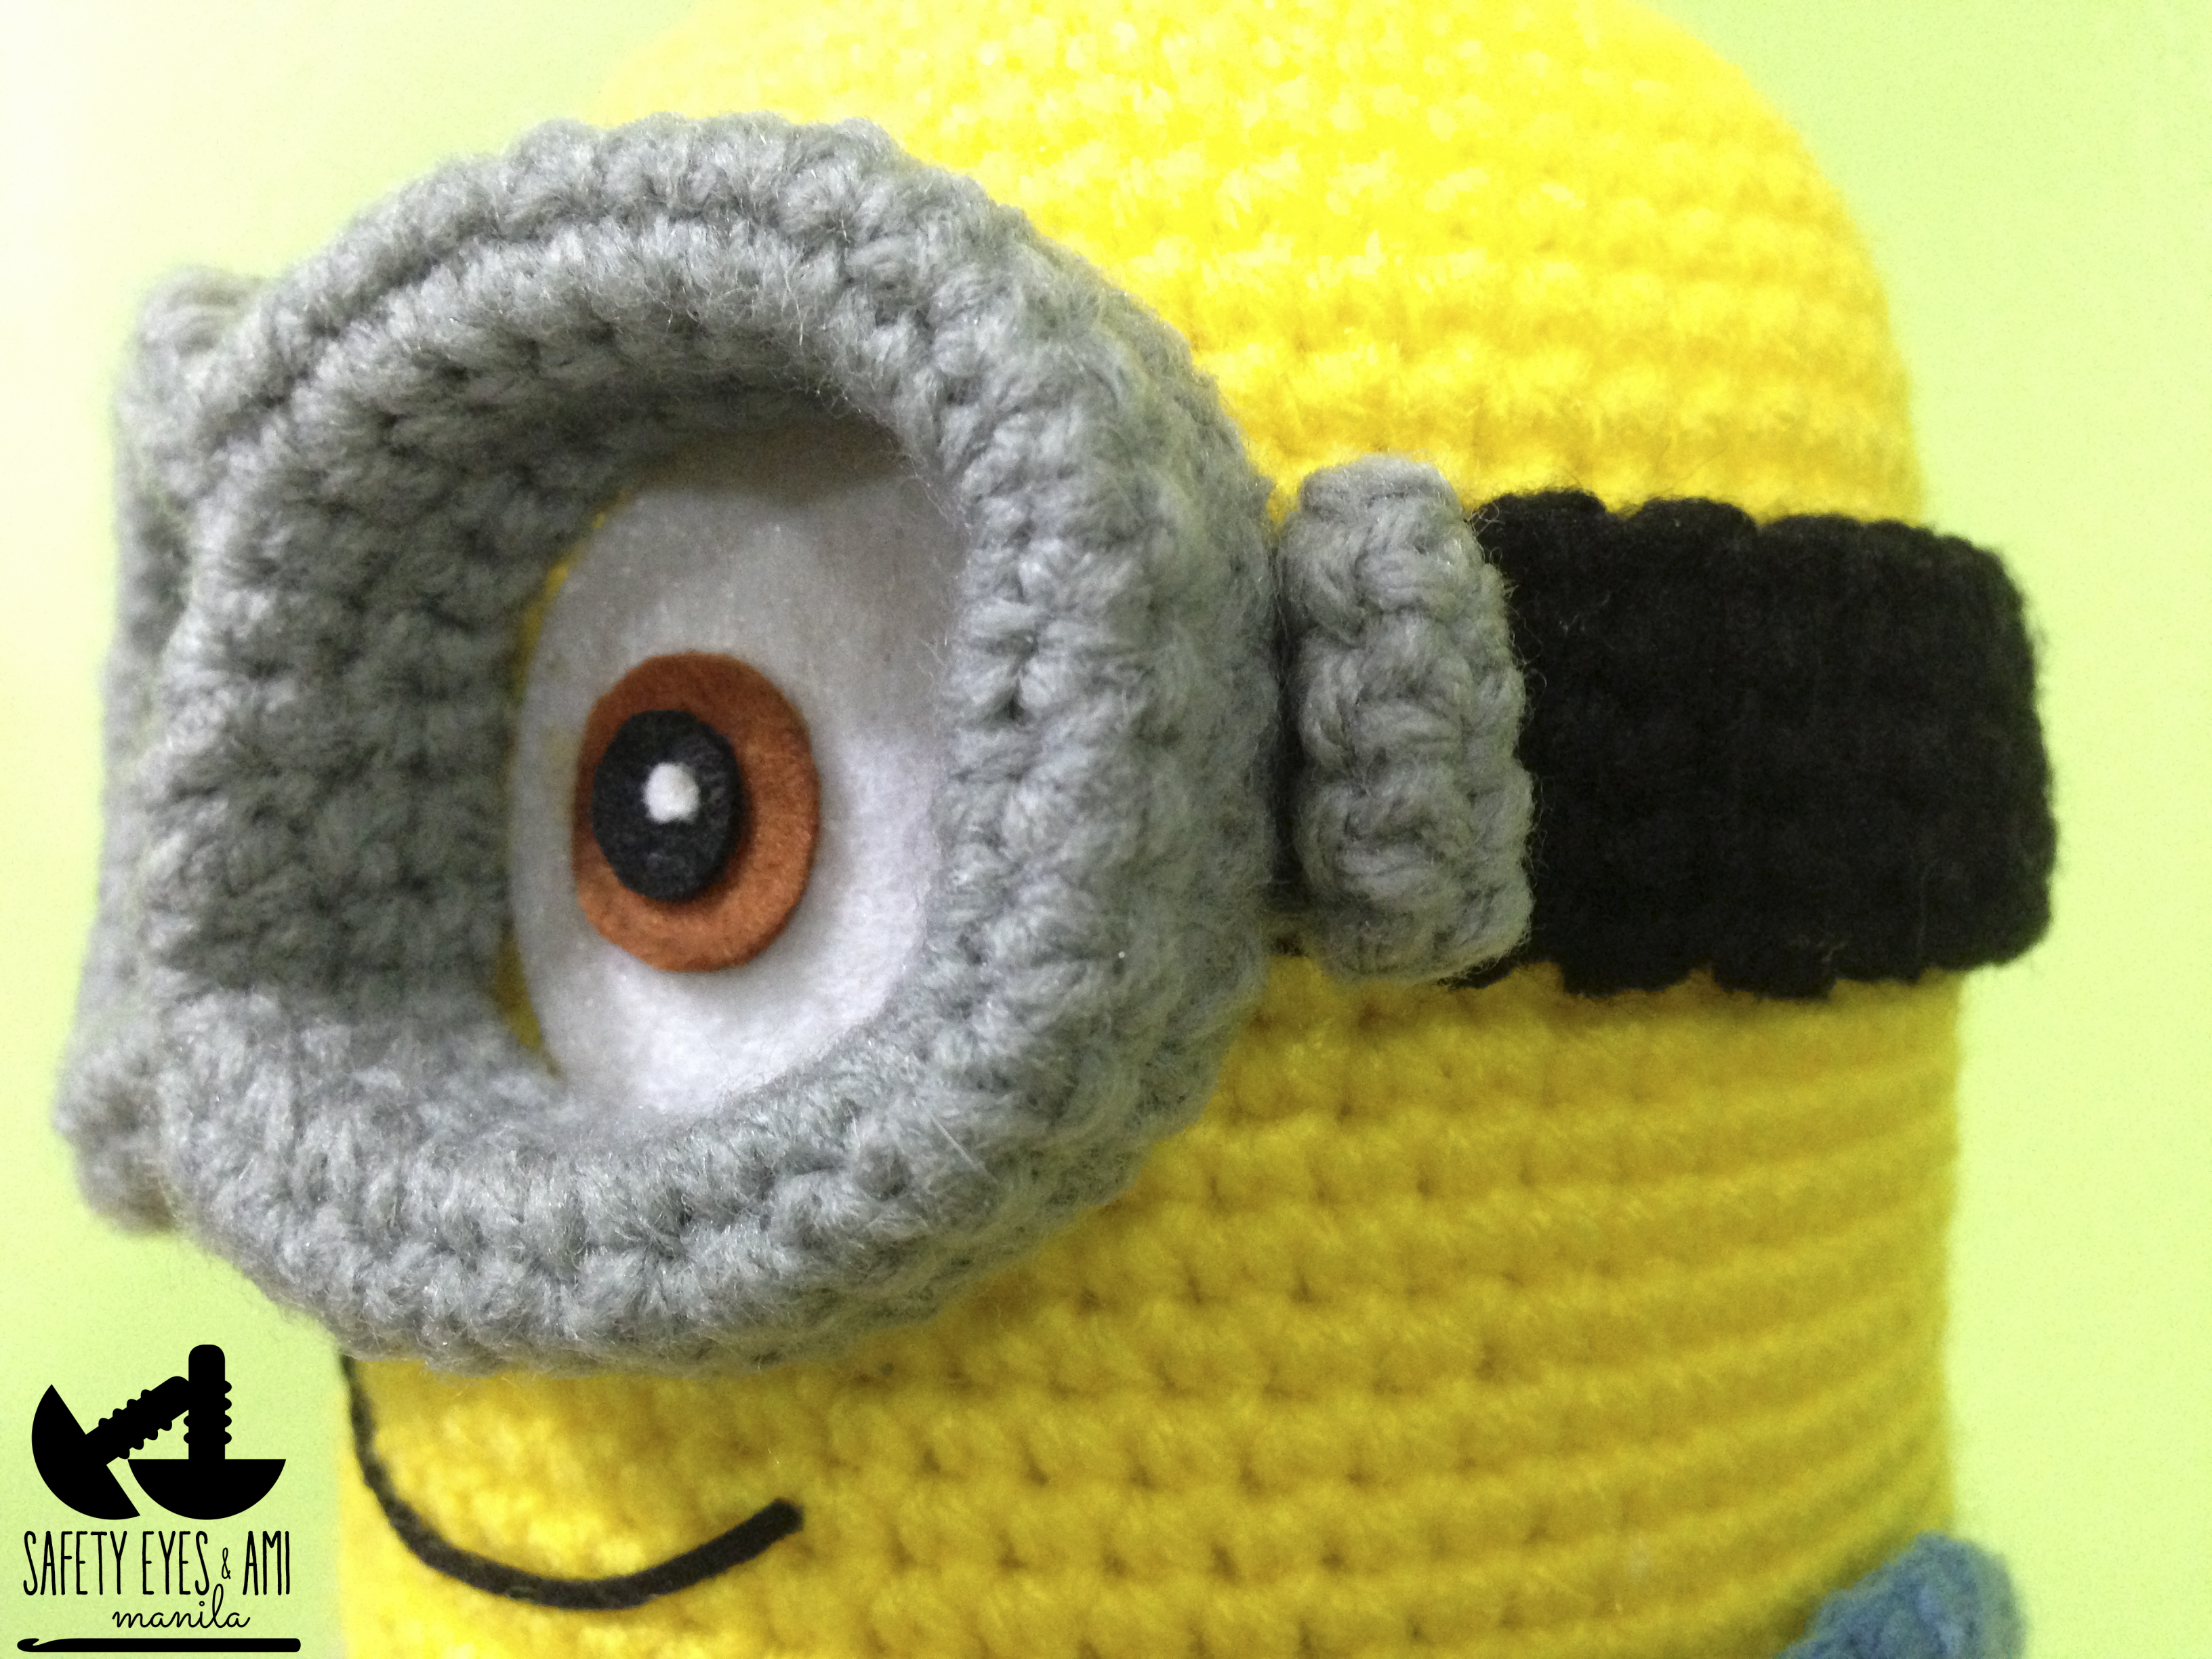
I am stuck on making the goggles ami tutorial is confusing to starting the Goggle round part please help!
Rosanna Z. Romero
2/19/2015 03:52:27 am
Hello Allana! The goggles are made with 2 strips crocheted in rows not rounds. Start by making enough chains to make a circle around 1 eye. (allaboutami's pattern shows 31) After you make a (straight) chain, sc in the 2nd ch from the hook. Then make 1 sc in every chain til you reach the end. That's your 1st row. Then ch 1 and turn your work and sc across the row. That's row 2. Do the same for row 3 and finish off.
Yeeli
3/13/2015 12:00:30 am
Thank you for your wonderful tutorial! Between yours and Stephanie's, my Minion is coming along pretty well. Do you have any tips on how to sew the boots onto the body? I would imagine using lots of markers before the actual sewing... but, is there any tricks or tips as to making sure the Minion will stand on its own?
Rosanna Z. Romero
3/14/2015 05:49:46 pm
Hello Yeeli!! Thank you for sharing your crochet experience with me :) Yes, use markers when attaching the legs to the body. You don't need to worry about it looking a bit messy in the stitching because the trousers will eventually cover the stitches. You just need to make sure they are centered yet with just enough space in between so your stitches in the crotch of the trousers don't stretch too much as you make the pant legs.
Yeeli
3/17/2015 06:55:45 am
I am done with my minions! I made the lower part like Stephanie's because my kids want to change the Minions overall with different color ones. But I took your advice on the soles and boots, my second one (pink) turned out really well, I am so happy! Now I have to make more overalls for them to play with. Do you have a Ravelry account? I would love to link yours to my project! Here is my finished project. http://www.ravelry.com/projects/Yeeli/despicable-me-minion
Rosanna Z. Romero
3/17/2015 05:36:42 pm
They're awesome! I'm sure your kids will have loads of fun playing with them! I do have a Ravelry account but I only use it to view links and don't really have any information in it. But I really appreciate your linking back to my tutorial. And I'm glad the advice on the feet worked!
Rosanna Z. Romero
3/25/2015 01:45:02 am
You're welcome Connie! Thanks for dropping me a line. I really appreciate it! Enjoy your Minions!
Monique T.
6/15/2015 11:27:50 pm
My minion is almost done. It is going to be a hit with my grand kids.
Jamie
7/6/2015 04:46:39 am
Hi i am just wondering what size (how tall) does this minion turn out to be?
Rosanna Z. Romero
7/6/2015 05:59:41 am
Hello Jaime! This one (after 50 rounds of 63sc) turned out at around 25cm or 10 inches in height. I used a 3.25mm hook and medium gauge yarn. Bigger hooks and thicker yarn will make bigger minions and you can make him taller just by adding rows. One of the last photos shows my hand in the photo so you get a bit of an idea on the size. Hope that helps!
Rosanna Z. Romero
7/6/2015 06:01:50 am
Hello Monique!
Bridelance Renée
7/9/2015 03:22:57 pm
Grand merci de partagé il est super
Rosanna Z. Romero
7/10/2015 03:35:48 pm
De rien Renee! Profitez!
Corinne
7/12/2015 11:21:25 am
I would love to make these for our charity craft day. We don't ask for payment just a donation. Could I copy this pattern for these, please
Rosanna Z. Romero
7/12/2015 12:18:51 pm
Hello Corinne. You may as long as you credit safetyeyesmanila.com and you will need to ask permission from and give credit to allaboutami as I refer to her pattern in my tutorial. It must also be 100% free without asking for donations as a pre requisite to access to the pattern. Cheers!
Bri
8/29/2015 09:20:01 pm
Does anyone know how much yarn you need I couldn't find it anywhere I got one roll of each color but not sure if it's enough!
Terena
9/13/2015 04:28:14 pm
What type of yarn do you recommend? On the original pattern she used an aran weight...
Joyce
7/31/2017 06:45:37 pm
Hi love your minion do have a video tuteral
Rosanna
8/1/2017 04:32:15 pm
Thank you Joyce! I don't have a video tutorial for it though. If you need any help, you can email me at [email protected] or chat with me through my Facebook Page - SafetyEyesManila.
Deborah Turner
7/16/2022 12:01:53 am
Can we sale these with your credit. Can’t wait to start one. You r awesome
Rosanna
7/16/2022 12:12:57 am
Yes you may. That would be great! Much appreciated 😊 I hope you have fun making them. Thank you for your comment! - Rosanna, Safety Eyes & Ami Manila Your comment will be posted after it is approved.
Leave a Reply. |


 RSS Feed
|
Follow me! or E-mail me!
|
© Safety Eyes & Ami Manila is owned by Rosanna Z. Romero. All rights reserved.